Need to share your wireless Internet connection with your friends or colleagues? If they’ve got WIFI, the solution is easy and free. This article tells you how.
Sharing Internet Connections
Have you ever found yourself in a position where you have the only Internet connection on your laptop and have friends or colleagues who would like to share that connection? If you have a wireless card or built-in WLAN on your notebook and all the other laptops all have WiFi (stands for Wireless Fidelity), the solution is both easy and free.
You would need to turn your laptop into a mobile hotspot, and the other laptops need to have WLAN support. Most new laptops do come with built-in WLAN support (also known as 802.11b or 802.11g), but if you aren’t sure whether the laptops do, then there are inexpensive PCMCIA cards or bus devices that could be purchased to connect to a wireless network.
Please note that these steps apply only to Windows Vista. If your laptop runs Windows XP, please go this article .
5 Easy Steps - Setting up a WIFI Hotspot
**
Step 1:
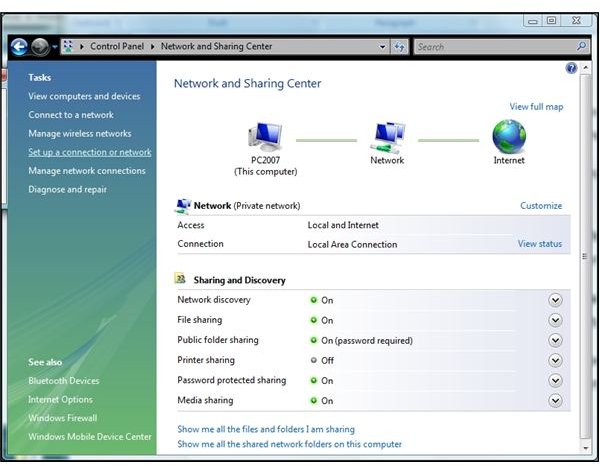
To start setting up your mobile hotspot, go to Start -> Control Panel -> Network and Sharing Center and click on “Set up a connection or network.”
Step 2:
On the next dialog, select “Set up a wireless ad-hoc network.”
Step 3:
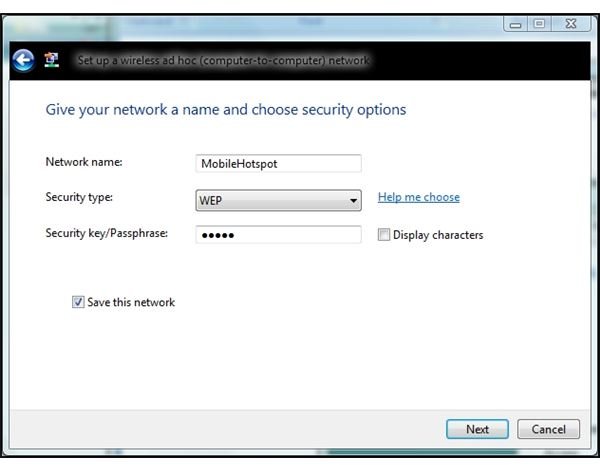
Enter a name for your new network, select WEP privacy, and set a password. Then click “Save this network." Let your friends know the name of your network, and the password to access it.
A word about the Security type – WEP is an older protocol and is not the most secure. I suggest selecting WEP rather than a stronger protocol because it will allow older laptops and handhelds to connect to your network. WEP is better in a mixed environment, and ad-hoc networks are intended to be networks of convenience, or in other words, temporary. If you have a permanent need to share an Internet connection, it would be more sensible to buy a WIFI router.
Step 4:
Click Next and select “Turn on Internet connection sharing.” This creates the wireless network and enables Internet Connection Sharing.
Step 5:
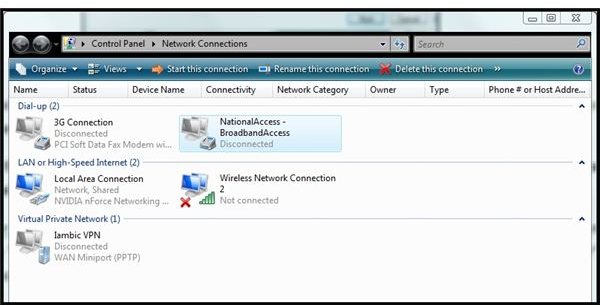
At this point, Vista is ready to share the default internet connection. This is probably the Ethernet connection, but we want to share the wireless card connection instead. On my Vista laptop, the wireless connection is called “National Access – Broadband Access.”
Again, go to Start -> Control Panel -> Network Sharing Center, and then click on “Manage network connections.” Right-click your wireless device and select “Properties.” Vista may ask for permission to continue.
Click on the “Sharing” tab and select “Allow other network users to connect through this computer’s internet connection” and click OK.
And this sets up your portable hotspot in Vista.
To use it, first connect to the Internet wirelessly using the usual method on your laptop. Then once you’re connected, go to Start -> Connect To and click your new network name under Wireless Network Connection. If all goes well, Vista will report “The [network] is ready to use” and inform you that the network is broadcasting and will stay active until everyone disconnects from it.
Your friends and colleagues should now be able to go to their Network Sharing Center and find your new network listed under Connect to a Network.
Note that only one internet connection can be set up for sharing at one time. If you later decide to enable it for your Ethernet connection, you’ll need to go into Network Connections and Properties for your “Local Area Connection.”
Link to this article from your blog or web pages:
https://www.brighthub.com/computing/windows-platform/articles/1685.aspx
Further Reading
How to Set Up Simple Wireless Networking with Windows 7, Vista, and Windows XP - Want to set up the simplest wireless home network for your mixed Vista, XP, and Windows 7 computers? Want a network without a “boss” computer or cumbersome passwords that works even if some of the computers are not online and the simple rule for those that are connected is “share and share alike?”
How to Set Up a Vista PC on a WiFi Network with XP Computers - Thanks to current technology, creating a home or small business WiFi network is relatively painless. However, if you have tried to network computers with Windows XP together with PCs running Vista, you may have hit a snag. Find out how you can successfully network all your Windows computers.
Top Five Wireless Printers - Wireless printers are your ticket to a cable-free, hassle-free, and efficiently fast way of printing documents. There are many wireless printers available in the market today with varying prices. We’ve gathered the top five of these printers to help you choose the best wireless printer for you.


