
The Window Activate event is triggered when the user clicks on the Excel workbook. In this article I’ll show you exactly what that means, how to incorporate it into your own spreadsheets and what you can do with it.
When Does the Window Activate Event Trigger?
The Excel Window Activate event triggers when you activate the workbook, this can mean one of three things:
- When you first open the workbook.
- When you have more than one workbook open, and you activate the one with the event coded.
- You have more than one workbook open and you close one that leads to the other with the event coded becoming the active workbook.
How to Make Use of the Event
Open a new (or existing) Excel spreadsheet and then open the Microsoft Visual Basic window (the easiest way to do this is press Alt + F11, or right click on one of the worksheet names and choose ‘View Code’). Once you’re in, make sure that you’re on the ‘ThisWorkbook’ section of the code (on the left of the screen, you should see a list of all the worksheets in your open spreadsheet, with ‘ThisWorkbook’ underneath them, double click on that to make sure you’re coding in the right place). At the top of the window are two dropdowns, one labelled ‘(General)’, the other ‘(Declarations)’, choose ‘Workbook’, and then ‘WindowActivate’ and you should see the following code.
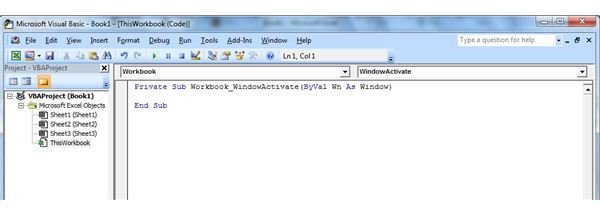
Private Sub Workbook_WindowActivate(ByVal Wn As Window)
End Sub
If any other lines have appeared (like a Workbook_Open event), you can delete those.
Add the code you want to execute with your Window Activate event in between those two lines of code. For example:
Private Sub Workbook_WindowActivate(ByVal Wn As Window)
Msgbox “This workbook is active”
End Sub
Practical Uses
Now you know how to manage an Excel Window Activate event, what can you actually do with it? As the event triggers when you open a spreadsheet, or move from one spreadsheet to another, the best uses for it are to control how Excel appears to the user when they are looking at your spreadsheet.
For example, you could minimize the Ribbon when someone opens your spreadsheet. One way to do this is to use Sendkeys to mimic the keyboard shortcut Ctrl + F1
Private Sub Workbook_WindowActivate(ByVal Wn As Window)
Application.SendKeys ("^{F1}")
End Sub
This works as long as you only have one spreadsheet open, if you open another one, then you’ll find that the Ribbon is minimized on that one too, and when you go back to your original spreadsheet, the code triggers again and toggles the Ribbon, so you can see it again. However, you can get the current Ribbon height with this line of code
iRibHgt = Application.CommandBars(“Ribbon”).Height
You can use that to determine whether or not the Ribbon is currently minimized and if the code should be triggered. Unfortunately there doesn’t appear to be any code to get the state of the Ribbon, just the current height, which can vary depending on your setup. Using a threshold of around 100 seems to work though.
Private Sub Workbook_WindowActivate(ByVal Wn As Window)
iRibHgt = Application.CommandBars(“Ribbon”).Height
If iRibHgt > 100 Then Application.SendKeys ("^{F1}")
End Sub
This code will only toggle the Ribbon if it has a height greater than 100, or if it’s currently maximized. This means it won’t keep reappearing when you go back to your spreadsheet, but how do you maximize the Ribbon again when moving to another sheet?
Putting Things Back to Normal
If you’ve made some changes to the way Excel looks (like the ones above), then you’re probably going to want to put them back when you close the spreadsheet, or switch to a different one. In order to do this, you need to make use of the Window Deactivate event, like this:
Private Sub Workbook_WindowDeactivate(ByVal Wn As Window)
iRibHgt = Application.CommandBars(“Ribbon”).Height
If iRibHgt < 100 Then Application.SendKeys ("^{F1}")
End Sub
This toggles the Ribbon if the height is below 100, so if it’s minimized, it will be maximized again when you move away from this spreadsheet.
Hopefully you can make good use of this Bright Hub article when managing Excel Window Activate events.
References
- Author’s personal experience
- Image credit: Wikimedia Commons.ZyMos


