This article takes a look at spam blocking in Microsoft Outlook. It talks about the default spam junk filter in Microsoft Outlook. It also offers some tips to minimize spam in Outlook.
Spam Blocking in Microsoft Outlook - The Office Junk Mail Filter
Spam blocking in Microsoft Outlook is turned ON as soon as you install the Microsoft Office package with Outlook. This article talks about the default junk mail filter installed by MS Office 2003 and above, for spam blocking in Microsoft Outlook.
Though Microsoft says spam blocking is automatically turned on for Outlook for 2003 and above, you may want to check the Office junk mail filter if you are using Outlook version 2010. I always find it turned off whenever I reinstall Outlook 2010. It is turned on by default in Outlook 2003 and Outlook 2007.
The Outlook default spam or junk mail filter combines its own algorithms to provide you with an excellent spam filter. This filter reads the incoming messages and based on the subject and content of the e-mail, automatically moves it to Junk folder if needed. At the same time, it converts the message to plain text so that the links are not clickable.
There are four options in the junk mail filter offered by Microsoft Office, for spam blocking in Microsoft Outlook. We will discuss each of them individually below. The user interface of the junk mail filter is same across Outlook 2003, Outlook 2007 and Outlook 2010. Only the method to invoke the filter is different.
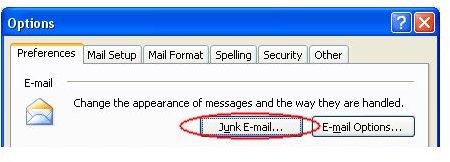
In Microsoft Outlook 2003, click Tools menu and select Options. On the Preferences tab, click Junk E-Mail.
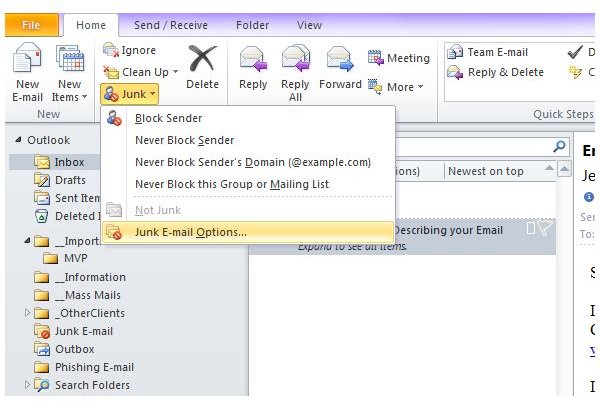
In Outlook 2007 and Outlook 2010, right click on any e-mail in your inbox. Click on Junk in the resulting context menu. In the sub menu that opens, select Junk Mail Options. In Outlook 2010, you can also click on the Junk on the Ribbon interface (Home tab, towards left, next to New Items) and then select Junk E-mail Options to invoke the dialog box for the Office default spam/junk mail filter.
Spam Blocking in Microsoft Outlook - Using Outlook Junk Mail Filter
Now that you know how to access the default junk mail filter for spam blocking in Microsoft Outlook, we will discuss the options available. The first tab in Outlook’s junk mail filter allows you to set/change its behavior.
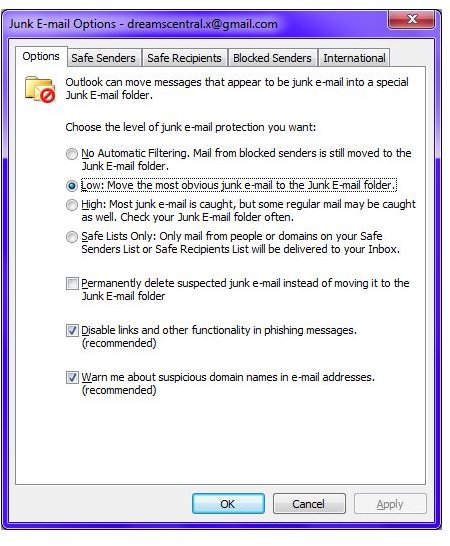
You can set it to the following four options:
No Automatic Filtering: Selecting this option will kind of turn off the filter. It does however, move the e-mail messages from blocked senders, to the Junk folder. If you are using Microsoft Outlook 2010 , you may find this option selected by default.
Low: This option is selected by default in Outlook 2003 and Outlook 2007. This options though checks e-mails for spam, it may miss on several junk mails as it uses a lower spam confidence level (SCL).
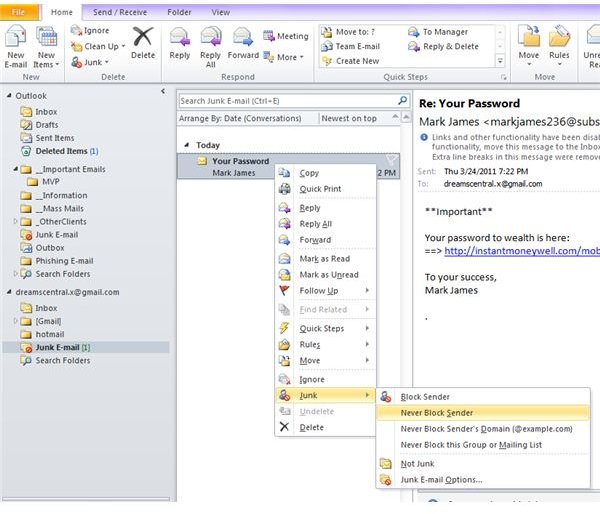
High: This option catches almost all spam. Some regular messages may also meet the criteria (such as length of the e-mail) and Outlook may move them to Junk folder. However, I would recommend this option if you are receiving much spam or if you do not wish to waste your time on reading and deleting each spam e-mail. If you select this option, make sure to check the Junk folder from time to time and see if any important e-mail is lying there. If you find any e-mail from a reliable source that you would not like to miss next time, you move the senders’ e-mail address to Safe Senders’ List. Right click on the e-mail message and select Junk -> Add to Safe Senders (Outlook 2003, Outlook 2007 ). In Outlook 2010, the option would be Junk -> Never Block Sender.
Safe Lists Only: If you select this option, Outlook will scan each incoming message to match the sender’s e-mail address with those present in Safe Sender’s List. If they match, the e-mail will be delivered to your Inbox else it will be converted to plain text and delivered to Junk folder.
This page explains the basics of spam blocking in Microsoft Outlook. The next page deals with blocking unwanted e-mails. It also offers some tips on dealing with spam.
Using Microsoft Outlook Junk Filter - Safe and Blocked Senders
While using the Microsoft Outlook Junk filter it is necessary that you know that you have the option to select what e-mail to accept and what not to.
There are five lists in the Outlook junk mail filter that allows for proper spam blocking in Microsoft Outlook. The most important ones are Safe Senders and Blocked Senders. If you do not wish to miss out the e-mails from anyone, you just add their e-mail addresses or the domains of their e-mail addresses to the Safe Sender’s list. Similarly, if you do not wish to receive mail from someone, you can simply add their e-mail address or the domain of their e-mail address to the Blocked Sender’s list.
If you wish to add an e-mail address or the domain of the e-mail address to Blocked Senders list, right click on the e-mail lying in Inbox. In the menu that appears, click on Junk and select Block Sender. The e-mail address will be added to Blocked Senders list.
You can also use the junk mail filter to add e-mails addresses or domains to Safe Senders or Blocked Senders list. Open the junk mail filter using the steps mentioned in the previous page and click on Safe Sender tab or Blocked Senders tab depending upon what you intend to do. Once there, click on Add to add the e-mail to the list you desire. To add a domain to the list, type the domain name.
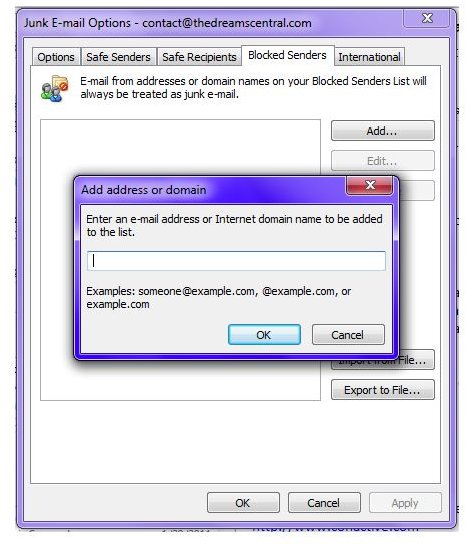
For example, if you do not wish to receive any e-mail from xyz.com, go to the Blocked Senders tab in Outlook junk mail options and click Add. In the resulting dialog, type xyz.com and click OK. Any e-mail from xyz.com will automatically be delivered to Junk folder.
Among other lists are international domains. When you click on International tab, you get to select the countries from where you don’t want any e-mails. However, you may not feel the need to create and use this kind of list.
Tips for Spam Blocking in Microsoft Outlook
1 For maximum spam blocking in Microsoft Outlook, select High in the junk mail filter. You may check the Junk folder in leisure to see if you missed any important mail. If yes, you can right click on it and add it to Safe Senders as explained earlier.
2 Keep the Outlook junk mail filter updated. Microsoft releases updates for the junk mail filter at regular intervals. You can access it from Start Menu -> All Programs -> Windows Updates.
3 Do not allow images to be downloaded automatically when downloading messages to Outlook. The default setting does not allow automatic downloading. If you see that Outlook is downloading images without permission, you can change the settings from Tools -> Options in Outlook 2003. In Outlook 2010, you click File -> Options -> Trust Settings. Spammers make use of images to see if an e-mail address is valid. If the image is downloaded, it is confirmed that the e-mail address is valid.
4. Some spammers also make use of delivery and read receipts to confirm the validity e-mail addresses. Make sure your copy of Microsoft Outlook is not sending out these receipts. You can check out the settings under Tools -> Options in Outlook 2003 and File -> Options in Outlook 2007 and Outlook 2010.
5 Use different e-mail addresses for different purposes. You can set up an e-mail ID for communicating with your family and friends. Use a different e-mail ID for shopping, newsletters and stuff that can wait.
The above serves as a basic guide to spam blocking in Microsoft Outlook . If you have anything to share, please feel free to use the comment boxes below.
References
Images courtesy Microsoft Outlook
Microsoft Office Website, https://office.microsoft.com
This post is part of the series: Outlook Tips and Tricks - Part III
Continuing further, this series on Microsoft Outlook offers five more tips on dealing with the e-mail client and its components. It covers Outlook PST repair, Saving Outlook e-mails as HTML to disk, Spam Blocking, Email setup and Transferring Outlook to new computer.


