Learn How to Burn Windows 7 ISO Image File to a CD or DVD
Burning Windows 7 ISO to a DVD
Step 1: Download and Install ImgBurn
Although there are many DVD image burners available, the ImgBurn software is very simple to use and capable of writing files to a disc at a very fast speed. So, the first step in the process is to download the ImgBurn software to your computer.
Also, rather than trying any other software you might already have installed, using the same software I am about to talk about here will help you to understand the DVD burning method better.
The ImgBurn software is free, and you can download it from imgburn.com. Once it is downloaded, install it on your computer.
Step 2: Run ImgBurn
Run the ImgBurn program and follow the steps below:
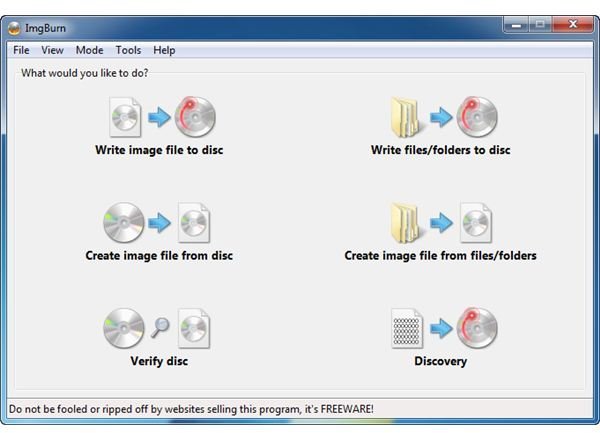
1. When you run the program, you’ll find many options in front of you. From those options, select Write image file to disc.
2. Now you need to select the ISO file. For this, click the Browse for a file button, then locate the Windows 7 ISO file in your computer, select it from the location and click open.
3. Insert a blank DVD into your DVD-RW drive.
Note: If you haven’t got a DVD writer drive, I will show you what you can do at the end of the article.
4. Immediately a new screen will open, requiring you to click the write button. Click the button and ImgBurn will start the process of writing your Windows 7 ISO image files to your DVD.
In the ImgBurn window, there is the Verify option. I recommend you select this option, as this will verify each file as it is written on the disc.
Note: Laptop users may get an error that the drive tray is open. Don’t panic, just ignore the error message and click the OK button to continue, and the burning process will resume.
5. After some time you will see a message assuring you that the operation has completed successfully. Click the OK button.
Congratulations! You now have a working Windows 7 setup DVD.
Image Credit: maketecheasier.com
Install Windows 7
I recommend that before you use this DVD to install Windows 7, verify that the Windows 7 setup works. Do this by opening the DVD contents in Windows Explorer and double-clicking the setup.exe file. If the Windows 7 setup program loads and shows up on the screen, it means the Win 7 ISO has been burned successfully and you’re ready to install Windows 7 from this disc.
You can use this disc like any other Windows install disc. Simply insert it in the DVD drive of the computer you want to install Windows 7 onto. Start (or restart) your computer and you should get the press any key to boot from CD/DVD message. Immediately press any key on your keyboard to start the Windows 7 setup. Alternatively, start the Windows 7 setup by double-clicking the setup.exe file in your current operating system.
No DVD Writer? You Have Another Option
_ _So, you haven’t got a DVD writer? Does that mean you can’t do anything with the Windows 7 ISO file? No! Without a DVD writer here is what you can do.
Microsoft Virtual PC lets you run two operating systems side-by-side. Download the application from Microsoft’s website, install and open it, and follow the onscreen instructions to create a new virtual machine. When you are asked for the operating system, select Vista, and when given the virtual hard disk options, select the option to create a new hard disk. Next, in the Virtual PC window, select the virtual machine you just created and click Start. When the virtual machine starts, click on CD from the menu then select Capture ISO Image. Now select the Win 7 ISO file and click Open. Finally, click Action and then Reset to start the Windows 7 install process.
Image Credit: winplanet.com
