Want to create Windows install CDs which can install Windows automatically? Want to create a custom Windows CD which installs only the components you select and keep the installation light? Check out this article and learn how you can use nLite to create a custom Windows CD which will do the above.
What is nLite?
nLite is a freeware application which allows you to extensively customize a Windows installation source which can then be burned to a disc as a customized Windows install disc. These custom discs can contain anything from an unattended Windows installation and various patches to addon softwares that you want installed along with Windows. All this is configured and setup using easy dialogs and settings menus in nLite. Once done, nLite offers to burn the finalised installation source as a bootable Windows setup disc. Read more to find out how you can do the same with nLite.
Usage Instructions
The first step is downloading nLite. The latest version as of writing this article is 1.4.9.1. Click on this link to go to the download page. Choose either of the available downloads (Installer or Self-extracting archive). Once downloaded, extract or install from the downloaded file. Then run nLite from the desktop or Start menu.
The first dialog box contains welcome information and a language-chooser. Click Next.
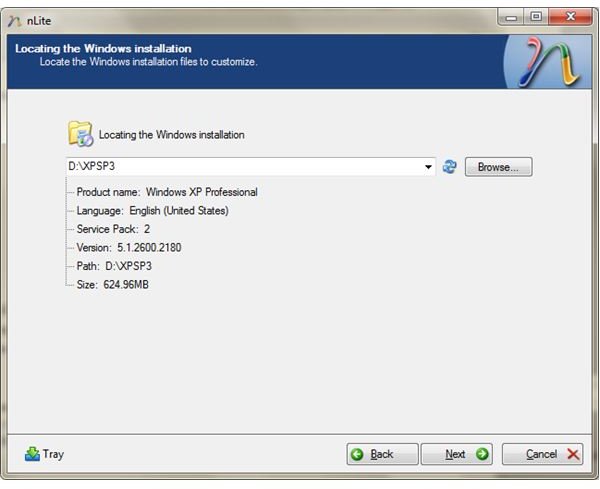
The next page asks for the path where the Windows 2000/XP/Server 2003 installation source is located. Point it to the folder where you have extracted the .ISO file. It will then scan the folder for the Windows Installation files. Remember that you need to point it to a Windows installation source, you cannot point it to your Windows folder on your hard disk.
Press Next a couple of times to reach this screen:
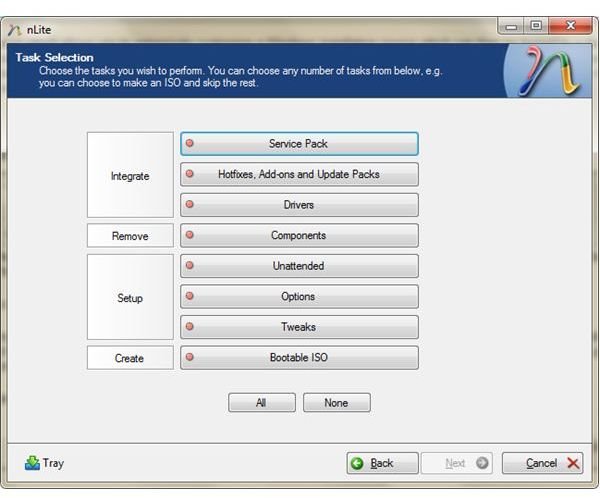
Here, select the options you want to configure. Here are the functions for each option:
Service Pack: Integrate/Slipstream a service pack into your Windows installation source. The resulting Windows installer will have the specified service pack already present. Use this if your Windows install source contains an older service pack or none. You can find the service-pack installers on Microsoft’s site.
Hotfixes, Add-ons and Update Packs: These are installers for patches that Microsoft or other vendors have released after the latest service pack. These can be downloaded off Microsoft’s site or through other methods like AutoPatcher.
Drivers: This section will integrate/slipstream drivers into the Windows install. Very important if you want to include drivers for your motherboard’s SATA/RAID chipset. You will not have to load the RAID/SATA drivers off a floppy during the Windows install if you’ve integrated the drivers into the Windows install. You can also integrate drivers for other devices which need a separate driver. These will then be installed with Windows itself.
Usage Instructions 2
Components: Select which components you want to remove from Windows. This can be useful if you want to lighten the Windows install. You can easily reduce the install size by even 100MB if you remove a lot of stuff that you don’t need. Play with caution though, don’t remove anything that you’re not aware of. It can be dangerous.
Unattended: Selecting this option will ask you for all the data that Windows generally asks during the installation process. Entering the information here will make the Windows installer an unattended one. You can then boot from the Windows install CD, go out and have a cup of coffee and return to find Windows completely installed and ready.
Options: Changing various Windows install options like default Program Files path, etc. Also includes patches for allowing custom-3rd-party themes, disabling System File Checker, changing networking options and special settings for USB hardware devices.
Tweaks: Loads and loads of tweaks to customize the Windows install. Everything from the size of icons on the Windows desktop to changing the Start button configuration. Also has a Services section which allows you to explicitly enable/disable certain Windows services.
Bootable ISO: This option will allow you to create a bootable ISO image of the Windows installation source which can then be used to install Windows on a computer. You can also burn the resulting ISO image from the application itself.
Final Tips
When working with the installation source, make sure to not remove components which you’re not sure of. It’s safer to keep something rather than remove it and then having to create another custom disc. After creating the ISO, the easiest way to check if your Windows ISO works fine is to install a Virtual Machine like VMWare or Virtualbox and test in it first. Once you find that the install has been done smoothly, you can burn the ISO to a CD and use it on your computers.


