WIFI WEP Cracking with Aircrack-ng: Recover a Lost WEP Key

Preparation
Forgotten your WEP key? Never wrote it down in the first place? Well it’s time to get it back. Disclaimer: Connecting to any network without the consent of its owner is illegal in many countries (including the US). This tutorial is only meant for use with networks you own. The writer of this post as well as its hoster do not condone or support the illegal use of this tutorial.
What You’ll Need
- A BackTrack 2 disk (you could use the beta of 3, but we use BackTrack 2 stable)
- A supported wireless card (you need a card that supports monitor mode amongst other things), if you don’t know if your card is compatible check the aircrack-ng team’s card compatibility page
Backtrack 2 is a penetration testing linux live-cd that contains all of the aircrack-ng tools we are going to use. Alternatively you could install these tools yourself (if you’re running linux).
As for hardware, I first tried to use my Macbook’s built in Airport Extreme card, but found that it was not compatible. Instead I went out and bought a WUSB54GC Linksys USB Wifi Adapter.
Configuring Aircrack
So you’ve got your compatible card and you’ve burned your BackTrack 2 ISO to disk. Now boot Backtrack 2 (alternatively you could install BackTrack 2 in VMWare fusion; use the VMWare image here). You should be prompted with ‘boot:’, hit enter. Once BackTrack has booted you should login with username: root and password: toor. Now enter ’startx’ and hit enter to start the KDE GUI.
The first thing we need to do is upgrade aircrack-ng to the latest version. This adds some new options to aircrack that will speed things up considerably later on. Open a konsole and run:
wget https://aircrack-ng.org/doku.php?id=install_aircrack
tar -zxvf aircrack-ng-0.9.tar.gz
cd aircrack-ng-0.9
make
make install
Now we need to check if our wireless card is working. Open a terminal and run ‘iwconfig‘. You should get something like this:
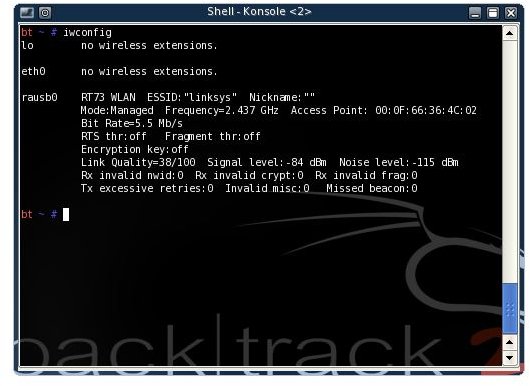
In my case the feedback was for rausb0 as I was using my WUSB54GC adapter. Your output will likely be on eth0. Write down the name of your wireless device (the entry in the left column with the feedback beside it), you will be needing this later. Whenever I use ‘rausb0′ you should substitute in the name of your wireless device. If your output looks nothing like the above, try ‘ifconfig rausb0 up‘ (don’t forget to replace rausb0, with your own device name) and run ‘iwconfig‘ again to see if your card is working. The mode of your wireless card is now ‘managed’. We need to the mode to ‘monitor’. While in monitor mode, the card will passively monitor network traffic.
iwconfig rausb0 mode monitor
airmon-ng start rausb0
At first, I was unable to set my card into monitor mode. Instead of ‘monitor mode enabled’, airmon-ng returned ‘monitor mode disabled by driver’. If this is the case for you, you need to install a new driver for your card. In my case the rt73 driver. Your specific card might work best with a different driver. One word: Google.
Get Cracking
Next we need to scout out our target using ‘airodump-ng rausb0‘. After a few seconds airodump should display all of the wireless access points in range.
At the top, all of the access points are listed. Write down the bssid (MAC address) of the AP you want to attack and the channel (listed under CH) that the access point is broadcasting on. The access point I want to attack has the essid ‘g47m60′, the bssid 00:11:F5:0F:7B:43 and is broadcasting on channel 11. At the bottom, are all the ’stations’. Stations are clients connected to the access points. Listed under bssid is the bssid of the access point the client is connected to, and listed under station is the MAC address of the client. You can tell what access point the client is trying to connect to by correlating the bssids at the bottom with the bssids at the top. I see that one client is connecting to the access point I want to attack. Write down the MAC address of a client that is connected to your device (if none are connected, wait until one is). My client’s MAC address is 00:1C:B3:BC:E9:2B.
Next we want to make a more specific call of airodump-ng so that it monitors only traffic from and to our chosen access point. We want to capture this traffic in a file that aircrack-ng will later use to crack the WEP key.
airodump-ng –channel
Be sure to replace rausb0 with the name of your wireless device. You should notice that the #data column has started to increase. We need to get this number to about 20 000. To speed up this process we are going to stage an ARP replay attack. Open a new Konsole window and run
aireplay-ng –arpreplay -b
In my case the command would be: ‘aireplay-ng –arpreplay -b 00:11:F5:0F:7B:43 -h 00:1C:B3:BC:E9:2B rausb0’
First aireplay-ng will capture ARP requests.
Then, once it has captured some ARP requests it will start sending packets to generate traffic. Switch back to your konsole window running airodump-ng. You should see that the #Data column is raising more quickly now and that the #/s number has increased to about 200 or more. Now wait until the #Data column reaches 20 000.
Now open a new konsole, we will now use the captured data to find the key. It’s finally time to run aircrack-ng.
aircrack-ng -z -b
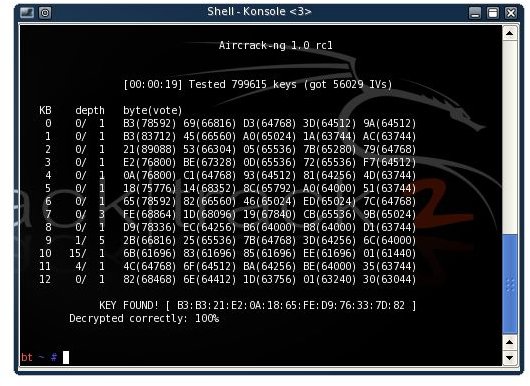
We got it! For me it failed 5 times until I got 50 000 IVs, so if it fails the first time just wait a few minutes for more IVs.
This is only a very basic guide, and this was my first time using the program so my knowledge is somewhat limited. The aircrack-ng website has some great information if you want to know more. A page containing a basic description of how aircrack-ng works is of specific interest.
Happy Cracking! If you enjoyed this article, be sure to check out Bright Hub’s Wireshark Sniffing, Ettercap DNS Redirection and Ettercap Wifi Sniffing tutorials!