Setting Up a Linux Steaming Web Server

Introduction
In this article I am going to go through how to set up VLC media player to stream to a web server. I will use localhost in my example, but there is no reason that you could not use any server on the internet once you have it working locally. First you will need VLC player which can usually be found in your distribution’s repositires.
Once you have VLC media player, there is a little bit of preliminary web stuff we need to sort out first. For this you will need to have apache2 or a similar web server on your computer. This can also usually be found in your distribution’s repositories.
Web Server
We now need to do is set up a web page to display the content. The first thing to do to accomplish this is to your web root, which is /var/www by default if you are using apache2. Create a file (you can call it anything) ending with file extension .asx, and copy the contents from here into this file. Once you have done that replace {your ip} with 127.0.0.1 and replace {your port} with 1234. This is just for testing purposes and can be reconfigured easily later.
Now you want to create a standard HTML page embedding the file you have just made. If you do not know HTML very well I have provided a sample file. Ensure that the embed link is pointing to the right place and then we can move onto configuring VLC to stream correctly.
VLC Stream
Now we will configure VLC so that it streams the correct files in the correct format. Open VLC player, click the Media tab and then click “Streaming..” towards the bottom of the menu. It will then ask for a file, you can also stream capture devices (such as webcams) and DVDs. But for this tutorial we will use a file.
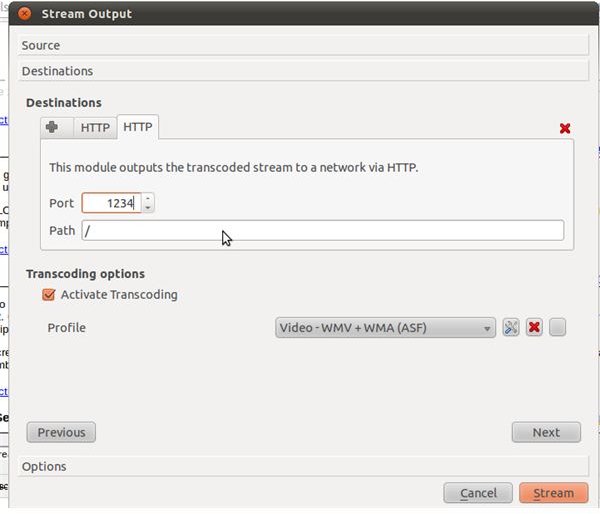
Choose a media file which you have on your computer, and then click the “Stream” button. It will now bring up a window. Click Next when it asks you about source, then when it asks you for a destination tick the box saying “Display Locally”. Now, using the dropdown choose HTTP, click add, and change the port to 1234.
Change the profile to “Video - WMV + WMA” and now click Stream. You should now be able to go to where you created the HTML file earlier and see what you are streaming on the page, congratulations! You can now change the port and IP address to your external IP so you can view your stream from somewhere else on the internet.
Conclusion
You may have to fiddle with the profile and encapsulation of the file you are streaming for this to work depending on your file type. However, WMV + WMA is known to work with most file types, and display on most computers. If you need any help with any part of this guide please do not hesitate to comment below.