This article details how to install a second hard disk in Kubuntu using two methods. The first is simple and uses a GUI tool whereas the other is designed for more advance users of Linux who are familiar with the terminal.
Introduction
In this article I am going to show you two ways in which you can install a second hard disk in Kubuntu, The first way involves using QTParted and the second is slightly more complex and is for users who are not intimidated by the command line.
I will assume that the hardware part is sorted, that is you have opened your computer, put the hard disk in and plugged all of the cables in successfully. You can check this by going to the terminal and typing in:
sudo lshw -C disk
If this comes up with two hard drives (and possibly a CD Drive) you have installed your hard disk correctly and can now go on to format it so your computer can use it. Make note of the “Logical Name” for your new hard disk, for the rest of this article I will use “/dev/sdx” to refer to that logical name, you must replace this with your own. Please ensure that you are using the new hard disk and not the current one! You can check this from looking at sizes and descriptions with the above command.
Partitioning from QTParted
Partitioning from QTParted is relatively simple but you will need to download the software first so type into the terminal:
sudo apt-get install qtparted
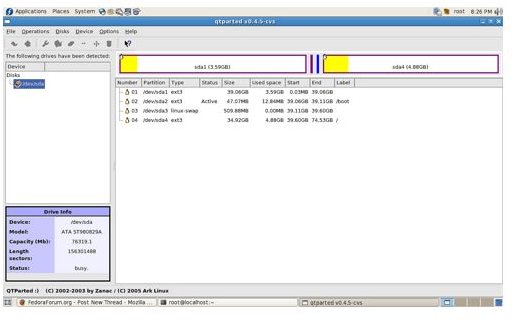
You may also obtain this software from the Synaptic if you are not comfortable using the terminal. Once you have downloaded and installed the program go and open it and you will see a window much like
.
If you look to the left you will see a list of the hard drives currently installed, on my image there is only one hard disk but hopefully you will see two. Click on the one labelled with “/dev/sdx” (Replacing sdx like above) and you will now see a blank hard drive, right click it and click “New” now you will see a window with a lot of options, select the following:
Create As: Primary Partition (This is the first one, you are allowed four of them altogether!)
Partition Type: Ext4 (This is for the most recent release of Kubuntu, 10.04 and possibly 9.10, for anything else use Ext3)
If you are using Windows as well in a dual-boot system you will want to use NTFS or FAT32 because Windows cannot read Ext4.
Label: Its up you you!
Position: Just leave this as it is, it should have selected the beginning of the space
Size: Again, if you only want one partition just leave this as the default, if you want lots make it smaller so you have space for the others.
Click OK and go get a coffee because this will probably take a while, once it has finished you have a fully usable partition :)
Partitioning from the terminal
This is the second method of partitioning and is generally faster, however be warned that if you type something incorrectly you may blast your entire system and be left with an unusable mess at the end. Be sure that you are typing in the correct commands! This was how I broke my first computer using the Windows equivalent.
Okay, now that that’s out of the way we will be partitioning with a little tool known as “fdisk” so in order to initiate it type:
sudo fdisk /dev/sdx (Remember to replace sdx with your real second hard disk)
fdisk will now be waiting for you to put in a letter, the first thing that you want to type is “n” and then press enter, this will tell fdisk that we want to add a new partition table. It will now ask you the following:
Command action
e extended
p primary partition (1-4)
For this you want to select “p” and then type the number “1” as it will be our first partition. It may ask about the first cylinder, just type in “1” again and press enter. There is one more step that must take place before the hard disk is usable and that is to “format” the hard disk, you can use fdisk for this again.
Formatting from the terminal
Okay, so we now have our partition, lets make it usable. To do this we will be using another command line utility known as “mkfs” and we will use a few simple commands to make it usable. The first command I will show you is best for use under Ubuntu only (Windows cannot read Ext partitions).
sudo mkfs -t ext3 /dev/sdx1
Use this one if you would like Windows to be able to read the partition as well:
sudo mkfs -t fat32 /dev/sdx1
When partitioning to ext3/4 mkfs will reserve 5% of your disk space for root to use in case the hard drive becomes full, this is not needed on storage devices so we can claim the 5% back using “tunefs” (This is the advantage of running these commands from the terminal).
sudo tune2fs -m 1 /dev/sdx1
This will set the reserve space to 1%.
Mount the drive
Now that all that is done, the disk is ready for use so you can now mount it, run the following command to create a directory for us to mount it in:
sudo mkdir /media/thechosenone (You can of course replace “thechosenone” which whatever you like)
In order to automatically mount the drive at boot you will need to change some files so type in:
gksudo gedit /etc/fstab
And add to the bottom:
/dev/sdx1 /media/thechosenone ext3 defaults 0 2
Replace /dev/sdx1 with the actual partition you created earlier, replace /media/thechosenone with the file you created earlier and finally replace “ext3” with “vfat” if you used a FAT32 partition, “ntfs” if you used an NTFS partition or “ext4” if you created an ext4 partition.
Save the file and run: sudo mount -a
Use the following to allow your user to write to the hard disk:
sudo chown -R USERNAME:USERNAME /media/thechosenone (Replace USERNAME with your username, and thechosenone with the folder name).
All done!
So there you have it, two ways to install a new hard drive in Kubuntu, I will add that this also works in Ubuntu and most other distributions and the GUI utility their is known as “Gparted”.
While i recognise that the command line method is more complex I needed to go through it so I could show you how it is done because it will not fail on ANY linux distribution with those 3 commands (“fdisk”, “mkfs” and “tunefs”).


