Have you ever thought that the old computer in your basement that is waiting for recycling can be a powerful web server? All you need is to get to follow our article and make sure that you complete all the steps to host your own web page at home!
Introduction
You can turn your old computer into a powerful web server at home, given that you know the necessary things to do. Throughout the article, I will assume that you already know the basic concepts about networking issues: network interfaces, DNS services, IP configuration, etc. Unless you don’t feel comfortable with these, I recommend you to harden your knowledge on networking. I will not go into the deep technical configuration issues in this article, but you will need some networking knowledge when you roll up your sleeves to set up your server.
Planning Phase
If you finally decided that you will set up your own web server, the first thing you need to do is to visit your Internet Service Provider’s (ISP) Customer Support and make sure that you don’t have any objections to set up a web server in your contract. Your contract may be preventing such use and possibly, you will not want to be a part in a lawsuit when you’re satisfying your geeky desires.
The second thing is to check your broadband connection. Most probably you are using an ADSL (Asynchronous Digital Subscriber Line) subscription, which means that the upload and download speeds are not equal. For example, I have a 1 Megabit/256 Kilobits ADSL subscription. When I deploy my own web server, my server will take the requests from the 1 Megabit part and reply on the 256 Megabit part. This means that my visitors will have 4 times the upload speed of their download speed. This is important: when hosting a web page, your upload speed is your visitors’ download speed.
The third thing is to check if you can get a static IP from your ISP. If you cannot get a static IP, you will have difficulties in hosting your web server, because your domain name has to be resolved to an IP address. If it’s not static, you have to use a dynamic DNS service to change your web server’s IP address whenever it changes.
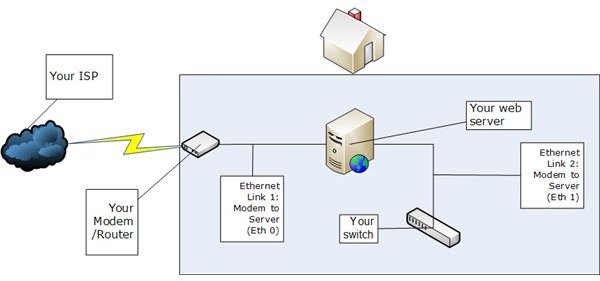
The fourth thing is to plan the network topology. 99% your topology will be to plug your modem to your web server (USB port or Ethernet) and then connect your server to a switch with an Ethernet cable, which other clients will connect to. In the latter and the better option, which is an Ethernet connection, you will need to network cards. The image shows this topology.
The fifth thing is to plan for your web server’s security. You cannot ask for official help from any company for your web server, you are personally hosting it and it is you who has to consider its security. Do not trust solely on your router/modem’s built in firewall, think about the possible defenses.
If you have cleared all these items, you can purchase an Internet Domain Name for your web site. The names are typically “rented” for USD 7 – USD 10 per year. Make sure that you choose your domain name registrar from Internet Corporation for Assigned Named and Numbers’ (ICANN ) accredited registrars.
Installation Phase
You will need a Linux installation CD/DVD to install the web server. For this purpose, I can safely recommend Ubuntu Server, CentOS or Fedora for installation. Make sure that when/if you are prompted, select the “server” or “web server” option to have the SE Linux (Security Enhanced Linux) components to be installed. When you choose the server installation option, you will not probably get a graphical user interface (GUI), because the GUI always presents an attack surface. You have to be familiar with the command line text editing tools such as Vi, Emacs or Pico. If this does not fit you well, you can always have the option to install your favorite desktop environment (Gnome, KDE, LXDE whatever) and then switch back to the command line by issuing the command init 3 with the root privileges.
After you have installed your Linux operating system make sure that Apache web server. There is no clear cut solution to check, but this one works in all installations: install slocate package via the distribution’s package manager and run updatedb& as root. Once the command is finished check with whereis httpd. If you see the path to httpd as the output, then the package is installed.
The next step is possibly the one that you will spend most time on: configuring the Apache web server. The Apache configuration file is typically in /etc/httpd/conf/httpd.conf. Before editing the file, make sure that you back it up by cp /etc/httpd/conf/httpd.conf /etc/httpd/conf/httpd.conf.old, so you can always revert to the original file if anything goes wrong. I’m not able to tell you the detailed Apache configuration here because there are infinite possibilities to set up a web server: will you host php pages? will you host more than one website? will you work with cgi? what if you want to add some server-side components such as Wordpress/Joomla content management systems? The Apache configuration will change depending on your setup. It is best to Google for this configuration issues.
Once you make the configuration, go to Network Tools website, select Lookup and search for the domain name that you have registered. If everything is working fine, you have to see your web server’s IP address (the one that you possibly received from your ISP).
Maintenance Phase
The most important maintenance parts are the security and backup. Make sure that you back up your web server daily and apply the updates to your operating system and –if installed- to your content management system. If you keep any data about your visitors and your web server falls victim to an attack, expect a lawsuit against you. Ah, don’t forget that you have to keep the logs for legal purposes! You do not want to face the government’s lawyers if you cannot present the logs when requested.
Conclusion
Running a web server at home is not an easy task, but it is undeniably enjoyable. If you have gone through the article completely and feel confident that you can go through all the steps, then you can roll up your sleeves and turn your old computer into a web server.
Who knows? If you do this correctly, maybe you can host your neighbors’ web pages for a small fee in the future and then upgrade your basement to a web hosting company! All you need is some time and dedication.


