Linux How-To: Wubi Ubuntu Installer- An Additional OS Running on Your System
It’s Easy…
The first thing you need to do is download Wubi. It’s an impressively small 957kb. You will need 256 mb memory, 5 Gb hard disk space, and a machine running Windows 98, 2000, XP, or Vista.
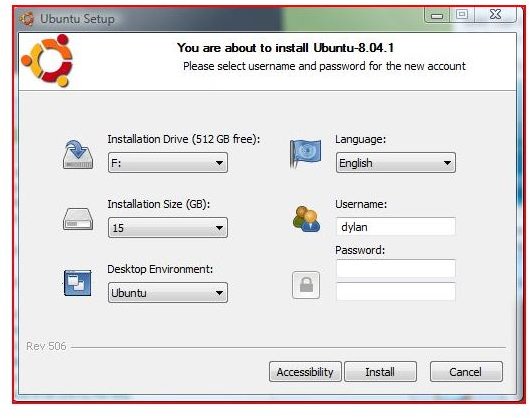
- Set the Install Drive: The drive to which Ubuntu will be installed (note: one of Wubi’s main features is that you do not have to make a Ubuntu partition so simply select the disk that Windows is installed on)
- Set the Installation Size: The size of the Virtual Drive that Ubuntu will use (how much space you’ll have for Ubuntu files). Note that the absolute minimum is 4gb.
- Set the Desktop Environment: This allows you to set the GUI that Ubuntu will use. It defaults to Gnome (my personal favorite), also available is Kubuntu (a KDE environment) and Xubuntu (a Xfce environment). If you don’t know which one you want use Ubuntu (Gnome) or Xubuntu (Xfce) if you have an older or lower spec computer. You can also install whatever version of Ubuntu you want, including 32-bit (expect a second tutorial shortly).
- Set the Language: This is pretty self-explanatory. It should be noted that you can change this post-install.
- Set the Username
- Set the Password: Check out this article on creating strong passwords.
- Click Install
Accessibility Options
There is a second page of settings you can go through: Accessibility Settings.
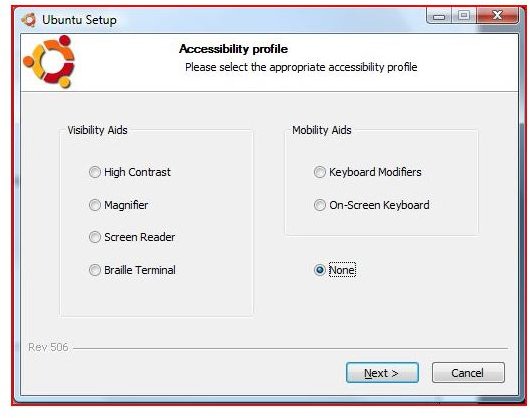
- From the main install page click Accessibility
- Choose a Visibility Aid: Note that you can only choose one.
- High Contrast: This changes the color scheme of Ubuntu to a higher contrast one as an aid to visibility.
- Magnifier: This allows users to use an on screen magnifier. They can move this magnifier over the screen and it will magnify the section under it.
- Screen Reader: This allows text and other output to be read out to a user using text-to-speech technology
- Braille Terminal: This allows Ubuntu to use a Braille Terminal (aka Refreshable Braille Display)
- Choose a Mobility Aid: Note that you can only choose one
- Keyboard Modifiers: The most commonly used keyboard modifier is sticky keys. This allows the ctrl, alt and windows keys to be stay pressed after only one press by the user. This is useful if the user is only able to press one key at a time.
- On-Screen Keyboard: This allows the user to input text via an onscreen keyboard, by clicking keys.
- Click Next
- Click Install
Wubi will now download the version of Ubuntu that you selected under Desktop Environment and install it. When you start your computer a boot option will come up allowing you to choose between Ubuntu and your other OS.
Uninstallation
So you’ve tried Ubuntu, and decided it isn’t for you. How can you uninstall it? It’s easy. Arguably Wubi’s best (and hopefully least used) feature is that it allows Ubuntu to be uninstalled like any other program. Just open Add or Remove Programs (under XP) or Programs and Features (under Vista), select Ubuntu and click modify or uninstall.
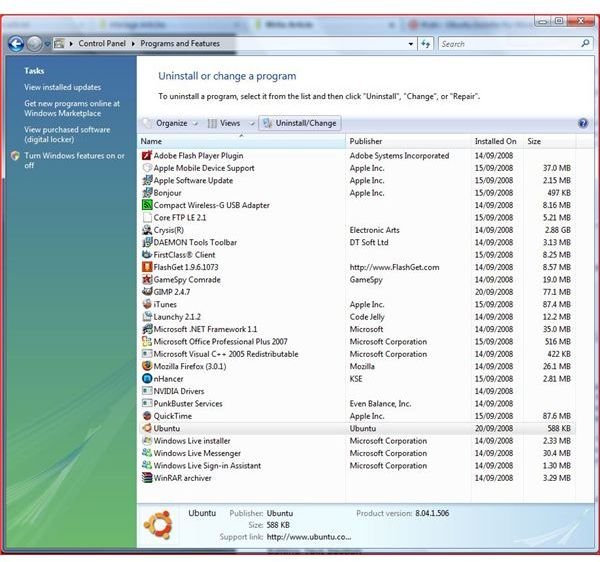
With Wubi it’s that easy.
What Next?
If you’ve tried Ubuntu, and you love it, then it’s a good idea to move it to its own partition. This has a whole range of advantages, but the largest ones are durability and stability. To do this, you can use a wonderful program called Loopmounted Virtual Partition Manager (LVPM) to migrate your virtual drive to its own partition (expect a tutorial shortly).