Ubuntu and all other Linux distributions are a joy to work with. However, for some reason or another, users have other operating systems installed and they do not know how to try Ubuntu without damaging their existing installation. Inside is our guide to try Ubuntu with no changes to your system.
Introduction
Trying Ubuntu without making any changes to your Windows drive is not a big deal, really. It just involves a couple of things:
- An Ubuntu image file, which you can download from Ubuntu’s website
- A USB thumb drive (if your computer can boot from a USB port) or a CD (if your computer cannot boot from USB)
- A CD/DVD writer (burner) on your computer
- A blank CD
When all are in place, we are ready to go.
Try Ubuntu from a CD
This is the easiest one. Open up your CD burning software, insert a blank CD to your CD/DVD drive, select “Burn ISO Image” from your program’s menu (can be something else, like “Burn Image File” depending on which program you are using) and when prompted, select the Ubuntu ISO file you have downloaded. When CD burn process is completed, we are done.
Put the CD into your CD/DVD drive, reboot your computer and enter your BIOS settings (you should press Del or F2 when you see your computer’s or your mainboard’s logo to do that). Set up your primary boot device as CD/DVD drive, save changes and exit. When you computer boots, it will read the CD you have burnt and will load Ubuntu.
Try Ubuntu from a USB Drive
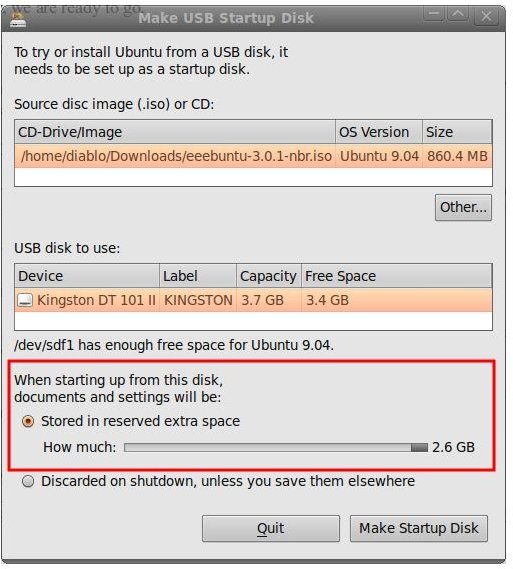
When you boot your system to Ubuntu as we have done above, plug in your USB stick and go to System → Administration → USB Startup Disk Creator. If you do not see your Ubuntu CD in the upper box, select the ISO file you downloaded to your hard disk. Then, at the bottom, you will see a menu which says “When starting up from this disk, documents and settings will be:” Now, select the first option, which is “Stored in reserved extra space” and take the slider to the right. When done, click on the “Make Startup Disk” button. (I did not have an Ubuntu ISO ready so I used another ISO file that I had available. Don’t let the screenshot misguide you.)
When the program finishes, you will not only have a full-blown operating system but also a space that this operating system recognizes as a storage space. Shut down the computer, take out the CD from the tray when prompted, leave your USB stick in place and reboot. Go to the BIOS settings and select USB disk (or removable drive) as the primary boot device. If you have done everything successfully, your computer will boot from your USB thumb drive.
Why did we select the USB drive method when we had the CD running smoothly? First, the CD would not let you save any changes. For example, if you created a simple text file, you could only save it to your computer (your Windows drive). Second, a CD always runs slower than a USB stick. Third, you cannot have a full-blown operating system including a storage space with a live CD. To put it shortly, it deserves the pain that we went through.
By booting from a USB drive, you can update your system, save your documents, make changes, install/uninstall software, meaning that you can do everything as if you installed the system to your hard disk.
Conclusion
Although I have only Ubuntu installed as my operating system, I do have a USB stick installation. There are some reasons for that:
- I have a portable computer with me, including the operating system and my selected files.
- I can boot a computer from my USB stick and continue to work in any computer. There is only one requirement: it must be able to boot from USB.
- When using public computers, I do not care about the malware infection or my private data to be held there. Everything I do is gone from the computer when I pull out my USB stick.
As we have seen, you can try Ubuntu without touching your Windows drive in any way. I personally recommend going with the USB installation. Plus, I recommend you to carry a USB installation with you all the time and use it when you are using public computers. When at home, you can also use your USB stick to surf the Internet and do your online banking while making sure that none of the nasty malware can do you any harm.


