Does Linux Find New Hardware? Hardware Detection in Linux Explained
Introduction
If you are a newbie Linux user, you will have noticed that hardware detection methods in Linux seem to be different than those in Windows. The reasons for that are multiple. Firstly, if you are buying common off-the-shelf hardware for Linux, chances are that the Linux kernel already has the drivers for that piece of hardware and it will be detected during boot-up automatically and the proper drivers loaded. In cases of plug-n-play hardware like USB devices, there are applications which detect hardware changes and do the needful automatically. Let’s have a look at how you can find and monitor your hardware detection in Linux.
The dmesg Command
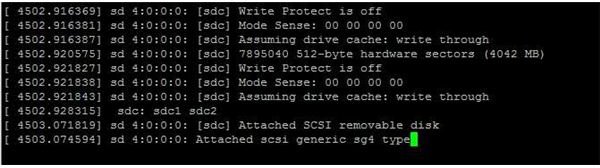
If you want to troubleshoot anything in Linux, one of the best places to look is the system-log. In Linux, there are various log files which record different things. In case of kernel messages, they are stored in the log file, /var/log/messages. This file contains logs of all kernel messages and can be viewed in multiple ways. You can either use the ’tail’ command to view the log file or type ‘dmesg’ to make it output the full file at the command-line. Both methods are essentially the same, with just a few differences.
The ’tail’ command, with a special switch, can let you see the file being updated in real-time. This means that you can type the command in a terminal, plug in your hardware and watch the terminal as the kernel records messages in the /var/log/messages file. To do that, add a switch -f to the tail command like this:
tail -f /var/log/messages
By default, the ’tail’ command displays the last 10 lines of any file. In case of new hardware being plugged in, you should be able to see your hardware’s details in the last 10 lines. If not, type “dmesg | less”. This will output the contents of the log file and pipe it into the ’less’ command that will allow you to view the output conveniently without everything scrolling up. You can use various buttons to scroll up/down while viewing the logs.
The lspci and lsusb Commands
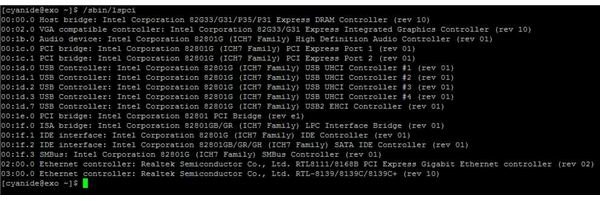
While ‘dmesg’ will show you all the information related to the kernel, it might get a bit too much for the newbie. If you are confused by the dmesg command, the ‘lspci’ and ‘lsusb’ commands will come in very handy. lspci and lsusb query the PCI and USB devices respectively and print out all the information in a much more understandable output.
The lsusb command works similarly, but for USB devices. This command will query the USB devices present on the system and print out relevant information about them. The best way to use this command is with the -v switch (lspci -v) which makes the output verbose and allows you to view the different USB devices present on the system. In cases of external storage via USB, it is still very much recommended to use the dmesg commands to find out the device nodes of the partitions though.
Using these commands, you can view all connected hardware to the system. In cases of external storage, you can then mount the disks/partitions by using the “mount” command. In cases of other hardware, Linux generally loads the appropriate driver. If the driver isn’t loaded by default, you can manually load it by using the “modprobe <module_name>” command. Refer to the documentation supplied with your hardware or other online support methods to find out which module your hardware requires.
lsusb and lspci outputs