It wasn’t so long ago that recording a Skype conversation in Linux was difficult, if not impossible. That’s all changed, thanks to a great piece of Open Source software called Skype Call Recorder.
Introduction
I use Skype quite a bit to call family, friends, and clients. I also use it to record interviews and the occasional podcast. For the longest time, recording Skype calls under Linux was either incredibly difficult or it just never worked.
Then, I ran into a program named Skype Call Recorder . It’s hands-down the best software for recording Skype calls in Linux.
Getting and running the software
You can download Skype Call Recorder from the program’s Web site . There are a number of installation packages – for various flavors of Ubuntu, Debian, any RPM-based distribution, ArchLinux, and Gentoo. You can also grab a package for the Eee PC.
All that you need to do to install Skype Call Recorder is open the file that you downloaded in a package manager. Then, let the package manager take care of everything else. gdebi on Ubuntu, for example, also installs a required library.
Running Skype Call Recorder is easy. In Ubuntu, the installer puts a shortcut under the Accessories menu. Just select the shortcut, and the program’s icon appears on your system tray. You should configure Skype Call Recorder before you start using it though.
Setting the recording options
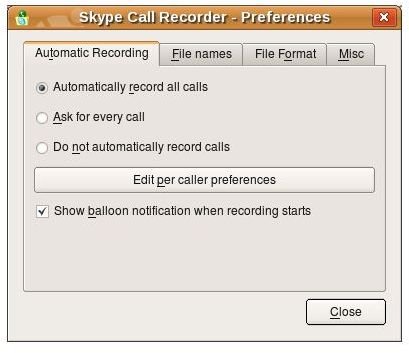
Right click the Skype Call Recorder icon on your system tray, and select Open Preferences. There are four tabs – you can ignore the one labeled Misc. However, take a close look at the other three.
The first tab is Automatic Recording which, obviously, enables you to start recording a Skype call when the conversation starts. You can choose to automatically record, be prompted to record, or manually start recording. There’s also an additional option: set the preferences for individual Skype contacts. You get the same options as above, with the ability to tailor those options for people that you call regularly.
Next up, the File names tab. Use this tab to tell the program where to save the recordings (the default is a folder called Skype Calls in your /home directory) and the file name under which to save the recording. You can choose four options from the drop-down list. These contain the date, time, and name of the contact with whom you were chatting. A lot of the information is inserted using variables – like Calls with &s/Call with &s, %a %b %d %Y, %H:%M:%S. Unless you’re comfortable fiddling with those variables, stick with the defaults.
Finally, the most important tab: File Format. Obviously, this is where you tell Skype Call Recorder how to save the recordings. You can save files as Ogg Vorbis, MP3, or WAV. You can also choose the quality of MP3 and Ogg recordings, and decide whether you want to record in stereo or in mono.
Using Skype Call Recorder
I configured the software to start recording automatically. The quality of the recordings that I made was very good, and the application is easy to use. It did all the work – all I did was click a confirmation dialog box when recording started.
What surprised me was Skype Call Recorder’s ability to record a three-way conversation. I was worried because the application was telling me that it was recording only the part of the conversation between myself and one of the participants. But, as it turned out, that was a bit of a lie.
Skype Call Recorder works wonderfully for the things that I use it for – interviews, recording podcasts, and the like. It’s small, fast, and easy to use. And it stays out of my way, even when I’m using it.


