A Guide to Free Photo Recovery for Linux
Retrieving Lost and Damaged Digital Photos
Hard disk drive crashes affect everyone, regardless of their chosen operating system. In the rush to resolve such a problem, however, it is easy to overlook some basic considerations. As such you might find that you have accidentally formatted your hard disk as part of your preparation for getting your computer up and running again, thereby losing vital photo data.
Similarly, card-based flash memory devices can often corrupt, leaving them unreadable without reformatting.
Thankfully, free photo recovery software is available for Linux. Using PhotoRec for Linux you can easily restore lost images from your disk and enjoy them once again!
(Image via www.cgsecurity.org)
PhotoRec Free Photo Recovery for Linux
PhotoRec can be downloaded with its sister product, TestDisk, which is used to recover lost disk partitions. This tool is for recovering data and fixing hard disk drives, whereas PhotoRec is designed specifically for recovering image files.
Available free, PhotoRec and TestDisk can be used to scan disk devices for lost images files and recover them. It is a great tool for image recovery on big hard disks and smaller camera “card disks” alike, and can be quickly downloaded and installed (example below performed using Ubuntu 10.10). You can either do this the hard way, by browsing to www.cgsecurity.org/wiki/TestDisk_Download and downloading TestDisk for Linux before unpacking and installing via the Terminal, or you can do it the easy way…
Installing PhotoRec for Linux
Go to System > Administration > Synaptic Package Manager and search for TestDisk. You should find that a single result is returned, and this should be right-clicked. Select Mark for Installation from the context menu and Apply. You will then see a summary of what files will be downloaded – again, click Apply.
The PhotoRec and TestDisk applications will then be downloaded and installed onto your Linux computer. The entire process shouldn’t take long at all, and once complete you will be able to start scanning your Linux PC and attached disk devices for damaged and corrupt image files.
Using PhotoRec for Photo Recovery

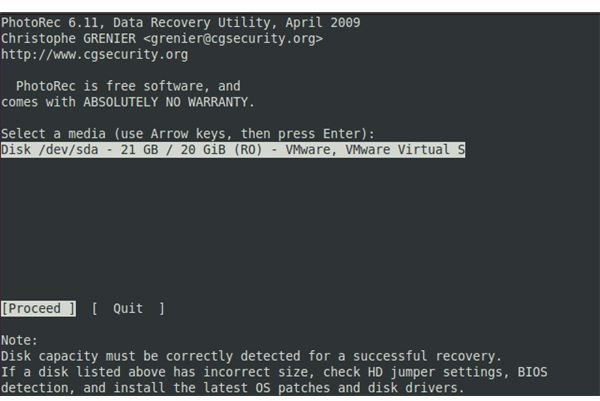
In order to restore images on your hard disk drive or any disk device inserted in your card reader, open the Terminal (Applications > Accessories) and enter:
sudo photorec
This will launch the tool within the Linux Terminal, and allow you to select a device to be scanned. You will then need to select the type of partition table that has been used on the disk. For instance if you are trying to recover data from a disk formatted for Windows, then you would select the Intel/PC partition option. Similarly if you had formatted your flash media on a Mac, you would need to choose Apple partition map.
(PhotoRec can also be used to recover a specific file, using the command sudo photorec FILENAME.)
Once a partition type is specified, PhotoRec will then invite you to use the Search option (available via the left and right arrows on your keyboard) to find the damaged or lost files. Select a directory and take care not to write the recovered data to the same disk or partition that the damaged file is on as this will cause problems with recovery.
(Screengrab by author)
