Many of you may be wondering if the eStarling ImpactV is worth buying. The allure of being the first digital photo frame to incorporate video play may be exciting enough to get you to buy it, but perhaps the eStarling ImpactV Clip Frame is something you may want to skip.
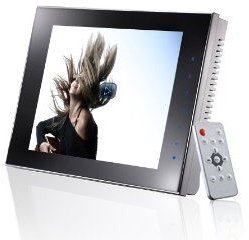
The eStarling ImpactV
Why The eStarling ImpactV Seemed So Attractive
When I was in the market for a new photo frame, I wanted the best of the best. News was circulating around the Blogosphere that eStarling had created the very first digital photo frame that would support video clips, this intriguing frame was called the eStarling ImpactV Clip Frame.
Seeing that the product was so new to the market at the time, no one had a solid review out of the frame. They added the specs, yes, and mentioned how cool it seemed, but as far as how well it worked, I was able to find absolutely no information!
The allure of the frame, though, convinced me that it would be the ultimate photo frame. It had features that I never thought possible, and being the impatient person that I am, I went ahead and made the buy; $199.99 later, my eStarling ImpactV made it to my door.
Features
The reason I bought the eStarling ImpactV Clip Frame was due to the features built into it. Besides playing video clips, the ImpactV also featured a slew of things that really got the geek in me pumped up.
Purchasing the ImpactV gives you access to a website called SeeFrame. At this website you can upload your photos, sync the frame with RSS photo feeds, Photobucket, Picassa, Facebook, Flickr and more. What makes the ImpactV so alluring to consumers is the fact that there is no monthly fee associated with the use of the site. Many wifi frames on the market today include a monthly membership fee, but the eStarling ImpactV Clip Frame is free.
The Photobucket feature is the most alluring because you can sync the frame up to your PhotoBucket account. Any photo you have stored in your PhotoBucket account will instantly load onto the frames screen. That is not all. You see, any photo you upload directly to the Seeframe site from your PC will also be stored in PhotoBucket. That way you don’t have to load the picture into PhotoBucket, the Seeframe site will do it for you.
Moving on to the screen, the ImpactV features a beautiful 8-inch LCD screen with an 800X600 resolution, that will display your photos marvelously, and it will play back video clips in DVD quality. Sexy, wouldn’t you say?
The LCD screen is also a touch screen. The side border of the frame can be touched in order for you to gain access to the frames menus and settings. Frankly, I could have done without, because touching the screen only leaves icky smudge marks on its flawless screen.
Next, the eStarling ImpactV Clip Frame has its very own email address. You can email the frame photos and the ImpactV will automatically display the photos on to the frame. You are also free to give this email address out to friends and family, whom can use it to send the frame photos as well.
The eStarling ImpactV also comes with an iPhone application that will allow iPhone users to send photos from their iPhones directly to the ImpactV instantly_._
One feature that really stuck out was the ability to set up photo scheduling on the Seeframe website. The SeeFrame website allows users of the ImpactV to add tags to individual photos. For instance, if you have 500 photos of Halloween events, you can schedule the frame to play only the Halloween photos or videos during the month of October. This is especially neat because it allows you to control what photos you want to display, and when.
You also have control over when the eStarling powers on and powers off. If you want the frame to play only from 9am-5pm, you can set it to do so. It will shut off at the time you have it scheduled to shut off, and will power on at the time you set it to do so.
The video that plays on the eStarling ImpactV can only support 4 minutes worth of video. It is a Clip Frame, so keep that in mind.
-The eStarling ImpactV also will support camera memory cards. However, it does not support the newer XD Cards. Honestly though I never would use this feature due to the wifi ability.
Turn to the next page to view the unpacking of the ImpactV, and the ease (or not so easy) of setting the frame up.
Unpacking the ImpactV
The eStarling ImpactV that I bought came from the actual eStarling company who sent it to Amazon, who then sent it to me. Once the frame was here I was pleasantly surprised at how well packed the frame was.
Inside of the official Amazon box sat the eStarling ImpactV’s box. I opened the box, and inside sat my frame!
The frame itself was nicely tucked into a white plastic sleeve. To the right sat the frames power chord, and on top of that a small pamphlet, which I assumed would be the tutorial on how to set the frame up and how to get it to work.
I removed the ImpactV and nearly died when I saw that the frames LCD screen was scratched! Look closer though folks, because I nearly packaged the frame up for a refund till I realized that the screen had a thin layer of protective plastic on top of it. I have heard numerous stories where people sent the frame back thinking it was scratched, little to their knowledge that it was nothing more than a screen protector that was scratched-looking.
I peeled the protective layer away from the frame and before me sat a gorgeous sleek high gloss frame! Yep, the thing is a beauty, I cannot deny it.
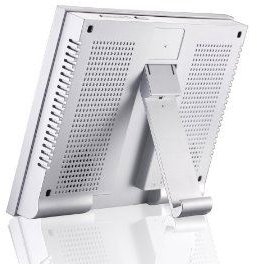
Behind the frame tucked into the frame’s kickstand was a small white remote control. This is handy for those who don’t like smudging up the frame by using the built in touch screen feature.
After unpacking everything, I was pretty excited to get the frame up and running. Unfortunately, I had to dive into setting the frame up head first with no instructions. You see, the pamphlet that came with the frame was nothing more than a little guide on how to set up the frame. Simplistic things that most users would be able to figure out on their own; plug in, turn on, etc. There was nothing that helped guide me on how to use the frame once I had it set up to the network.
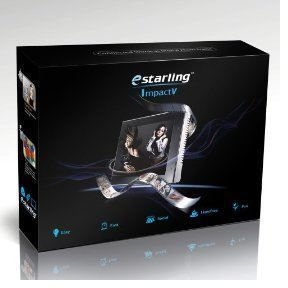
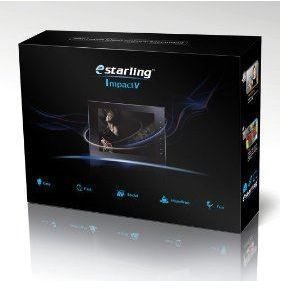
Box
Set Up & Ease Of Use (1 out of 5)
Setting the frame up to my network was a cinch. After I turned the frame on a pretty blue screen with some diamond graphics popped up for a few minutes. Shortly after that, the eStarling ImpactV went looking for an available network. In about 30 seconds, it found my network and was ready to roll. Or so I thought.
Once the frame was up and running on my wireless network, it then displayed a temporary email address for my frame, and a temporary password, which I could change on the SeeFrame.com website to something more personal, or easily remembered.
When I first got the frame, the SeeFrame website was nicely laid out in a somewhat easy layout. You had a section to browse all of your uploaded photos, a section where you could upload pics from the PC to the site. A tab that allowed you to subscribe to RSS feeds, Flickr, Photobucket and so on.
The very first thing I did before attempting to mess around with the Photobucket feature was to simply upload a picture from my computer on to the SeeFrame site.
I did just that. Next I simply waited for the photo to make its way to the eStarling ImpactV. Unfortunately, the photo never made it. I toyed around with it for close to an hour before realizing that I had to go to the main page of the SeeFrame site where I noticed a small start and stop button next to the sites where I could get photos.
It is set up exactly like this:
3 photos from Email or Mobile. (Stop)
0 photos from RSS. (Stop)
217 photos by Upload. (Start)
688 photos from Photobucket. (Stop)
I learned on my own, with multiple attempts at contacting customer support (with no reply) that I had to set all other tabs to STOP. Only one photo-sharing tab can be left at START. It sucked because I would have liked to be able to set all tabs to start to have photos come in from all devices. The only fix for this is to set all of your photos with the same tag and creating a play list.
Once I had figured this out the frame began playing the pictures I had uploaded to it.
The SeeFrame site has upgraded this version of the layout into a newer sleeker look, but in all honesty, I still find the old web version to be easier to navigate. You can switch to the old web version on the site by clicking on My Account, and clicking the Old Web Version tab.
-Go to page 3 to learn about the frames compatibility with Photobucket, and the photo image quality on the 8-inch LCD screen.
PhotoBucket Compatibility (2 out of 5)
As I said, the eStarling ImpactV comes with the ability to sync your SeeFrame account to your Photobucket/Flickr/Picassa/Facebook RSS feeds, and so on.
I only have an account with Photobucket, so mainly this was what I went to work with next. Without any directions whatsoever, I was once again on my own when it came to hooking the frame up to work with PhotoBucket.
I was able to find the Photobucket tab in the top tab labeled Subscribe. I clicked on the Photobucket tab. Once clicked, a small link shows that reads, “If you want to get photos from/to Photobucket click here.” I clicked on the small link, where a window popped up asking me for my user name and password on Photobucket.
It took quite some time for my photos to make their way to my SeeFrame account, but lo and behold, it did work…well…sort of.
After 688 photos made it to the SeeFrame site, the other 400 or so decided to stay behind on Photobucket. Why they failed to load to the SeeFrame site still boggles my mind.
Photos uploaded to SeeFrame directly from the PC are also supposed to automatically make a copy and store it on Photobucket as well. This feature has never worked for me. When I upload pictures from the PC on to the SeeFrame site, a copy is never stored into Photobucket for me. They are supposed to, but the feature is obviously flawed.
Photo Quality On the ImpactV’s Screen (5 out of 5)
Although I encountered flaws from the very get-go, as soon as I had photos playing on the eStarling ImpactV I was happy at how nice they all looked on the 8 inch LCD screen. The photos were all rich in color, with a tight, sharp clarity to them that I loved.
Directly on the frame I was also able to adjust the screen’s settings for the perfect overall image quality. Frankly, though, the images looked so flawless that I never had the need to go into the settings to mess with any of them.
-Turn to page 4 to learn about some of the issues that I ran into while using the eStarling ImpactV.
Issues
The very first issue I encountered was the lack of a tutorial on how to use the frame. The next issue was the flawed Photobucket feature.
I was hoping that these two issues would be the only issues I would encounter on the eStarling ImpactV Clip Frame. Sadly, these were not the only issues I came across. There were more.
I would not have bought the ImpactV had I known this prior to my purchase! The ImpactV needs interaction in order for videos to play back on the frame. As the picture slide show goes on, my very first uploaded video clip was up next. To my shock, the video did not play automatically!
I had to actually hit play on the remote, or hit play on the touch-screens sidebar. However if I did not hit play fast enough, the video would simply go skipped without playing. This was a huge setback for this ‘world’s first video photo frame!’ I was pretty livid that they would include such a gnarly feature and have that one gnarly feature totally lacking.
Yep folks, you heard it here. If you do not hit play on the remote, or on the frame’s touch border, the video will not play at all.
As far as the video’s quality, I will indeed vouch that the videos look sharp, but man, what a waste of a feature.
I wanted the video clips to play on their own for when friends and family came over. Having to run up to the frame and interact with it every time a video popped up in the slide show was a total geek’s buzz kill.
That is the next issue I will be covering: the slideshow.
When I make slideshows using freebie online websites, I love having complete control over the photos’ display order. For me, being able to create the order of the pictures is like being able to create a photo story. I thought I would have complete control over the eStarling ImpactV. I thought I would be able to place photos in whatever order I wanted. Unfortunately, this is not the case. Photos will display randomly in the slideshow on the frame. You never know what photo will play where, or when. It is just a scattered mess of photo puke. That’s right, photo puke. It’s a term I made up when the ImpactV spat out the same photo three times in a row.
Another issue I encountered time and time again was freezing. The frame will sometimes play the photos without any issues. The slideshow will be happily shooting out my photos onto the lovely screen…and then…it will stop.
Hitting the Power Off button on the remote will not always power down the frame, so I am left with no other choice but to unplug the cord from the back of the frame, which I know cannot be good for the frame at all.
-Turn to page 5 to view one of the biggest issues I had with the ImpactV, and view my overall conclusion on the frame.
The Biggest Issue Of All
Two months into owning the eStarling ImpactV Clip Frame, it stopped working altogether. I wanted to cry, considering how much money I spent on the frame and how many issues I encountered previously.
The Clip Frame just refused to display any photos. Whenever I powered it on it would freeze up on the main loading window and stay there.
I let the frame stay on the main loading page for an hour hoping that it would eventually fix itself. It never did. I gave it chance after chance, until finally I located the eStarling customer service email address on the SeeFrame website, and asked for a full refund.
Instead of giving me a refund, the company asked if I would like a brand new frame. Seeing that I knew the frame was out of its 30-day full warranty refund limit, I knew I would take a cut in the price I originally paid if I refused this offer.
For me, the customer service was a complete positive change around from 2 months earlier though. At that time I got no reply from them at all when I needed help setting it up. The company emailed me within just 2 hours after asking for a refund, which was a major improvement.
The positive changes were rather wonderful when it came to satisfying me. Instead of waiting for me to send back the broken frame for a new one, they sent me out the new one first. This type of customer service is usually unheard of, so I was very, very pleased.
Overall (2 out of 5)
As happy as I am with the frame’s screen quality, and the new positive changes in customer service, I still have to say no the eStarling ImpactV Clip Frame is far too flawed for me to recommend it to anyone.
I think the folks over at eStarling have a spectacular concept on their hands. The ImpactV is a decent attempt, but overall it seems like a glitched beta version of what could be an excellent product.
If they were to come out with a new model that fixed all of the issues mentioned in my review, then it would be one heck of a fantastic digital video/photo frame. Till then though, leave the ImpactV alone.
Related Material
[Top 5 Digital Photo Frames for Under $100 & How to Decide Which One to Buy?](https://Top 5 Digital Photo Frames for Under $100 & How to Decide Which One to Buy? ) Looking for a digital photo frame for less than $100? Here’s our top 5 digital photo frame picks from five different brands. If you still can’t decide which one to get, we also share some tips on how you can decide which digital photo frame to buy.
Top 7 Photo Sharing Websites & What Makes Them the Best Is there too much choice out there for photo sharing sites? This article will look at 7 popular ways to share your photos, and what the best features of these top 7 photo sharing websites are.


