This article will guide you through the steps in creating a bootable USB Flash drive and extracting the contents of an ISO image of your choice to the drive. With the added convenience of the size and portability of USB Flash drives this is a viable option especially for PCs without a CD-ROM.
Overview and Requirements
With the size and convenience of USB Flash drives you may find the need to copy boot CD ISO to USB drive. This article will explain step-by-step the process to make your USB Flash drive bootable and extract your ISO files to the USB flash drive. You will need a few things before you can get started:
- USB Flash drive – with enough free space to hold the files of the ISO image. A 2GB USB flash drive will be sufficient for most applications but you may need up to 8GB.
- 7 Zip – Freeware utility which will extract all the files out of your ISO image so that you may copy boot cd iso to usb drive. You can download 7-Zip here: https://www.7-zip.org/ .
- PC running Windows – preferably Windows Vista or Windows 7.
- ISO files – You will need to already have the boot ISO images which you would like copied to your USB Flash drive.
- Windows Vista or Windows 7 installation DVD – used to make the USB flash drive bootable.
Prepare your USB flash drive to become bootable
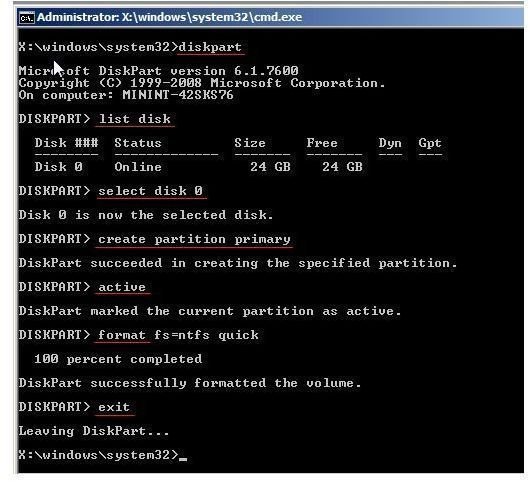
To copy boot CD ISO to USB drive, first you will need to insert your USB flash drive into a personal computer running Windows Vista or Windows 7 and assure it is recognize and ready to use. For this article we will format your USB flash drive so NOTE: FORMATTING YOUR USB FLASH DRIVE WILL ERASE ALL DATA FROM THE DRIVE. Make sure you back up all data you can’t afford to lose before proceeding. After you have done this from a command prompt you will need to launch a Windows utility called “DISKPART”. To do this go to START > RUN then type “CMD” then press ENTER. This will open a black DOS-like window and at the command prompt type “DISKPART”. This will open a new black DOS-like window but the prompt will now say “DISKPART>”. You may be prompted by a security alert simply click OK to continue. At this point you will need to determine the drive number of your USB flash drive. To do this type “LIST DISK” and it will show a list of drives connected to your computer. In this case, the USB flash drive is DISK 1 with a size of 3930MB since we are using a 4GB flash drive. If your flash drive is a different number other than 1 then substitute the correct drive number in the following instead of using disk 1.
Format Completion
The next step to copy boot CD ISO to USB drive is to select disk 1 by typing “SELECT DISK 1” and you should get a message saying “DISK 1 IS NOW SELECTED”. After you have selected disk 1 type “CLEAN”. This will delete all configuration data on the USB flash drive. You will get this message: “YOU HAVE SUCCEEDED IN CLEANING THE DISK”.
It’s time to create the partition on the drive. To do this type “CREATE PARTITION PRIMARY” and you will get a message saying “DISKPART SUCCEEDED IN CREATING THE SPECIFIED PARTITION” then select the partition just created typing “SELECT PARTITION 1”. Now type “ACTIVE” and finally it is time to format. To do this simply type “FORMAT FS=NTFS”. It will take a few minutes to format the flash drive partition but you should see the percent completed in the format process. Once the format has completed type “ASSIGN” and “EXIT”. The drive is ready to be made bootable.
Making your USB Flash Drive Bootable
To make your drive bootable you will use a utility on the Window Vista or 7 DVD called BOOTSECT. Insert your Windows Vista or 7 DVD into your CD-ROM. Then change the directory to boot directory by typing in the command window “D:” then press enter. Type “CD D:\BOOT”. At this point you will type “BOOTSECT /nt60 E:” where E is the drive letter Windows assigned to your flash drive. Substitute E for the appropriate drive letter if yours is different. You can now close the command prompt window. Your flash drive is now a bootable USB flash drive and we can proceed to extracting the files from the ISO image.
Extracting your ISO Image files to your USB Flash Drive using 7-Zip
The final step to copy boot CD ISO to USB drive is extracting the files in your ISO image. You will use the 7-Zip utility. Open the 7-zip File Manager program and within 7-Zip explore to the ISO image file you wish to extract the file content from. When you double-click on the ISO image the contents of the ISO image are displayed. Now select all files in the
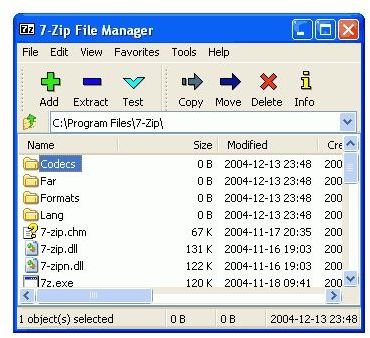
image by pressing CTRL+A or highlighting everything. Once everything is highlighted press the “EXTRACT” button in 7-Zip. This will bring up a window asking for the destination to extract the files. Explore to your bootable USB Flash drive created earlier and press OK which will begin the extraction process. Depending on the size of the ISO image this could take a few minutes. Once the extraction has completed you are finished.
Congratulations
You have just created a bootable USB Flash drive with the contents extracted from an ISO image of your choice. You now should be able to boot the personal computer to the USB drive and whatever ISO image you installed should begin running.


