Creating a bootable USB flash drive to install Windows Vista or 7 is very simple and easy. You do not need to buy one of the many utilities available on the Internet to accomplish this easy task. In this article we will explain step-by-step how to create a bootable CD partition on a flash drive.
How to create a Windows Vista or 7 CD boot partition on a USB flash drive
In this article we will explain step-by-step how you can create a bootable CD partition on a USB flash drive in minutes from a command line, the built-in DISKPART utility, and the BOOTSECT utility. You will need:
- USB Flash drive of 4GB or more.
- A computer already running Windows Vista or Windows 7.
- The Microsoft OS DVD for Windows Vista or Windows 7.
Creating a partition and formatting your USB flash drive
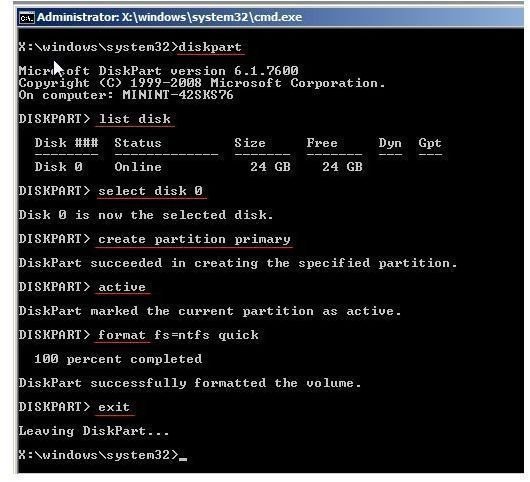
First plug in your USB flash drive and prepare it to be formatted. PLEASE NOTE: FORMATTING YOUR FLASH DRIVE WILL ERASE ALL DATA ON THE DRIVE so backup anything you need before proceeding further. After you have backed up any important data you will need to go to a command line prompt and type “DISKPART”. This can be done within Windows by going to START > RUN and typing “CMD” then pressing enter. A black DOS-like window will appear. At the command line prompt type “DISKPART” which will open a new window. You may get a Windows Security pop-up asking if you want this program to make changes to your computer and you will click “YES”. The DISKPART utility window should now be opened.
Next you need to determine the drive number of your USB flash drive. To do this type “LIST DISK” and it will show a list of drives connected to your computer. In this case, the USB flash drive is DISK 1 with a size of 3,930MB since we are using a 4GB flash drive. If your flash drive is a different number other than 1 then substitute the correct drive number in the following instead of using disk 1.
Now select disk 1 by typing “SELECT DISK 1” and you should get a message saying “DISK 1 IS NOW SELECTED”. After you have selected disk 1 type “CLEAN”. This will delete all configuration data on the USB flash drive. You will get this message: “YOU HAVE SUCCEEDED IN CLEANING THE DISK”.
It’s time to create the partition on the drive. To do this type “CREATE PARTITION PRIMARY” and you will get a message saying “DISKPART SUCCEEDED IN CREATING THE SPECIFIED PARTITION” then select the partition just created by typing “SELECT PARTITION 1”. Now type “ACTIVE” and finally it is time to format. To do this simply type “FORMAT FS=NTFS”. It will take a few minutes to format the flash drive partition but you should see the percent completed in the format process. Once the format has completed type “ASSIGN” and “EXIT”. The drive is now ready to be made bootable.
DISKPART SCREENSHOT
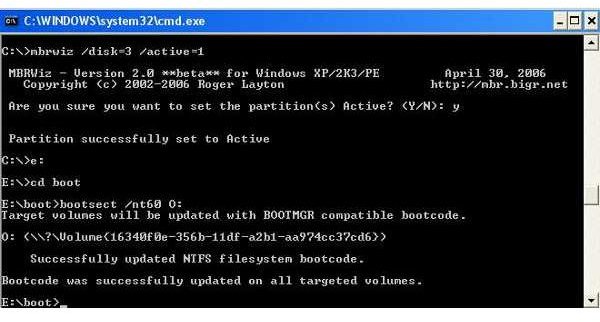
Making your USB flash drive bootable using BOOTSECT
To make your drive bootable you will use a utility on the Window Vista or 7 DVD called BOOTSECT. Insert your Windows Vista or 7 DVD into your CD-ROM. Then change the directory to boot directory by typing in the command window “D:” then pressing enter. Type “CD D:\BOOT”. At this point you will type “BOOTSECT /nt60 E:” where E is the drive letter Windows assigned to your flash drive. Substitute E for the appropriate drive letter if yours is different. You can now close the command prompt window. Your USB flash drive is ready to have the installation DVD copied to it.
Copy the Windows Vista or 7 DVD to your bootable USB flash drive
The easiest way to copy the Windows Vista or 7 DVD to your flash drive is to use Windows Explorer. Once you have copied all the files your flash drive is now a bootable USB flash drive with Window Vista or 7.
Congratulations
You have just created a bootable USB flash drive so upon PC boot-up you will be prompted to select which device you want to boot from. Simply choose the USB flash drive as your boot option and the installation will begin.


