If you’re looking to create a dual-boot, modify the disk space for a dual-boot, or even creating space for back-up information, a partition is what you’ll be looking to do.
Why Create a Partition?
For users who want to install multiple operating systems on their computer or create a backup portion of the hard drive, a partition is very useful. In particular, if you only have one hard drive, you will have to divide space on that disk. For users with desktop computers, you likely have more than one hard drive. However, laptops are popular these days and only have one hard drive available. It is important to divide space accordingly depending on how much space you want to have from one partition to the next.
Step 1
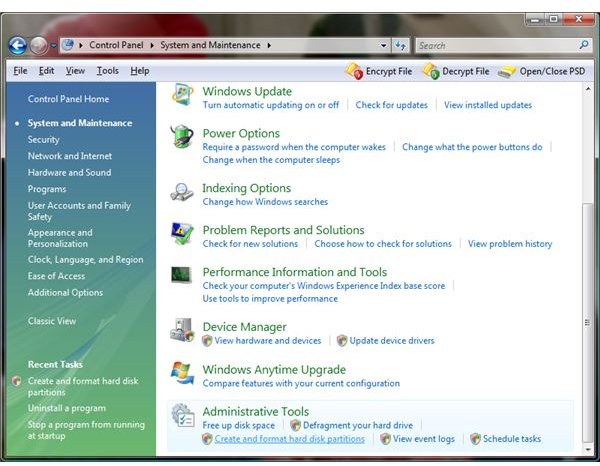
The first thing you will want to do to begin creating a partition in Vista is to access your Control Panel. From there you will want to select System and Maintenance. From there, scroll all the way to the bottom until you find Administrative Tools - but do not click on that link. Instead, right at the very bottom, you should see a subcategory: Create and Format Hard Disk Partitions. If you have a password set up with Vista, you may be prompted to enter it here, as you will require administrative privileges in order to make this change.
Step 2

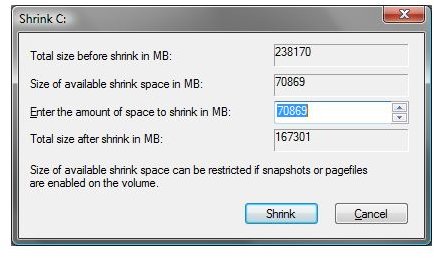
Right click the hard drive in which you wish to create a partition. If there is unused space, you will be prompted to choose New Simple Volume. If not, then the option you will want is Shrink Volume.
If you have chosen the Shrink Volume option, you will be prompted to enter the size you will want to be able to shrink. By default, it will give you the total amount of available space you can resize. However, if you want less, you can enter it here as well. Note that it will only give you a figure in megabytes as opposed to gigabytes. 1000MB equals 1GB, so calculate accordingly. Afterwards, hit Shrink, and your new partition is created. If prompted to format the unused space, you may do so if desired.
If you have chosen New Simple Volume, proceed to Step 3.
Step 3
If you selected New Simple Volume to start creating a partition in Vista, a wizard will begin. Click Next, and then choose the amount of size you will want to create the partition for, in megabytes. Click Next again. You can create a different letter name for the drive, or use what is provided to you by default.
You will then be prompted if you want to format the drive. If you don’t want to format it, choose Do Not Format This Volume. Formatting does take some time, as it will clear out any data on that partition. Click Next to review your choices, then finish the wizard.


