If you find your keyboard is sluggish, or you are having problems with letters appearing more than once as you type, it may be because of dirt. A build-up of dust, food crumbs and drops of spilt drinks can affect your keyboard’s performance. We explain how to clean your keyboard simply and safely.
Cleaning your keyboard
The easiest method of cleaning a keyboard, which can be surprisingly effective, is to unplug it, turn it upside down and shake it vigorously (though not so much that you drop it!) You’ll be amazed how many food crumbs and other pieces of dirt and dust fall out. Ideally you should do this over a bin, but often the keyboard is too wide to be sure all the dirt falls into the bin. If this may be a problem, try doing it over a sink or sheet of newspaper.
For a more effective ‘dusting’, you can spray between the keys with a can of compressed air, which you should be able to find at most computer or electronic specialist shops. Remember that this will only loosen stubborn crumbs – you’ll still need to shake the dust and dirt free.
This type of cleaning won’t get rid of dirt that’s become stuck to the inside of your keyboard; for example, where you’ve spilt drops of sticky liquid (particularly sugary coffee). In this case you’ll need to reach in between each key with a cotton bud (Q-Tip) that’s been dipped in a suitable cleaning substance. The best is isopropyl alcohol, which you’ll usually found sold as rubbing alcohol. It’s a relatively safe substance, but be extra-careful to keep it away from flames (such as a lit cigarette), and make sure to wash your hands thoroughly afterward.
In some circumstances, this sticky dirt can build-up so much that you can’t reach it with a cotton bud. In this case you’ll need to remove the keys. You can do this with pretty much any object that’s thin enough to act as a lever, but don’t use a knife or scissors as this can be dangerous. Instead try a flat-head screwdriver or, better, a sturdy pair of tweezers. You’ll need to apply a gentle force to pop the key out of place without breaking anything.
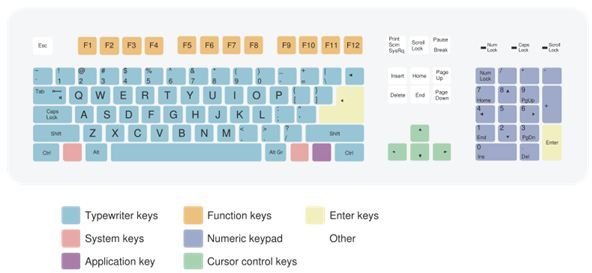
Technically you can remove any key, but any unusually shaped one such as the Enter key or space bar can be difficult to get back into place, so it may not be worth the effort. Once you’ve taken off all the keys you are removing, you need to remove any dust from the keyboard (either with a duster or compressed air), then wipe the surface with a cloth lightly soaked in isopropyl alcohol. For a thorough job wipe each key as well. When you come to replace the keys, be sure to put them back in the right place! (There’s a diagram at the end of this article, courtesy of Wikimedia Commons.) Putting the key back requires a firm, but not hard, amount of force.
If cleaning a keyboard doesn’t improve its performance, or you find you have to clean it so often it becomes overly time-consuming, you may find it makes more sense to simply buy a new one, especially given entry models can cost as little as $20. A new purchase is also a good chance to get a better quality keyboard (particularly if yours came as part of a complete PC package) or one with extra features such as special keys for controlling media players, a cordless facility, or even a built-in handset for Internet phone services such as Skype.
Related reading
>» Keyboard Tips & Tricks for Windows
>» This Micro Innovations Keyboard is a Piece of Junk
>» Razer Gaming Keyboard Review: Razer Tarantula


