How to Use Google App Inventor
You’ve been sat playing with your Android, haven’t you, wondering just how easy it is to get started developing apps? Perhaps you’ve got a really good idea for an app, or perhaps you simply want to make your phone do something cool.
With App Inventor you can create a basic app on your computer and save it to your phone, where you can then use it to perform whichever task you had in mind. While it isn’t possible to save your creation for publishing on the Android Market, the App Inventor acts as a great way of understanding the basic mechanics of creating an app.
Formerly known as Google App Inventor, the code for the tool is set to be declared open source, and is now being overseen by MIT Center for Mobile Learning. This will ensure the future of the App Inventor software.
So How Does App Inventor Work?
In order to create your app, you need to be familiar with using your mouse and keyboard – it’s that simple!
If you’ve managed to open this web page, then the chances are that you will be able to create something with App Inventor. Genuinely, it is a case of point, click, drag and type.
Additionally, functions on your phone such as the buttons and your touch screen can be configured with particular commands. This might enable you to assign a particular background color to a particular gesture, for instance.
Basically, App Inventor provides all of the tools you need to quickly build and play with apps on your Google Android phone.
Downloading and Installing App Inventor
In order to use the App Inventor you will need to download it to your computer. There are some minimum system requirements that you need to be aware of. Microsoft Windows, Apple Macintosh and Linux/GNU operating systems can be used, although note that older Apples using PowerPC processors cannot run the tool. As long as your computer is running Windows XP, Windows Vista, Windows 7, Mac OS X 10.5 or later or a Linux Ubuntu 8 or later or Debian 5 or a later version, then you should be fine to install App Inventor.
You will also need to make sure that your browser is up to date, so make sure you have Mozilla Firefox 3.6, Apple Safari 5.0, Google Chrome 4.0 or Microsoft Internet Explorer 7 or later versions installed.
Finally, ensure that the Java is installed on your computer. Head to check https://www.java.com/en/download/testjava.jsp and if the result is negative follow the instructions there to install the most up-to-date version.
To install on Windows, visit https://dl.google.com/dl/appinventor/installers/windows/appinventor_setup_installer_v_1_2.exe, and once the file is downloaded run it to begin installation. Note that you should not change the installation directory.
Mac users should download the file from https://dl.google.com/appinventor/installers/mac/AppInventor_Setup_v_1.1.dmg. Once the download has completed, double click the AppInventorSetup.pkg file to begin installation and follow the instructions.
For installing App Inventor on Linux Debian distros, head to https://dl.google.com/dl/appinventor/installers/linux/appinventor-setup_1.1_all.deb and use your usual package installer to install. The software will be installed in /usr/google/appinventor-setup.
Note that you will need to connect your Android phone to your computer in order to use App Inventor successfully. Depending on your phone and which version of App Inventor you are using, this may require some additional research on your part.
Familiarise Yourself with App Inventor
When the software is installed, don’t head to the Start button or look for an icon on your computer to launch it. Instead, visit https://appinventor.mit.edu/explore/setup-mit-app-inventor.html to get started.
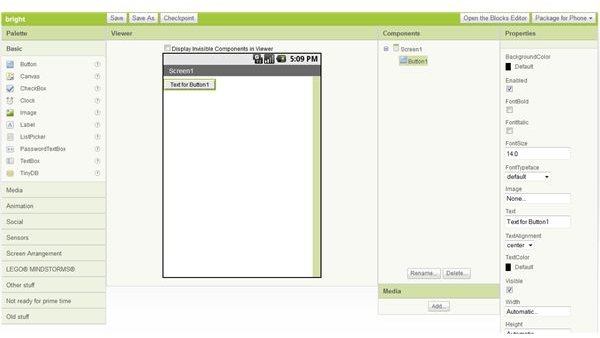
To begin, click New, assign a name to your project and click OK. You will then be presented with a preview of an Android phone, along with a selection of tools on the left hand side. These might be Basic things such as buttons and images or more complicated aspects of an Android device such as the Sensors or Social aspects like the contacts screen.
All of these elements can be dragged to the Viewer section where the app is previewed, while on the right-hand side you will find the properties for the item. For instance, you might change the label of a button by updating the Text field.
How to Build Functions
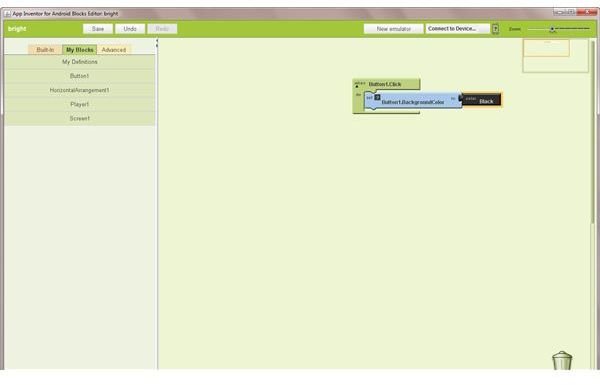
Of course there is more to App Inventor than dropping buttons onto a square. Using the Blocks Editor tool you can determine what actions occur when an element is launched or interacted with (note that the Blocks Editor requires the Java component installed earlier, and depending on your computer platform you may see several warning boxes concerning this. It is quite safe to run, however).
For instance, you will see a list of block types in the editor, listed on the left. These will be Built-In blocks, those which you have already added to the project (labeled My Blocks) and Advanced. We’ll stick with My Blocks, which when opened will display a list of those items added to your project. When clicked, each item will display a list of blocks, actions that can be added to the editor to acquire a particular reaction.
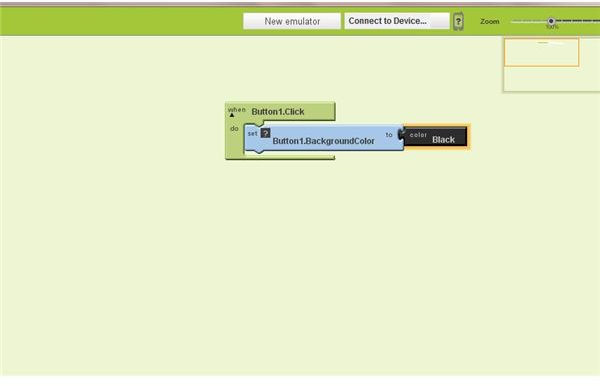
A good example is the button. If we select the button added to the project in the My Blocks menu, a list of options for this item is displayed. We might decide that we want the button to change the color of the background – to do this, select the Button1.Click block, drag it to the main pane of the editor, and then drag the set Button1.BackgroundColor to block into the Button1Click block, as pictured.
To select a color that should be applied, simply left click next to the block, select Colors and click one to add it to the block process.
The Building Blocks of App Development
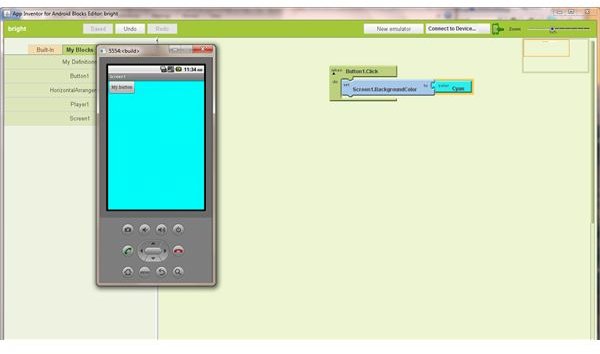
Once you are happy with the first few parts of the app project, you should Save it and then view it in action, either in an emulator or on your phone. If you don’t have an Android phone connected, use the New Emulator button. This will take a few moments to run, but when it is active, you can click the Connect to Device button to send your app to the emulator. You can then try the app out, using your mouse to click if necessary.
While converting an App Inventor project into an app that can be sold on the Market isn’t possible without a lot of hard work, there is plenty to be achieved with this software, not least an understanding of how apps are programmed.
Although App Inventor offers a simplistic view of the process, don’t let anyone tell you that this tool is worthless. Many programmers of mobile and desktop apps use construction kits and simplified interfaces to aid with project development, and App Inventor is no different.
With this software you can take the first steps into the world of app development, so enjoy it!
References
- Screenshots provided by author.