WordPress Design Tips: Editing Existing Templates
Still Searching for the Perfect Design?
Self-hosted WordPress blogs make it very easy for you to find and install new templates – but do you ever really get what you’re looking for? While some templates might offer some configuration options (perhaps the inclusion of different color themes), usually the only way to customize them is via the sidebar and by tweaking the CSS.
But what if you’re looking for something more? What if you have found a theme that looks suitable but perhaps misses some particularly useful key elements? Furthermore, what if you wanted to combine two different templates to create a third?
While this last suggestion might seem pretty daunting (not to mention tricky), it is possible to introduce elements from one blog template into another by taking advantage of plugins and code that are featured in one template but not the other.
These WordPress template editing tips should help you out and enable you to get the blog layout and design that you have been dreaming about. We’ll be looking at a single of example, one of adjusting the layout of a custom template by introducing some of the properties of a popular free WordPress template.
Before You Start – Have a Good Design!
If you have any ambitions of success for your blog, there’s no point just using the same WordPress themes that others are using. This means that you will need to establish a unique design for your blog, one that can be translated onto an existing template.
The advantage of using an existing template is that a lot of things such as web standards and solid page structure have been put into place, making it easier for the blog to be viewed in multiple browsers.
A key strength of a good design is its suitability across multiple platforms; another is in its simplicity. You shouldn’t be looking to implement a needlessly complicated design onto an existing template, only one that shares some similarities. For instance your design might have a banner section that displays images from several different articles; an existing magazine-style theme would be a suitable starting point. If your theme is truly unique then you should be starting from scratch with a brand new theme rather than editing an existing one.
Choosing a Suitable Template to Edit
When you have established the new design of your blog, it is time to find a suitable WordPress theme that you can adapt to suit it.
The principle is simple: match your page layout to an existing template, install the theme to your website (this is best achieved via the Appearance > Themes > Install Themes page in the WordPress dashboard) and then begin editing the theme to suit your needs, adjusting the page templates and CSS documents so that you eventually end up with a design that matches the one you want.
Note that you may need to be careful with your choice of WordPress theme; while some offer basic customization options, others feature licenses that prevent them from being edited.
Using the steps shown in the article How to Install WordPress on Your PC, you should create a local copy of your website and install the WordPress template that you’re planning on using. Paste in a few test articles while you’re at it and then you should be able to get to work on your template redesign project!
Work on One File at a Time
When the time has come to start editing the theme to match your template, you should begin by making a copy of the design on a piece of paper or on your computer so that you can refer back to it at your leisure.
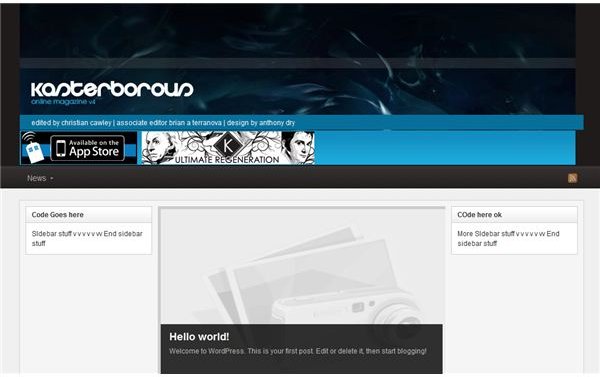
The task of editing an existing theme should begin in the page header. This is the section of your blog that by default appears on every single page (along with the footer) and is a very good place to start – not least because this is where you will want to claim some early success with the project by stamping your identity on the blog with the logo.
You might do this as follows:


edited by christian cawley | associate editor brian a terranova | design by anthony dry
