A Zune Hack To Work With Mac Effectively
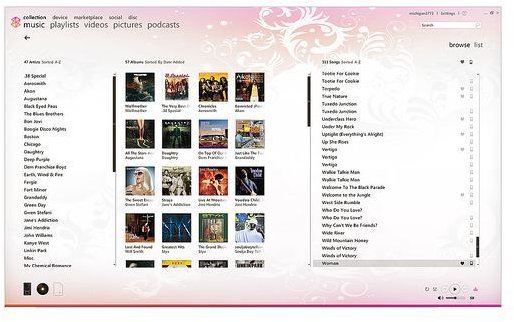
Zune on Mac
A Zune hack to work with Mac is necessary because ever since the Zune’s release, Mac users have been left out in the cold with the Zune software being unsupported on OS X. Though there have been several attempts to rectify the situation, none have actually given you the ability to use it with Mac or let you play with Zune and transfer files using the Zune software itself; primarily because Microsoft hasn’t bothered to do with Zune what Apple has done with iTunes (bringing it over to Windows). Here, we take a look at three possible ways to use your Zune with your Mac computer.
XNJB
Zune makes use of MTP. “libmtp” is an open-source library that implements Microsoft’s Media Transfer Protocol (MTP) in a way suitable for Mac OS X and Linux. XNJB is a Cocoa GUI for using OS X with players that employ MTP. You can find it here: XNJB
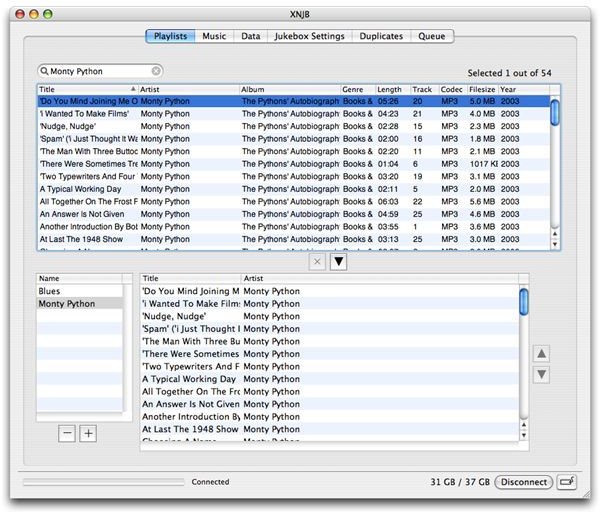
Downloading and installing is the same and it’s simple enough. However, due to certain choices Microsoft made, you can only see a list of files that are on the Zune when you use XNJB to access it on a Mac. Sending or receiving data from the Zune is not possible.
Bootcamp
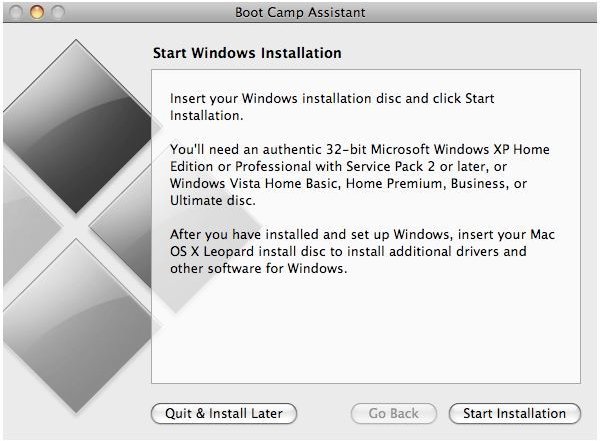
Bootcamp is an Apple utility that helps you run Windows on a Mac. This is not a Virtual machine, but it’s a full on multi-boot installation of Windows that you’ll be using. You will require a legally obtained Windows disc to be able to use this method.
1. Make sure you’re logged in on the admin account. Go to Applications -> utilities -> Boot Camp Assistant.
2. Now allocate space for the Windows Partition when Boot Camp Assistant asks you to and click Partition.
3. Hit “Start the Windows Installer” and click Continue.
4. Insert your Windows installation disc and click “Start installation”.
5. Assuming you’re going to install Windows 7, choose “Custom (advanced)” and not “Upgrade”.
6. Choose the disc labelled Bootcamp and format it. The rest of the steps are very simple and you’ll soon have installed Windows 7.
7. Once inside Windows 7, eject your install disc and pop in the OS X install DVD. Now run through the Bootcamp installer setup and install the Apple Software update for Windows.
8. Once this is done, your Windows OS reboots and you can plug in your Zune player via USB. Install the Zune Media manager software from the CD and you can proceed with syncing the Zune to your computer.
For an in-depth setup guide, check these links - Apple’s Official Bootcamp Guide and this article on Brighthub.
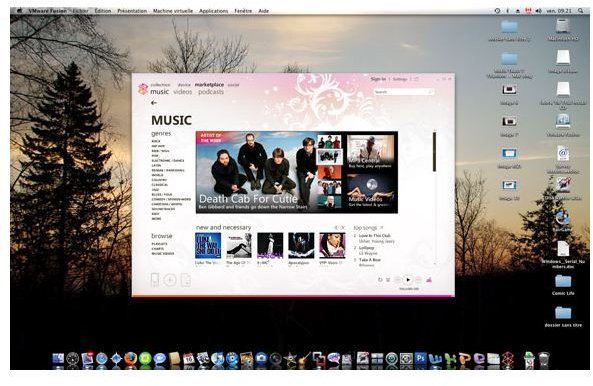
A Virtual Machine
There are of course those of us who prefer to stay within Mac OS X while we access our Zune devices and have seamless dock integration. For such people, the only option is to use VMware Fusion 3 or Parallels and run Windows inside a virtual machine. Here’s an in-depth guide.
1. Purchase and install VMware Fusion or Parallels on your Mac OS X.
2. Now, start VMware Fusion and choose “Install Windows or another operating system in a new virtual machine option”.
3. Insert your Windows Installation disc in the optical drive. The installation process from here on is simplified by VMware’s prompts.
4. Once you’re done installing, start the virtual machine from within VMware and install the software that came with your Zune.
5. You can now begin using Zune software to sync your Zune player and transfer files.
For a free alternative, check out VirtualBox (another Virtual Machine tool).