Easy Way To Set Up Earthmate PN-20 GPS: Activate The Device, Then Plan a Route
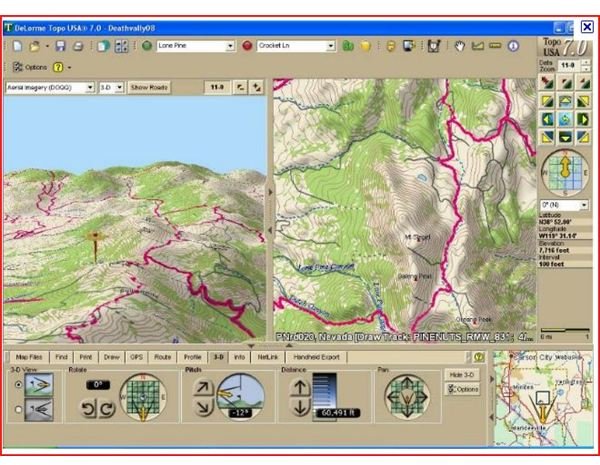
Setting up Topo USA
Here’s the easy way to set up Earthmate PN-20 GPS straight out of the box so you can plan your first route in the great outdoors and let the PN-20 be your virtual guide once you get there. First off, get your SD card and batteries ready. Then unscrew the D rings on the back to remove the battery cover. Pull the ribbon under the cover to the side, push the latch on the bottom, and insert the SD card with the label side up. Then place the batteries in according to the diagram. Replace and tighten the cover.
The TOPO USA software which comes out of the box with this DeLorme offering is where you do the setting up and transferring of data from your computer to the unit via the USB cable. You have the option of transferring the data you want directly into the 75 MB of internal memory or onto an SD card which stores 2 GB. Having an SD card enhances the unit’s performance when using large maps which is why these instructions include installing one in the process. Having the Quick Start guide, which comes with the box handy is helpful throughout the process. Incidentally, to find out more details about the differences in capabilities, features, and pricing within the PN Series, read this article on the Top Three DeLorme GPS Model Reviews.
Place the Topo USA Install CD in your computer. The installation wizard walks you through the process and make sure you complete registration information about your unit because that info is necessary for acquiring data including aerial imagery. Once the installation is complete, replace the Install DVD with the Data DVD which you’ll need for working with Topo USA. Aerial Data Packets (ADPs) can be downloaded online and usually you get a free download certificate out of the box depending upon what packet you choose.
Activate the PN-20
Now it’s time to activate the PN-20 itself which needs to work in conjunction with the Topo USA software on your computer initially. Connect the USB cord to the device and the computer. Press and hold the PN-20 power button until the Welcome Screen appears on the device display. Click the Exchange button in the tool box of Topo USA. When a dialogue box appears on your computer with two sets of menus (left menu is for Topo USA, right menu for PN-20 data) your device is activated. Close the box and now we’re ready to plan your first outing; a hike sounds good. Just so you know, once you’ve followed the easy way to set up your Earthmate PN-20 GPS here, read how the device’s buttons and menus work by reading Tips on How to Use EarthMate GPS Devices.
Find the trail you want to hike on Topo USA, then the click Find tab, and type in location in the Search For box. Once it finds it, double click on it and the map automatically re-centers on that location. With the PN-20, you get to choose from any of the following viewing options; High-Resolution Aerial Photography, USGS Topo maps, DeLorme Topo maps, or Satellite imagery. Click the Net Link tab, then Data Sets. Use the Selection tool to select the area you’d like to download (the larger the areal you select, the longer it takes to download). Click Add to List, then name the packet, then hit Okay. You’ll use the certificate we talked about above or you’ll have to pay for the Aerial Imagery.
Now it’s time for adding waypoints to mark routes. Click the Draw Tab, click the Waypoint symbol and the PN-20 from Symbols list. The trail head can be marked with the Parking Lot symbol you find on the Symbols list. Enter the name for the trailhead under that symbol .You then have the options to choose the waypoint symbol for where this trail goes such as the Mountain Top symbol. Name the destination waypoint, then right click on Parking Lot symbol and select Create Route, Set As Start, then right click the Mountain Top symbol Set As Finish. Name the route by typing it into the Name Field. Now you’re all set to go. DeLorme also provides helpful YouTube videos which show you how to upload imagery to the PN Series along with other tutorial to help you get started and acquainted. Good luck and happy trails.