How To Remove IE 8: An Uninstall Guide for XP, Vista, Windows 7, and Windows Server Editions
Before You Begin…
Removing IE 8 is very easy. But before you could do that, you must have administrative rights on your Windows account. If you installed Internet Explorer 8 on Windows XP, before you installed Service Pack 3, you will not be able to uninstall IE 8. In this case, you must remove Service Pack 3 before you can uninstall IE8. Also, Windows 7 users wanting to remove IE 8 should note that the latest version of IE is a component of Windows 7. That is, if you remove it from Windows 7, you’ll have to download and install another internet browser to use the internet, so do that first.
Removing IE 8 From Windows 7
Technically, you can’t uninstall IE 8 from Windows 7, but you can bury it for a while. Just follow these simple steps:
1. Close all the open programs
2. Go the Windows Control Panel
3. Click on Uninstall a program
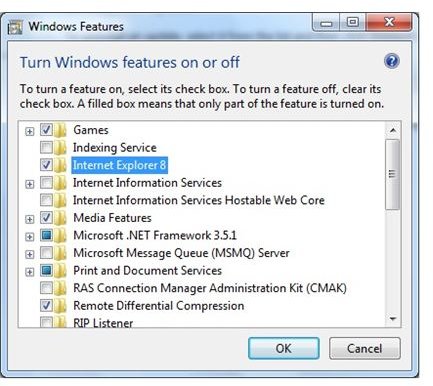
4. In the new window that opens, click on Turn Windows features on or off. A new window will open, showing the currently installed Windows features.
5. Deselect the checkbox beside Internet Explorer 8
6. You will get a warning alert in a new window, click on Yes
7. Click Ok on the previous window
8. You’re done!
Note: As IE 8 is part of Windows 7, it will not be permanently removed from Windows 7. If you ever want to bring it back after completing the instructions above , simply follow the steps from 1 to 4 and check the box beside Internet Explorer 8. IE 8 will now immediately become available again for your use.
Uninstalling IE 8 From Vista and Windows Server 2008
To remove IE 8 from Windows Server 2008 or Windows Vista, here are the steps you will need to follow:
1. Close all the open programs
2. Go to the Windows Control Panel.
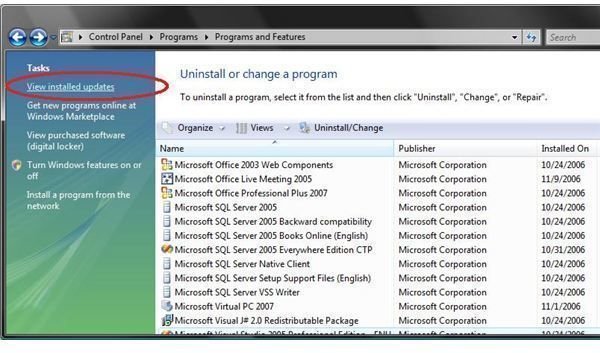
3. Click on Uninstall a Program
4. Click on View installed updates
5. Double click on Windows Internet Explorer 8
6. In the new window that opens, click on Yes
If you’re asked an administrative password, enter the password, and click continue.
7. Follow the simple instructions on the screen to remove IE8
8. Restart the computer.
Uninstalling IE 8 From XP and Windows Server 2003
To remove IE 8 from Windows Server 2003 or Windows XP, proceed as below:
1. Close all the open programs
2. Go to the Windows Control Panel
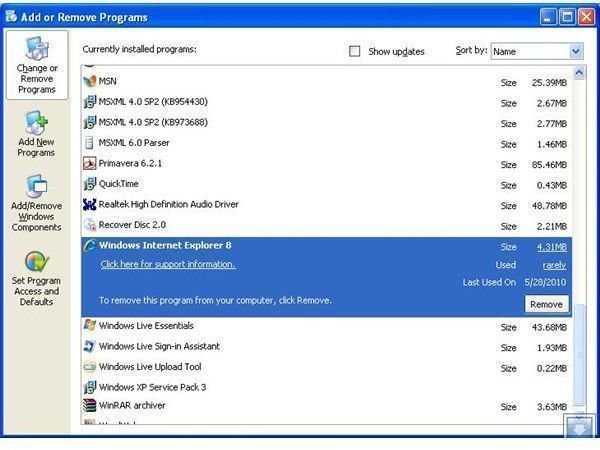
3. Double-click on Add or Remove Programs
4. Select Windows Internet Explorer 8 from the list, then click on Remove
5. Follow the onscreen instructions to complete the uninstall process
6. Once you are done with the above steps, reboot your computer to complete the uninstall process
7. You’re done!
Finding a New Browser
Now that you have successfully removed Internet Explorer 8, why not check out Bright Hub’s guide to the best alternative browsers for your PC.