Drive Striping in Windows 7 [Windows RAID] – Introduction and Implementation
![Drive Striping in Windows 7 [Windows RAID] – Introduction and Implementation](https://img.bhs4.com/9F/B/9FBCC2ED1778613388541D4A83CFF3717308E68F_large.jpg)
Introduction
Previously we have talked about the various RAID (Redundant Array of Independent Disks) configurations. Microsoft has a different jargon for these configurations:
- RAID 0: Striped disks
- RAID 1: Mirrored disks
- RAID 5: Striped disks with parity
In this article we will talk about the RAID 0 (drive striping) configuration in Windows 7.
Why Use Drive Striping (RAID 0)?
A good question to ask would be the reason to use RAID 0. RAID 0 is used where hard disk read and write speeds become a serious bottleneck in the overall performance of the computer – be it a personal computer or a server. Since the data is spread across multiple disks in a RAID 0 configuration, the theoretical speed of the disk system is calculated by the number of disks in the array: if you have 3 disks in a RAID 0 configuration, the theoretical speed of this array is 3 times the speed of one disk in the array. The disk size will be equal to the number of disks used in the array times the capacity of the smallest disk.
If you are a serious gamer, video editor, CAD/CAM modeler or a user that needs high hard disk read/write speeds, then RAID 0 can be a good option. However, do not forget that if one disk fails in the RAID array, then the data stored in the whole array will be lost; there is no redundancy!
Implementing Drive Striping
For the example that I will use in the article, I had set up a system as follows:
- 30 GB system disk
- Two additional disks, each with 10 GB capacity.
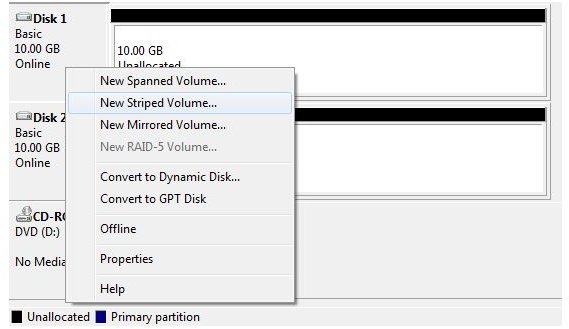
After you install the disks that you will use in the Windows RAID array and boot your computer to Windows 7, you will see that Windows will not display any information about the disks. You have to manage them yourself to achieve drive striping. To access Disk Management console, type diskmgmt.msc in Windows’s search bar and hit Enter. You will be greeted with a warning that tells you to initialize the disks before Disk Manager can access them. I have selected both disks and chosen MBR partitioning style (Step 1). If your disks are smaller than 2 Terabytes, then choosing MBR partitioning is the safe option.
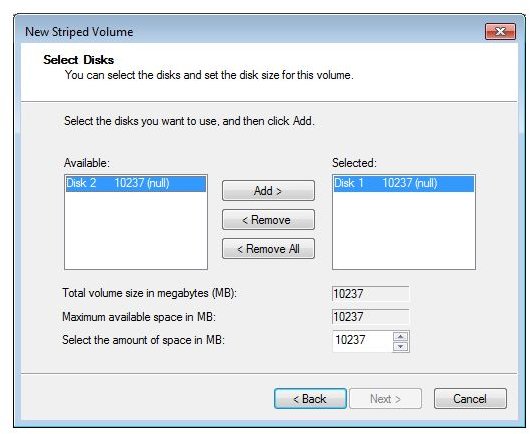
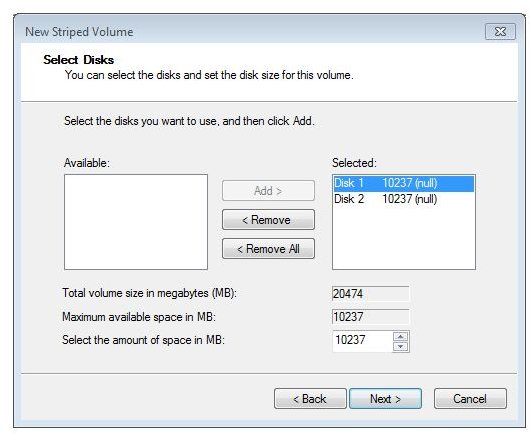
The two disks are online, meaning that they are accessible without problems, but they are not allocated. To utilize the disks in my striped volume configuration (Windows RAID configuration), I right clicked on one of the disks and selected “New Striped Volume” (Step 2). The wizard opened and asked me which drives I will use in the array (Step 3). I selected the two 10 GB disks (Step 4) and clicked next.
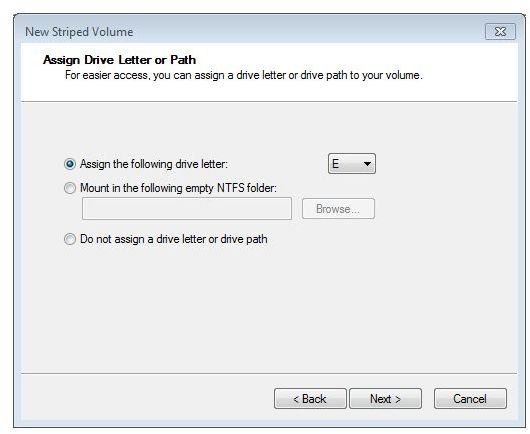
Implementing Drive Striping with Disk Management Console (Steps 1 to 4)
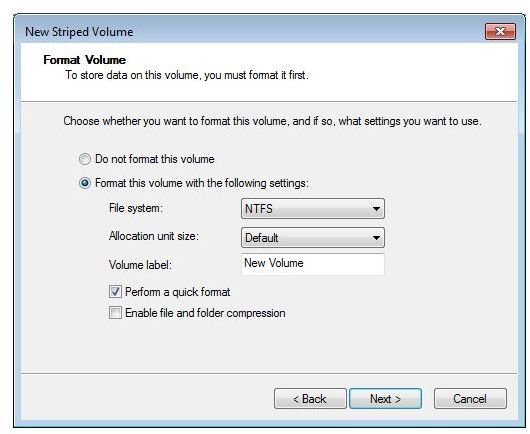
Then I was prompted to choose the partition settings, allocation unit size, volume label, quick/normal formatting and whether to enable file and folder compression (the essentials to any disk configuration, Windows RAID or not.) To choose which allocation unit size to use for your needs, consider your use of the striped volume: will you be using small files (such as allocating your disk to store temporary Internet files, as done in the proxy servers) or will you be using large files (such as video files). For small files, use small unit size (e.g. 8 KB) and for large files use large unit size (e.g. 64 KB). I left the default option unchanged and named the array creatively as “Striped Volume” (Step 5).
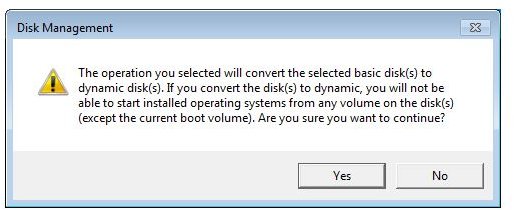
The wizard warns me that I am about to convert basic disks to dynamic disks (the image on the right), and I will not be able to install an operating system from any volume on the disk except the current boot volume. Aha! Let’s go back to Step 2. If you have noticed, the wizard did not list my current C: drive in the disk choosing window. This is because I could not change the running basic disk with primary partition to a dynamic disk with striped volume. If you are using software RAID, like the one we are doing, you cannot install the operating system. Or, you will have to make RAID configurations before installing the operating system (creating RAID systems before operating system installation is far beyond the purpose of this article, therefore I am skipping the subject). I click OK to continue.
When the wizard finishes, the Disk Management console shows us that the disks are online, utilized, healthy, formatted with NT File system (NTFS) and they are dynamic volumes.
Implementing Drive Striping with Disk Management Console - Steps 5 to 7

Conclusion
The striped disk configuration (Windows RAID) is easy with the Disk Management console in Windows 7. Before using your disks in a striped configuration, make sure that the data stored is not too valuable for you and speed is more important than redundancy. To emphasize again, if you lose one disk in the array, you will lose the whole set of data in the configuration.
Article and screenshots: Author’s own