Drive Letters Disappeared Windows Vista - Windows Vista Troubleshooting When Drives Disappear
Drive Letters Disappeared – Possible Reasons
The most common reason for the drives to disappear is that you installed Windows Vista from Windows XP instead of clean installing it straight from the DVD. The problems of drive letters disappearing also appears when you install the Service Packs for Windows Vista or any other automatic Windows updates for Vista. Other reasons for drive letters to disappear include changes in any CD- or DVD-based programs or the uninstallation of MS Digital Imaging Software.
Whatever the reason is, the above actions affect two of the registry keys related to the Windows Vista registry and damage them. Once they are fixed, the problem is solved. Let us check out the Windows Vista troubleshooting steps listed in the next section.
Troubleshooting Windows Vista Registry for Missing Drives
Important: The following Windows troubleshooting steps involve making changes to the Windows Vista system registry. It is highly recommended that you make a backup copy of the registry keys to be modified and/or create a system restore point before you proceed with this step. You can create a system restore point from the option available under the System Tools Menu under Accessories, which lies under the All Programs Menu when you click the Start Button. The restore point helps in case you need to restore the system after making changes to the registry. Backing up the registry key before making changes to the key is mentioned in the following paragraphs.
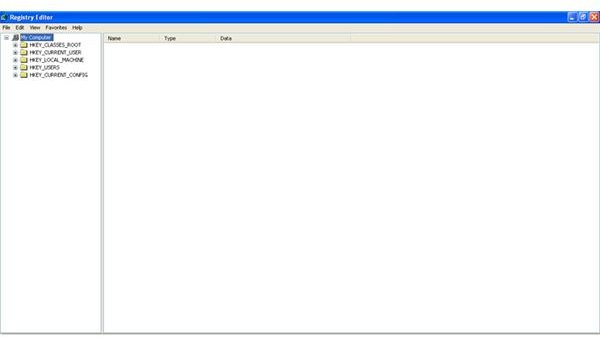
You need to log in as an administrator before you can make any changes to the registry. The registry can be accessed from the Run Menu. Click the Start button and then All Programs. Navigate to the Accessories menu, and click on the Run option. In the Run Dialog box, type “Regedit” without quotes. This will present you with the Windows Registry Editor (see Fig 1 in section 4). Here you can make changes to the keys once you find them.
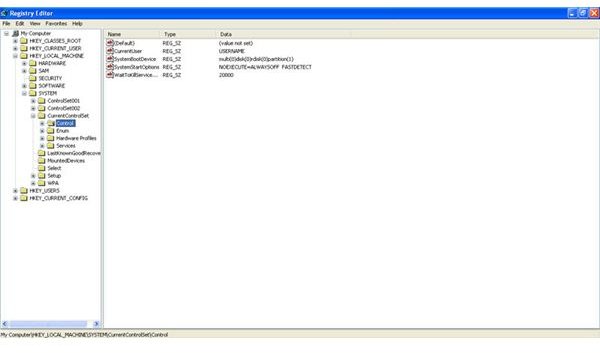
To locate the key, click on the plus sign next to the HKEY_LOCAL_MACHINE to expand it. Once the key is expanded, you can see a number of sub-keys. Each sub-key has further sub-keys and sub-sub-keys. See Fig 2 in section 4 to get an idea on expanding the registry keys. Look for the key named SYSTEM, and click the plus sign against it to expand it. Similarly, expand the CurrentControlSet, Control, and then Class sub-keys. Under the Class sub-key look for the key {4D36E965-E325-11CE-BFC1-08002BE10318}.
TIP: You can use the Find option (CTRL + F) under the Edit Menu to locate the key. Once you are presented with the Find Dialog box, just copy and paste the last sub-key (the one in braces) and hit enter. This may take some time as the Find process has to scan the huge registry database before it locates the key for you.
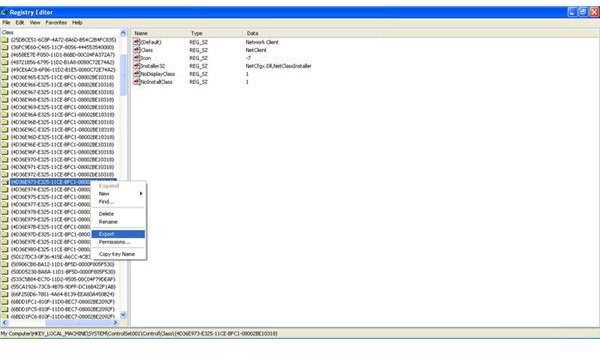
BACKUP THE KEY: Once you find the key, the foremost step is to back up the key so that you can restore it in case anything goes wrong. To back up the key, select the key in the left pane, right-click on the key, and select Export in the context menu (see Fig 3 in section 4). Select a destination and name for the backup. To restore the key, all you have to do is to double click the backup key. It will automatically be added again to the registry. It is better to run a Registry Cleaner after restoring the key to avoid duplicate keys in the system registry.
As you have found the key now, you need to make some adjustments in the right pane of the Windows Vista registry editor. Look for the entries named UpperFilters and LowerFilters. You may also see an entry named UpperFilters.bak. This has nothing to do with the Windows Vista troubleshooting. Delete the entries named UpperFilters and LowerFilters. To delete the entries, right click on the entries, and then select Delete option. Once deleted, close the Windows Vista registry editor window, and restart the computer.
Once you get to the desktop upon booting, open My Computer and see if the drive letter is displayed. If the drive letter is there, your Windows Vista troubleshooting effort was successful. In case you cannot use the drive properly, you may need to reinstall some programs that use the drive. Examples of such software are Roxio, iTunes, and Nero. If you still cannot use the drive, go to section 3 for further assistance.
If the drive letter is still not appearing in the My Computer, we may have to check the drivers for the external storage devices. Let us follow these Windows Vista troubleshooting steps in the next page.
Reinstalling Drivers to Solve the Problem of Drive Letters Disappearing
Note: As explained in the first section, as we are again playing with the system configuration (this time its computer hardware), I recommend creating a system restore point so that you can restore the system settings in case you feel that your computer is experiencing more problems after this step.
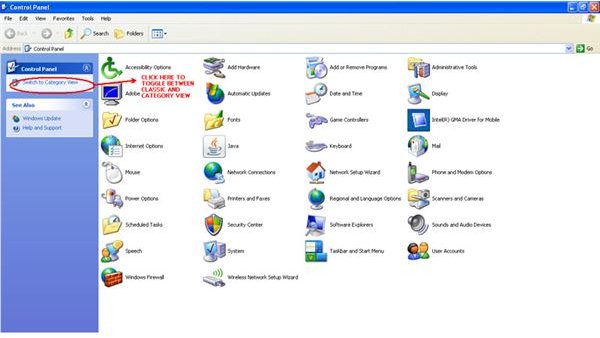
In this Windows troubleshooting step for drive letters disappearing in Vista, we will reinstall all the drivers related to the DVD/CD drive on the computer. To do this, open the Control Panel, and click on the System icon. In the System Properties Dialog, click Device Manager. If the Control Panel is not in the Classic View, select the Classic View from the left pane of the Control Panel window (see Fig 4 in the section 4).
TIP: You can also press the Break key while holding down the Windows key to get to the System Properties Dialog Box.
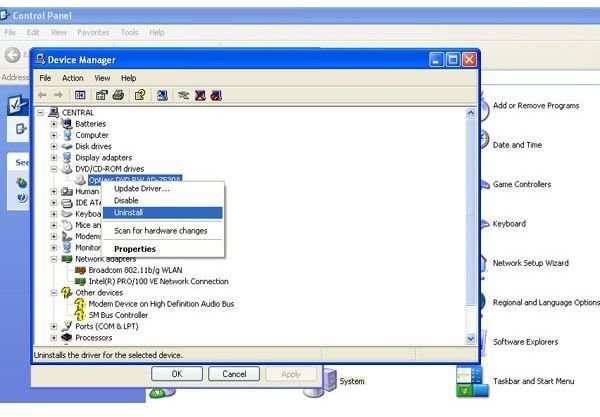
Once you are in the Device Manager, click the plus sign against DVD/CD ROM drives to expand it. Right click on the entries under it, and select uninstall (see Fig 5 in Section 4) to remove each driver. You will be prompted with a message that asks if you really want to remove the driver. Select Yes. After removing the entries, reboot the computer. Once the computer reboots, Windows Vista automatically detects the DVD/CD drive drivers and installs them.
Open My Computer to see if the drive letter is there. If it is there, you need to check if the device is working properly. If it is, then your Windows Vista troubleshooting efforts are successful. If the drive letters are still not visible, you need more help. Check out the next section to get more help on the issue of drive letters disappearing in Windows Vista.
Getting More Help for Windows Vista Troubleshooting
Even after trying both of the troubleshooting steps, when you open the My Computer and see that the drive letter or drive icon is missing, you will need help from expert technicians who are well-trained on Windows Vista. While you may find local expert technicians to help you get your drive letters back to My Computer, if you are still in the warranty period for Windows Vista Support, you should get help from the online support system of Micrsoft Windows.
If you are unable to see the drives in My Computer or Windows Explorer, you may contact a Microsoft expert technician specially trained for Windows Vista troubleshooting. He can access your computer remotely and make the necessary changes or instruct you to make changes, depending upon the complexity of the problem.
Even in the case wherein the drive letter appears after the above Windows troubleshooting steps but does not work as expected, you need to contact the Microsoft technical experts. They will help in identifying the programs that are creating the problems with the drives and will assist you in reinstallation of the programs as well as guide you to any patches or fixes available from the vendor of those programs.
Images
Sources
- Images from the Registry Editor and Device Manager of Windows