Top Tips to Secure Windows XP Pro
First Step - Use Windows Updates
Windows updates are not only good for making the operating system more stable, but also for making it more secure. An important function of updates is installing extra security features against the latest threats and patches to increase protection. Windows updates, usually set to the time of 3 am by default, can be done automatically in the background while you continue working.
Microsoft makes updates freely available for registered systems. Microsoft also provides an extremely useful utility available online that scans your system for potential vulnerabilities and recommends Microsoft Security Essentials.
Second Step - Rename Default Accounts
Not many people are aware of this one. By default, Windows creates two user accounts: an Administrator and a Guest account. Since these two accounts are always present and are always named like this, it makes it a little easier for anyone trying to get into the system. Fortunately, there is a simple solution for this.
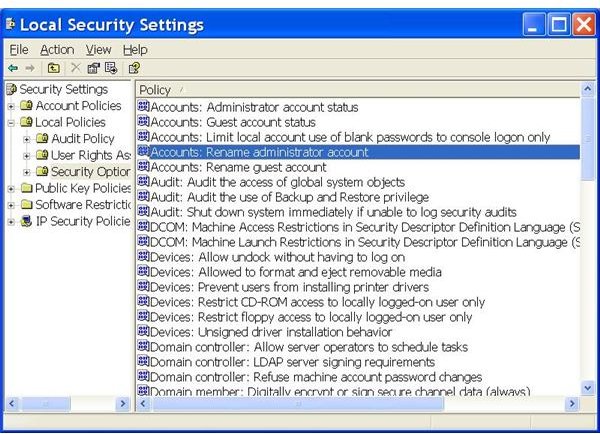
Press the Windows key + R to bring up the Run window. Type in “secpol.msc” and then click OK. A window will open up. Locate “Local Policies” and expand it, then select “Security Options.”
At the right-side of the dialog, look for “Accounts: Rename administrator (or guest) account.” Double-click on these options then type in another name you like to use for these accounts. Click on “Apply" and then “OK.” You have just changed the account name!
Third Step - Constrain Network Connections
When Windows is installed, several protocols and services for network or Internet connection will also be installed by default. For many users, all of these are not required because they will never use them. These protocols and services can possibly make Windows vulnerable if used by an unauthorized user.
Note that if you have a home network and are using file or printer sharing, this step will not apply.
“File and Printer Sharing” and “NetBIOS,” in fact, are examples of such services and protocols. However, this problem can be resolved with easy steps, as follows:
-
Open Control Panel and then Network Connections. Right-click on the Internet connection you use and then select “Properties.”
-
Now select “File and Printer Sharing for Microsoft Networks” and click Uninstall. Similarly, uninstall “Client for Microsoft Networks.” These protocols are used for printer sharing over the network and for making a connection with another computer on your network, respectively.
-
Select Internet Protocol (TCP/IP) and click the Properties button then the Advanced button.
-
Now select the WINS tab and uncheck “Enable LMHOSTS Lookup” and also select “Disable NetBIOS over TCP/IP”.
Close all the windows and restart your PC.
Fourth Step - Physically Secure the PC
Often when it comes to security, we are often familiar with the security software and tools, but at the same time we are forgetful about some of the most convenient methods for protecting and securing our Windows computers.
Putting a lock on the operating system is a very good idea when you are going to be temporarily away from your system. This will make the computer inaccessible for anyone. It can be locked in an “as is” state without needing you to close your running programs.
To lock Windows XP, do it simply by either pressing Windows + L key simultaneously or by pressing CTRL+ALT+DEL together and then selecting “Lock Computer.” When you are ready to unlock it, press CTRL+ALT+DEL again and enter your login and password.
It is also possible to set Windows to lock automatically after a specific period of inactivity. To do this, Right-click on the desktop, select Properties, then the Screen Saver tab.
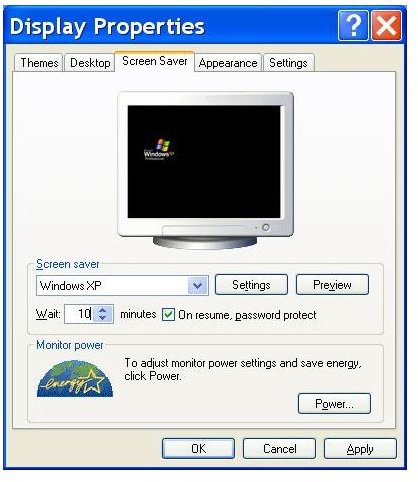
Now check the option ‘On resume, password protect’ and also set “Wait” time. When you are inactive next time, Windows will lock itself automatically.
Fifth Step - Restrict File Sharing
By default, Windows uses an advanced file sharing feature. There is another security feature that is safer for Windows XP and that is also recommended by Microsoft. To enable “Simple File Sharing,” open up the Control Panel and then double-click on “Folder options.” Select the View tab then scroll down to the end and check “Use simple file sharing (Recommended).. Finally, click “Apply” then “OK.”
Sixth Step - Configure Security Options
For each of the following option, right click on each then click Properties. Now from the options on screen, consider whether the service or setting is beneficial for your particular needs. If not, choose “Disable” for the options:
· Interactive logon: Do not require CTRL+ALT+DEL.
· Microsoft network client: Send unencrypted password to connect to third-party SMB servers.
· Network access: Allow anonymous SID/name translation.
· Network access: Let everyone permissions apply to anonymous users.
· Recovery console: Allow automatic administrative logon.
· Recovery console: Allow floppy copy and access to all drives and all folders.
Similarly, there are many options that can be Enabled to improve Windows Security. With each of these options, now choose “Enable” from the option’s properties:
· Devices: Restrict CD-ROM access to locally logged-on user only. Note that this can cause problems copying or installing applications from certain CDs, however, i have never encountered this problem.
· Devices: Restrict floppy access to locally logged-on user only.
· Interactive logon: Do not display last user name.
· Microsoft network client: Digitally sign communications (if server agrees).
· Network access: Do not allow anonymous enumeration of SAM accounts.
· Network access: Do not allow anonymous enumeration of SAM accounts and shares.
· Network security: Do not store LAN Manager hash value on next password change.
· System objects: Strengthen default permissions of internal system objects (e.g., Symbolic Links).
Finally, there is more you can do to strengthen your security by double-clicking on “Network access: Remotely accessible registry paths” option. This option defines which registry paths should be made accessible remotely by non-locally logged on Users. People using private systems or home based networks should delete all the paths listed there for further security improvement.