Tips for Making Outlook 2013 More User-Friendly
User Interface
One of the first comments I hear from people regarding Outlook 2013 is the bland monochromatic user interface. Everything seems to be awash in light grey and blue colors (Figure 1). To me (and others I’ve spoken to) it’s difficult to distinguish between read and unread messages.
The first thing I do when setting up Outlook 2013 is change the default view. My recommended settings may not be perfect for you, but once you know where to look you can play around with the settings until you are satisfied.
- Click on the View tab and then View Settings.
- Click Other Settings.
- Under the Grid Lines section, choose Solid.
- Choose your preferred Reading Pane style and click OK.
- Back at the Advanced View settings window, click Conditional Formatting.
- Check to see if you have a rule for Unread mail. If not, click Add.
- Give the rule a name and click Condition.
- Under the More Choices tab select “Only items that are: unread.” Click OK.
- Click Font and select Bold and your preferred color. You can also change the size to a larger font.
As you can see in Figure 2, it is much easier to quickly tell the difference between read and unread messages.
Organizing Mail
Outlook 2013 has some handy ways to organize your mail. These include categorization, search folders and rules. Using these three features allow you to automate your inbox to help keep unwanted messages away from your busy eyes.
Categories
Categories allow you to put colored flags on messages. You may want to categorize mail from specific people or specific topics. Categories are a nice visual indicator of the type of mail you have. To use a category right-click a message and click Categorize. Select a category. Note that you can customize the default categories by selecting the “All Categories” option from the categorize menu.
**
Rules
Outlook Rules look for messages meeting specific criteria and perform some action on them. For example, you can move all messages from a specific person to a specified folder. Or you could delete all messages from a mailing list you can’t get rid of.
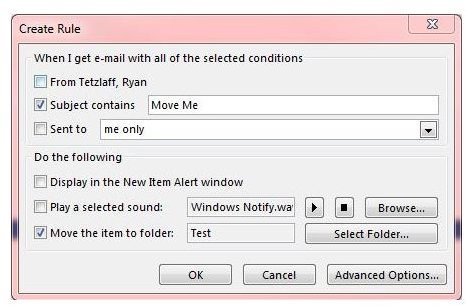
The easiest way to set up a rule is to right-click on a message meeting the criteria you wish to use. Select Create Rule from the list of options. Now you can specify the criteria that needs to be met along with the action. As you can see in Figure 3, I’ve specified when a subject line has “Move Me” in it, it will be moved to my Test folder. To see the full power of rules you can click on the Advanced options button.
Search Folders
While Rules interact with your mail and perform actions, Search folders are essentially filters that you apply to your mailbox. As an example, if you used categories within your mailbox, you can set up a search folder to find all categorized messages – no matter the folder – to give you an aggregate view.
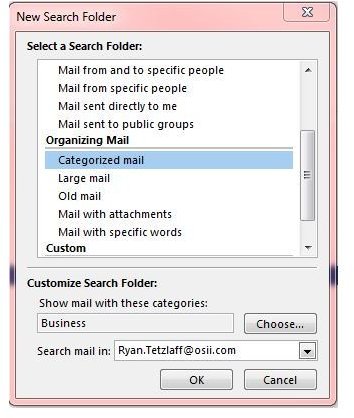
To create a search folder, right-click the Search Folders folder in your inbox. Select New Search Folder. Select the criteria you wish to use and click OK. As you can see in Figure 4 I’ve selected a category for my Search Folder. Now when I click on the search folder it will show me all messages in my mailbox that meet this criteria.
Contacts
Outlook 2013 makes it easier than ever to import and manage contacts. One new feature is the ability to import social network contacts. This allows you to have a single contact list with personal contacts along with social network contacts. The great thing about this is that pictures and status notes can automatically feed into your contact list from the social networks so you can keep up to date with your contacts’ statuses.
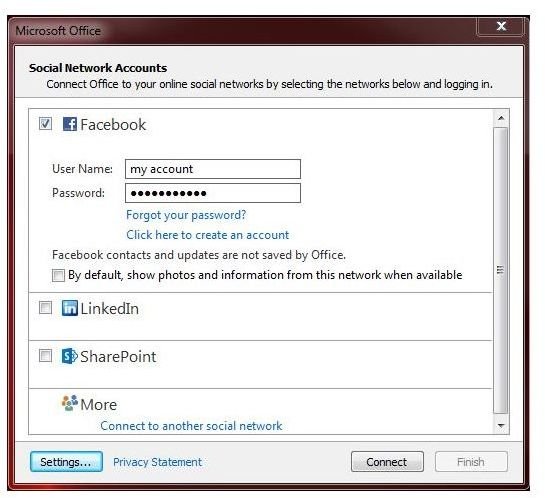
To set up social contacts, click the File menu. Click Account Settings and then Social Network Accounts. Expand the network you wish to set up and enter your username and password. Note that there is also a checkbox that will update your contacts with a “What’s new” section along with pictures (Figure 5). Now when you click the People tab in the bottom of Outlook you’ll see a new contact list for any networks you set up.
This article just scratches the surface of some of the big time savers in Outlook 2013 – I hope you found the article to be helpful. Be sure to leave a comment with your favorite Outlook tips below!