How To “REALLY” Hide Files In Windows 7 Using DOS ATTRIB Command
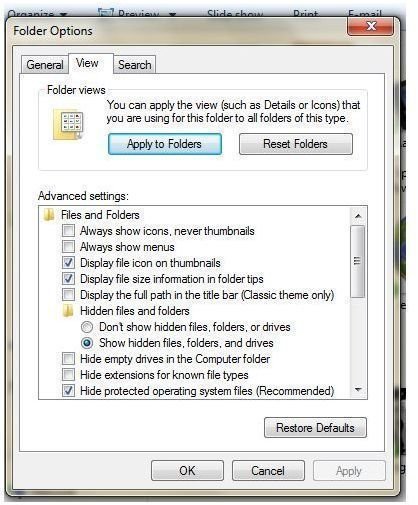
If you search for the term ‘how to hide files or folders in Windows 7’ on the Internet, you’ll get plenty of posts - all explaining you just need to select an option that will hide the file or folder. True, but looking again at those posts, if you use a simple click to hide it, another simple click can make it visible – hidden or not hidden. That is, if you go to Folder Options and select the radio button against Show Hidden Files and Folders, it does not matter if you have hidden the file or folder. The hidden file or folder will appear in Windows Explorer – of course, a little dimmed but you can still see them. And if you can see them, others can see them as well. See the following image for a quick reference of what we are talking about.
Usually, I keep the option turned on so that I know what all files and folders are present in a folder. That makes it easier to keep tab of paths so that I do not have to use the Search feature again and again. Since there is no one else using my computer, it should not really matter if I hide the files or not - unless they are in a sync folder.
By sync folder, I mean the folders that you choose to sync with any of the many existing cloud services such as SkyDrive, Google Drive, Comodo Backup or Dropbox, Mozy etc. Most of the sync software ignores the files marked as hidden and do not sync them.
TIP: To make sure all your files are being synced to the cloud, right click on the file or folder and select Properties. In the Properties -> General tab click to uncheck the Hidden attribute to make the file visible to the syncing software.
How To Hide File/Folder In Explorer Even If Show Hidden Files Is Checked?
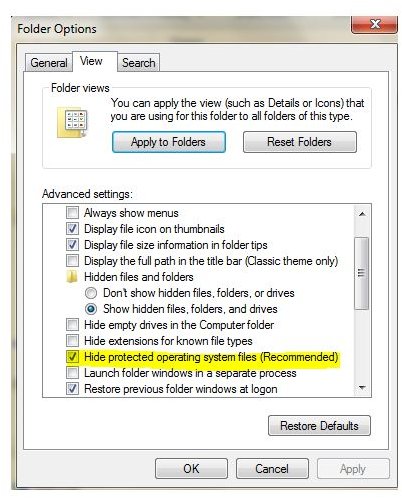
If you go through the Folder Options dialog box, you will find another option that says Hide Protected Operating System Files. Not many of the computer users will go ahead and uncheck this to view the hidden operating system files, fearing unwanted problems. See the image below to understand the option I am talking about.
IMPORTANT: Messing up with existing operating system files will lead to system instability and you may have to repair or even reinstall the entire operating system.
But we are not even touching the existing operating system files. Rather, we will mark only those files and folders that we wish to hide. And to mark any file or folder as an operating system file, you need to set its attribute as ‘system’. This option is not available in Right Click -> File Properties -> General Tab.
Until Windows 95, they had all four attributes for any file under the File Properties context menu: 1) Read Only, 2) Archive, 3) Hidden and 4) System. This was probably because until Windows 95, they required MS DOS to boot before Windows could load. In other words, Windows 95 is built upon MS DOS and cannot work if basic MS DOS files are absent or corrupt. Windows 95 cannot boot a computer on its own.
Coming back to the system attribute, we will have to use the ATTRIB command. The next section explains using ATTRIB command to set the system attribute so that people cannot find it even if they select the option to show Hidden Files and Folders in the Folder Options dialog box. The same section also tells you how to remove the system attribute so that you can work on the files without any problems.
Using DOS ATTRIB Command To Set Up File Attributes
Before using the DOS ATTRIB command, you will require:
- Command Prompt Window: Both CMD and COMMAND can open the Command Prompt Window but the latter opens up the older style DOS window that does not allow spaces in file and folder names. Since most of us use spaces and special characters in naming files and folders, I would suggest using CMD instead of COMMAND in the RUN dialog.
- Absolute Path of the Folder or File to be assigned an attribute: Absolute path means you guide the operating system from the drive letter instead of specifying relative to current folder. For example, if you type ..\folder2\abc.txt, it says to go back to the parent directory and from there, go to folder2 where you will see abc.txt. This type of usage is not wrong, but I prefer absolute path as it is easier to use: simply copy from Windows Explorer and paste into the DOS window.
STEP 1: Copy the path of the folder or file that you wish to hide using system attribute. Open the location that contains your file/folder - using Windows Explorer. Click the top bar where it shows you the path structure. As you click in the bar, the folder structure changes to MS-DOS path format. Copy it as you would with any other file/text/image – using CTRL+C or right-click and select Copy/Cut.
NOTE: Do not open the folder you wish to hide but the one that contains the folder you wish to hide.
STEP 2: Assign the system attribute to the file or folder
Open command prompt window (Press Windows Key + R to bring up Run dialog and in the Run dialog, type CMD). To change to the folder containing the folder/file you wish to hide, type the following at the command prompt.
CD
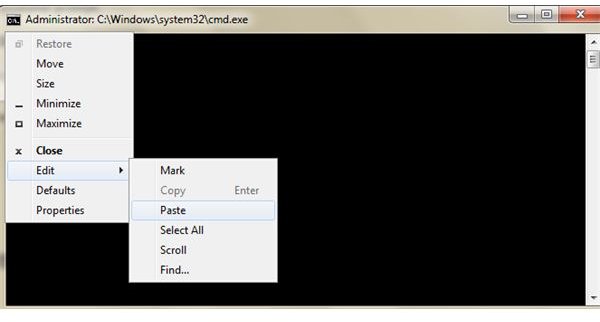
Do not yet hit the Enter key as you have to insert the path. To insert the path after CD, click the window icon (top-left of the Command Prompt window) and from the menu, select EDIT and then Paste. This will paste the path so that your command looks something like the following:
CD C:\Users\Public\Documents\My Videos (just an example)
Hit Enter key to move to that folder. If your file/folder lies on a different drive, type the drive letter before using the next command. To change the drive, simply enter the drive letter following by full colon and hit Enter (example: E:)
Now, to hide the file in Windows 7 using DOS Attrib command, type the following and press Enter:
ATTRIB +S {file/folder name}
Examples:
ATTRIB +S desktop.ini {for file}
ATTRIB +S Movies {for folder}
NOTE: Adding the hidden attribute is optional. If you wish, you can add +H after +S in the above command, separating the two with a space.
Example
ATTRIB +S +H desktop.ini {for file}
Since you are already in the folder that contains the file/folder to be assigned the s attribute, you need not paste the entire path again when using the Attrib command.
Once you are done assigning the system attribute using the MS DOS Attrib command, you can be sure no one will come to know of these files and folders. And if you do not note it down somewhere (in case you use the file/folder rarely, you too might forget about the existence of that file/folder).
TIP: To get a list of all system files only on an entire drive, type the following and hit enter key:
DIR /S /A:S > output.txt
You can give the .txt file any name. The DIR command lists all the files and since you used /S, it will scan all sub folders present on the drive. The “/A:S” command makes it show only the files that carry system attribute and finally “>” will send the output to a file or printer instead of displaying the results on screen. If you wish to print the results on your default printer, you can specify PRN instead of filename.
To Remove System Attribute And Make It Visible In Windows Explorer
Repeat the steps you took above: copying the path and changing to the folder containing the folder/file. Instead of +S, you will now type –S. Also, if the file carries a hidden attribute, you may have to specify both –S and –H with the command.
Example: ATTRIB –H –S Desktop.INI
I’ve been using this command to hide unwanted files (mostly thumbs.db and desktop.ini) to avoid clutter in folders containing different file types. If you know of a better method, or wish to ask something, please use the comment boxes below.