Installing the Windows 8 Developer Preview
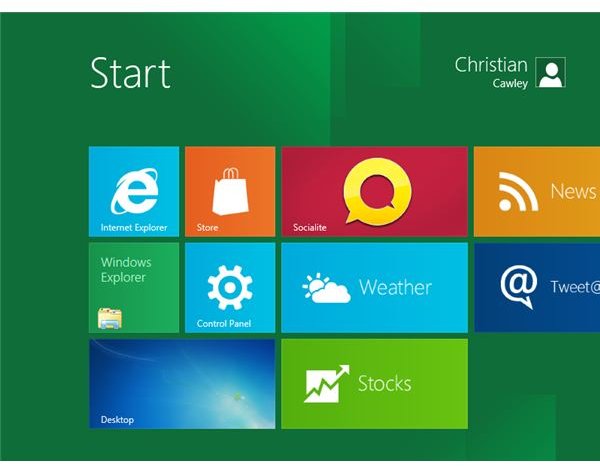
Due out in 2012, Windows 8 is the probably the most considerable upgrade Microsoft has made to its desktop operating system since the release of Windows 95. With a stunning new user interface and scalable installation options, the user interface is a developed version of the Metro UI found on Windows Phone devices since 2010.
Visually it is stunning, and after using the operating system in the currently available preview versions I can tell you that while very different to any other desktop computer UI, the implantation of Metro works surprisingly well.
You don’t have to take my word for it, however. The Windows 8 Developer Preview was released in September 2011 and anyone with a Windows Live account can register to download the preview and install it on their computer, either on the hard disk drive or in a virtual machine. You won’t be alone – over 500,000 copies have already been downloaded.
Two Options for Installation
To get your copy of the Windows 8 Developer Preview, head to https://msdn.microsoft.com/en-us/windows/home/br229518, sign into your Windows Live account and then register to download the operating system.
The file is quite hefty so you will need to prepare in advance – you’re looking at downloading over 4.8 GB of data, and depending on your installation option this will need to be burned to disc.
Which installation option you choose depends on your system. Physical installation can be performed on any PC or laptop with a multi-core CPU, 512 MB of RAM and 20 GB of spare hard disk space. Installation in a virtual machine, however, is best done on a computer with an Intel processor, as some applications in the developer preview will not run on AMD systems.
One last note about virtualization: for the best results use the free VirtualBox from https://www.virtualbox.org, available for 32-bit and 64-bit computers.
Installation on VirtualBox
With VirtualBox downloaded and installed and your Windows 8 Developer Preview downloaded and burned to disc or mounted using software such as PowerISO or MagicISO, you will be ready to begin.
In VirtualBox, click New then Next, and enter the name for the virtual machine, Windows 8 Developer Preview. Also, set the Operating System to Microsoft Window and then select Windows 7 as the Version (there is no option for Windows 8 as yet).
Click Next again and use the slider to adjust the proportion of your system’s RAM you would like to assign to the virtual machine. For the best results you will need about 1 GB. Proceed once again by clicking Next and select the Create new hard disk option; another click of Next will take you to the virtual disk creation wizard, where you should select VHD (Virtual Hard Disk).
There are two ways of configuring a virtual hard disk, either to adhere to a fixed size or to dynamically adjust depending on how much space is required. Click Next to set the storage options and choose Dynamically allocated.
Click Next to adjust the slider for the initial size for your hard disk drive, with a minimum of 20 GB selected, and once again click Next, this time to proceed to the summary. Check everything is as expected and then click Create.
You will then return to the main VirtualBox console, so select your new virtual machine and click Start to begin the first run wizard. Click Next and use the browse folder button to select the Media Source, which will either be a mounted ISO or a freshly burned DVD. Click Next again and then Start, and the installation process will begin.
Install the Developer Preview on Your PC
To install this preview of Windows 8 on your PC hard disk drive, you will need to make sure that you have enough space on a separate partition of at least 20 GB. See Partitioning a Hard Disk in Windows 7 to find out more about partitioning space on your hard disk drive.
Your computer will need to be rebooted, so insert the Windows 8 Developer Preview disc, then go to Start > Restart and wait for the system to restart. With the default boot options selected you should receive a message asking you to hit any key to boot from the DVD.
When you’re ready to install Windows 8 Developer Preview (either on your PC or on VirtualBox) you will be greeted by the installation screen, familiar to Windows 7 users. The on-screen prompts are self-explanatory – as you proceed through the steps you will need to configure localization options for language, time, etc. You can also connect the installing operating system to your local network to download some settings.
Another useful feature is the ability to use your Windows Live login as your computer account.
Note that you may also install Windows 8 Developer Preview over the top of Windows 7, but this isn’t really recommended as there are various problems that can occur. Additionally, you will probably find that you can’t install sound and graphics drivers on the Windows 8 Developer Preview, something that will prevent you from using this as a production operating system. Drivers need to be correctly configured to recognise the operating system, and no drivers are available for Windows 8 at this stage.
Getting Started with Windows 8
Windows 8 Developer Preview installs in just a few minutes (surprisingly fast, in fact) so it shouldn’t be too long before you’re enjoying the interaction with the Metro UI and snapping between different apps and views.
The old Windows Start button is still present, but has undergone an overhaul; it no longer houses all of your applications and documents as these can be found via the Metro UI. Start is hidden in Metro, but you can find it by clicking the lower-left corner of the screen. It is expected that legacy applications will run in this traditional desktop environment if required.
You’ll find plenty of things to play with in the Windows 8 preview, so what are you waiting for?!
References
- Screenshots provided by author.
- Author’s own experience.