Linux Screencasting: How to Record Screens in Linux
Introduction
In the early days, making screencasts in Linux involved working in the command line and arranging all the parameters via the command’s options. Much has changed and today, recording your screen is all about making a few clicks. We will look at the two famous programs for this job, but of course there are other alternatives as well.
Gtk-recordmydesktop/Krecordmydesktop
Seasoned Linux users could easily guess that Gtk-recordmydesktop is a graphical, GTK front-end for the command line tool recordmydesktop. There is also a KDE version, called Krecordmydesktop which uses QT libraries instead of GTK libraries so there is in fact no difference between the two except how the interface looks. I will continue with the GTK version.
GTK-recordmydesktop is present in many mainstream distributions’ repositories. You can install the program using the Synaptic package manager or with sudo apt-get install gtk-recordmydesktop. After the installation, the program will be placed under the “Sound and Video” menu.
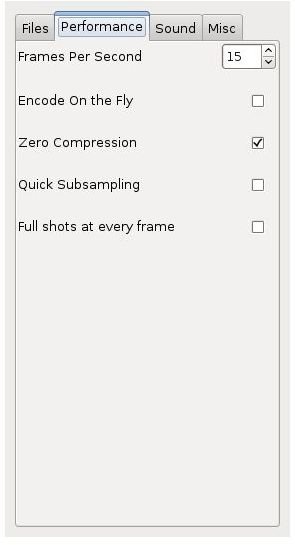
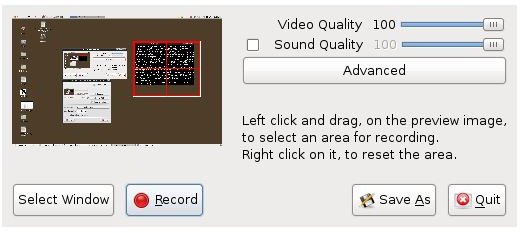
When you open up the program, you will be greeted with a small window. Inside this window there is a small demonstration of your desktop, as you see in the screenshot. First, click the “Advanced” button and go through the configuration options. Especially note the “Performance” tab: the more frames per second you set, the larger will be your output file. Under the “Sound” tab, be sure to set your microphone correctly. Under the “Files” tab, do not forget to set the folder where the output file will be saved (otherwise you will have to go through the /temp directory to find it.)
When you are done with the configuration, set the area by clicking and dragging where you want the screen to be recorded. After you finish, you can press the “Record” button in the main window and begin to make your Linux screencasts. Do not forget though, the screencast will be saved as an “ogv” file, which is an Ogg Theora Video file.
Istanbul
Honestly, I will try to be objective about this program because Istanbul is where I was born, still live, and is my most beloved city.
Similar to Gtk-recordmydesktop, Istanbul is available in many distributions’ repositories. You can install it through Synaptic or apt-get install istanbul. After the installation, the program will be under “Sound and Video” menu in Gnome.
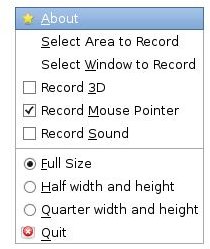
Opening the program, you will not see a window really. Instead, there is a small square placed in your taskbar (I am telling this because I spent many clicks to find the program at first and finally noticed a couple of open Istanbul programs in the taskbar.) Right clicking on this square opens up the program’s menu. Since the objective of this program is to be easy and user-friendly as possible, there are no more options to be set before recording. I especially liked the “Select window to record” option, which is not available in Gtk-recordmydesktop. In Istanbul, when you want to define an area, you do it on the desktop, not in a preview window. This enables you to make a more precise selection. When you make the necessary settings, left-click on the square button once to begin recording. During the recording the button will turn into a red circle, indicating recording in progress.
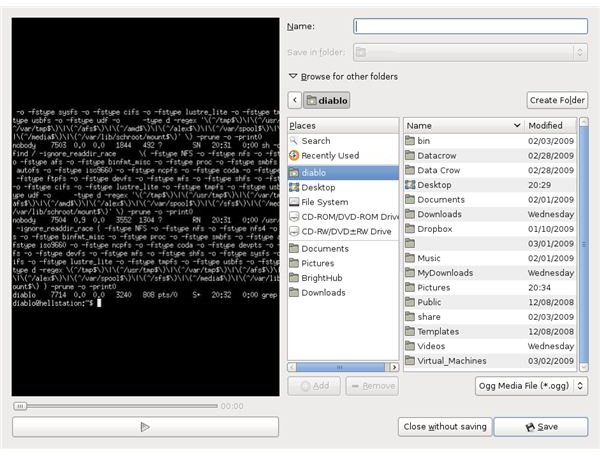
The saving options come up after you left click on the red circle in the taskbar to stop the recording. In the opened window, you can preview your screencast and proceed to name and save it to whatever directory you want. Istanbul provides a more common approach here. You can save the file only in Ogg Theora Video though.
Conclusion
Preparing Linux screencasts used to be very hard and involved using the command line heavily, such as setting the frame rates, dimensions to be recorded, resolution etc.. With the graphical user interfaces this task became much easier. Screencasts are an efficient way of communicating information, for example telling your friends how to perform a particular task. Creative users will find screencasting has other uses, such as recording web TV.
Between the two tools, I cannot prefer one over another: Istanbul can set the window to be recorded, but does not include the window borders, Gtk-recordmydsektop does not provide precise recording location. You can choose which according your heart’s wish.