Setting Flash Drive Disk Partition Boot
Setting up a Flash Drive Disk Partition Boot
Setting up and using a USB boot partition on a flash drive can be accomplished many ways. If you have a personal computer running Windows Vista or Windows 7 operating system and have the operating system installation DVD/CD you can create a bootable USB partition in minutes on a flash or external drive.
Formatting and Creating the Partition
First you’ll need to prepare your USB flash or external drive to be formatted. PLEASE NOTE: ALL DATA WILL BE ERASED FROM YOUR USB FLASH DRIVE. BACKUP ALL DATA BEFORE PROCEEDING.
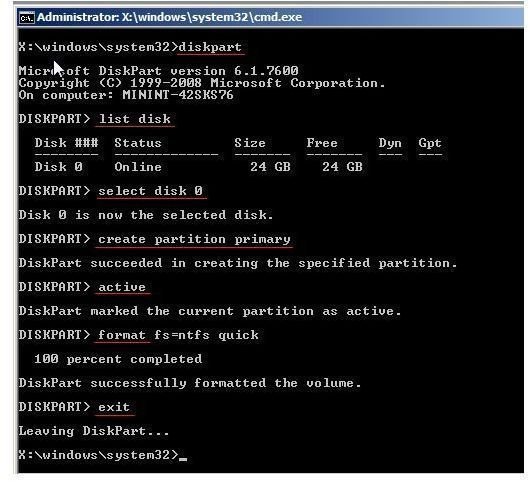
Log into your computer assuring you are running as an administrator for best results. Insert your USB flash or external drive into your personal computer. Then open a command window by going to START then RUN and type “CMD” or “COMMAND” then press enter. A black DOS window will open with a “\Windows\System32\cmd.exe” title. Now type “DISKPART” and a new window will open. You may get a Windows Security alert asking if you want this program to make changes to your computer, say “YES”. The new window will have a “DISKPART>” prompt.
Now you will need to select your USB flash drive. To do so first type “LIST DISK” and a list of disks attached to your computer will appear. In most cases your USB flash drive will be DISK 1. Check the size listed to assure you are picking the correct drive. Be careful as you do not want to select the wrong drive. If your USB drive is a different number substitute it in the following commands.
To select the drive type “SELECT DISK 1”. You should get a message saying “DISK 1 SELECTED”. After you have selected disk 1 successfully type “CLEAN” which will delete all configuration data on your USB drive. You will get a message saying “YOU HAVE SUCCEEDED IN CLEANING THE DISK”. At this point your USB drive is ready to be formatted.
To format your USB drive type “CREATE PARTITION PRIMARY” and if successful you will get a message saying “DISKPARK SUCCEEDED IN CREATING THE SPECIFIED PARTITION”. Next you will select the partition you just created by typing “SELECT PARTITION 1” and then type “ACTIVE”. Finally type “FORMAT FS=NTFS” and formatting the primary partition on your USB flash drive will begin. It will take a few minutes to complete but you will see the percent complete during the process. Once the formatting has completed type “ASSIGN” and “EXIT”. Your USB flash drive is now ready to be made bootable.
Making your Flash Drive Bootable
To make your USB flash drive bootable you will need to insert your Windows Vista or Windows 7 DVD into your CD-ROM. In this example your CD-ROM will be drive letter D: so in the CMD window you opened earlier type “D:” then press enter. Now type “CD D:\BOOT” to change to the boot directory on your Windows installation DVD and then type “BOOTSECT /nt60 E:” where E: is the drive letter Windows assigned to your USB flash or external drive. You can now close the command window. Your USB flash or external drive is now ready to have data copied to it and can be used as a bootable disc. There are many options at this point but one very useful option is to copy the Windows installation DVD to the flash drive and use the drive as a bootable Windows operating system disc.