This guide is for beginners and brings you through the very basics of Microsoft Works Word Processor. You will learn how to change the color, size, and style of the text, how to use bullets, and more.
Basics
This is a beginner’s guide to using Microsoft Works Word Processor. Learn how to do things like save and open a document, print, change font options, align text, and more. This guide will take you through each step. Microsoft Works Word Processor is a great processor to use in your home office. You can create everything from a simple letter to an invitation and much more.
**How To Create a New Document
**
Let’s start off by creating a new document to use. When you open Microsoft Works Word Processor it will automatically create a new document for you to work on. From there if you need to create a new document, you can click the white paper icon in the toolbar. It is the first icon on the left. You can also click File > New at the top of your window and that will open a new document.
**How To Save a Document
**
Saving a document is very important if you are working on an essay, report, or anything that you do not want to lose. I have typed a many of articles and lost them when the power went out. So, make sure that you save your work often. Go to the top of your window and click File > Save As. Enter a name for your document and click Save. You can continue saving your work by pressing CTRL S on your keyboard. That’s the thing about working from your home office, at any time the lights can flick off and you do not want to lose your work.
**How To Open a Document
**
Opening a document is quick and easy. With your word processor opened, go to the top of your window and click File > Open. Locate the document on your computer that you want to open. You can double click the document to open it or you can click it one time and click the Open button on the box.
**How To Print
**
You can print a document right from your home office printer using Microsoft Works Word Processor. Open the document that you want to print or you may already have the document opened. Go to the top of the window and click File > Print. When the print box opens, adjust the settings if you need too, then click the Print button.
Managing Your Text
How To Change the Font Style, Color, and Size
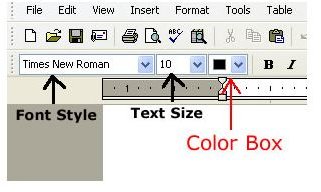
Let’s start off by changing the color of the font. Type some text on your document. Highlight the text and click the color box at the top of your window. When the color box drops down, select the color that you want the text to be. If you can’t find the color that you are looking for, click More Colors at the bottom of the list. A color window will open and you can select the color from there. While you still have your text highlighted, you can go ahead and change the size. Drop the size box down and select the size of your choice. The size box is the box with the number. See the image to the left to see this box. You can change the font style by dropping the font box down and selecting the style that you want.
How To Align Your Text
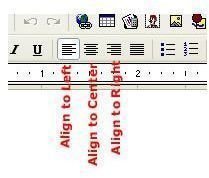
Let’s take a look at aligning your text. You can align the text to the left, right, or center. At the top of your window in the toolbar you will see the align icons. Take a look at the image to see these icons. The first align icon is the align to left icon. The second one is the align to center icon and the last one is align to right icon. To align your text, highlight the text, and click the icon of your choice.
**How To Insert Bullets and Number List into a Document
**
Number List and Bullets are often used to point out a list of things. Applying bullets or a number list to your
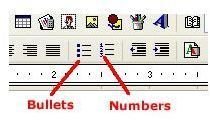
document is very simple. Highlight the text that you want to apply the bullets or number list too. Then click the Numbers icon or the Bullets icon. To see these icons, look at the image on the right. These icons are located on the bottom bar, right beside the align text icons.
How to Check Your Word Count in Microsoft Works Word Processor
Sometimes when typing a document, you will need to check to see how many words you have typed. This can be easily done. Go to the top of your window and click Tools > Word Count. The Word Count box will open and you can see how many words you have typed. Click OK on the box to close it.
Word Art
The Word Art tool allows you to create different types of text. Some of the text that you can create can be seen below.

This text was created quickly. This is just to give you a general idea of what you can do with the Word Art tool. I will show you how to create word art and what the different icons are. From there you can get creative and create your own. Let’s first get to the word art section and look at the toolbar.
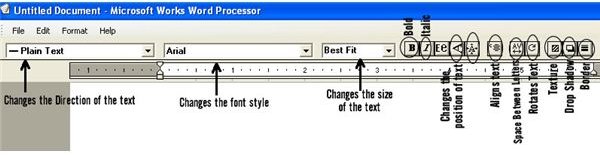
To get to the Word Art section, click the blue A in the toolbar at the top of your window. The Microsoft Works window will turn into a new window. Look at the image below to see what each icon on the toolbar is.
We will create a simple word with the Word Art Tool. Then you can go back and create what you want and apply what styles, colors, and everything else you want to the word art.
When you clicked the Blue A, a box should have opened where you can enter your text. If that box is still opened, go ahead and type what you want in that box. If it is not opened, click Edit > Edit Word Art Text. The box will open back up. Then enter your text in the box. Click Update Text and click the X on the box. Your text will appear on your page.
Now you can change the font style and size. To change the shape of your text, drop the Plain Text box down and select the shape of your choice by clicking a shape. Now you can apply a drop shadow. Click the drop shadow icon and the drop shadow box will open. Click the drop shadow that you want to apply to the text. You can also change the color of the drop shadow by dropping the box down and selecting the color that you want to use. Click OK to apply the drop shadow.
Now you can change the texture of the text. Click the Texture icon. This is also known as the shading box. When the box opens, select the colors that you want to use. Then select the texture or shading by clicking one of the icons. Click Apply and then click OK.
If you want to apply a border to the text, click the border icon. When the border box opens, select the border of your choice and the color that you want the border to be. Then click the OK button.
Those are the main things that you can do with the Word Art. You can also rotate the text, add spaces between the letters, apply the bold and italic style to the letters, and stretch it to fit the frame.
Word Art is great for creating certificates, worksheets, and banners. You can use it for a number of other things too.


