When you are a service provider a good practice to get into is handing out a printable receipt or form for completed work. This is especially useful when you need to split jobs into multiple time frames. Find a free printable receipt or form for completed work right here!
Layout
The first part of creating a free printable receipt or form for completed work is to look at the layout. The layout with the most detail uses an 8 ½ -by-11-inch sheet of paper. The more detail provided allows for better understanding of the amount, and type, of work performed. First, download the free printable receipt template in our Media Gallery by clicking here .
Receipt Sections
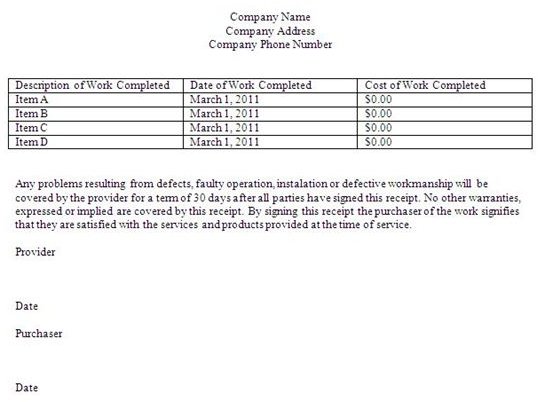
At the top of the layout will be the company name and contact information of the provider of the work. If you’re not a company, substitute your own name for the company name. The next section is created using the Table feature of Microsoft Word , although you can also find this feature in Open Office Word. In the table you use three columns; label the columns to include a description of the work completed, the date the work was completed and the cost of the work completed. This creates an itemized list so everyone knows exactly what was done and when and for what price. Underneath the table write out a warranty statement that allows for a specific amount of time to claim any issues with the services provided. After the warranty paragraph, you insert the signature and date areas where the parties sign and date the document. This section creates a legal acceptance of work and payment should any problems arise later.
Customization
Use Microsoft Word or Open Office to create a custom receipt . Both word processors have the basic functions to do this.
The title and contact information found on top can be customized using the middle toolbar at the top of the document. This is where the font, font size, color, centering and the bold or italics can be found.
The table can be customized by using the Table feature found at the very top menu bar. Highlight “Table” to get to the drop down menu. From there you can create custom tables.
You can customize any part of the free printable receipt or form. For work completed you will want a disclaimer section included for any work completed. Use your own wording but make sure it clearly states a time limit and what avenues will be taken to correct any issues.
Once you have customized this free printable receipt or form for work completed to your liking, save it as an original document using the “Save As” function under the “File” tab found at the far left. Make sure you keep this file where you can find it later. When you need it, fill in the necessary information for each job or client. Save each client or job as a new file using the “Save As” function. Print out the new file to create the customized receipt. Save the original file as a template.
Reference - Microsoft Office utilized by author.
Image Source - Receipt created by author.


