How to Get Final Cut Pro Make Video Look Like Film
Punching Up DV in Final Cut Pro
Apple’s Final Cut Pro offers a powerful range of tools beyond the basic video editing interface. The program can be used to fundamentally alter the look and feel of video footage, working non-destructively so as to leave your original files as they were while altering edited projects to give them the qualities of many different types of visual media. One series of editing and grading procedures even allows Final Cut Pro to make video look like film.
What’s the difference between video (or DV, Digital Video) and film? Isn’t today’s digital video so advanced as to perform basically like film anyway? Yes and no. Film is an analog medium, meaning it stores and reproduces pictures through photochemical processes that can’t be measured in numeric quantity. When an image is stored on film, it’s burned into millions of silver crystals embedded in the film, creating an image at once richly detailed and appealingly “grainy” and imperfect. The granular fine depth of film can never be exactly replicated by a digital medium like DV, which stores information as numeric code whose imperfections and fine details alike are a function of how high a resolution it was shot at. This isn’t to pass judgment on either medium - today’s filmmakers have been afforded far more opportunities by limitless DV than granted by expensive film - but for many, the richness of film is the way movies are “supposed” to look.
There’s also the issue of motion: many DV formats perform a technical process called “Interlacing” that gives the image a fluidity alien to film. This, as well as the reduced contrast, flat color cast and too-perfect lack of grain - can be tinkered with in Final Cut Pro. This tutorial shows you how to have Final Cut Pro make video look like film.
De-Interlacing Fluid Motion
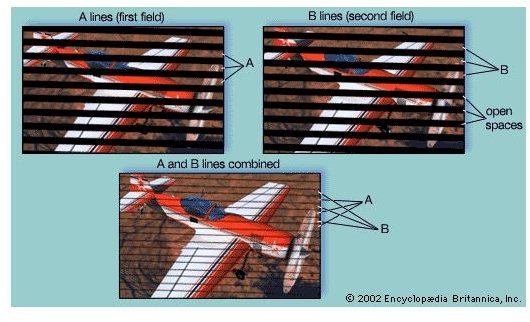
“There’s something not quite right about this picture,” many people say when they view DV trying to pass as film, “I can’t put my finger on it. Something about how the images move.” Because we usually look for the qualities of the image itself when judging whether it’s video or film, we can often neglect to pay attention to the flow between frames: whether images move with a too-smooth motion or film’s 24/25 frame-per-second stutter.
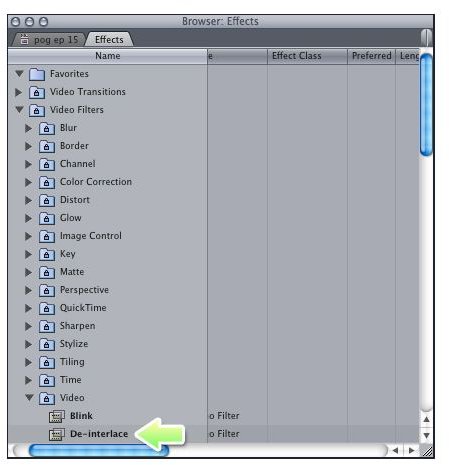
This is due to a process called interlacing. For reasons of storage and display, many DV formats break a single image up into very fine alternating lines, displaying the odd set of lines in one frame, then the even set of lines of the next frame’s odd set. It’s a confusing process to get your head around, so let’s skip to the fix: Final Cut Pro has a filter called “De-Interlace,” which can remove this process, restoring each image to its undivided, full-frame glory. To see whether your video requires de-interlacing, right-click a clip and choose “Item Properties.” If the “Vid Rate” section ends in an “i,” that means it’s been interlaced. Highlight all video clips on the timeline, then open the “Effects” folder and scroll down to “Video.” Drag the “De-Interlace” filter onto the clips (or apply it to one then copy and paste) to take out this non-filmic fluidity of movement.
Achieving Filmic Contrast
One area in which film continues to excel over DV is in the field of contrast. Filmic processing mechanics are physically built around shadow and light levels, whereas to DV, it’s all just information to be stored and reproduced. This means if you want video to retain the rich shadows of film, you have to simulate the process in Final Cut Pro.

When sending film to the lab to be processed, a cinematographer will specify how much of the silver crystals embedded in the film are to be stripped out. The more silver is left in, the deeper shadows and more “blackened” colors will be visible. This is abundantly visible in movies like Se7en and 300, where the look has been amplified for effect, but it’s apparent on a more subtle level in any comparison between video and film.
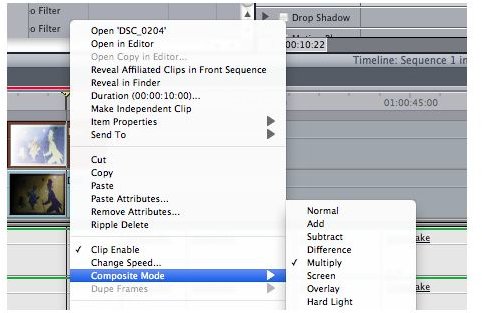
To bump up the filmic contrast, highlight all visual tracks in your project. Copy and paste them, then place the new tracks on a higher level of the timeline, lined up exactly with the originals. Now open the “Image Control” effects menu and drag the “Desaturate” filter onto the upper tracks. Right-click the upper video track and select “Composite Mode,” then choose “Multiply.” Notice how the black areas of your upper track have now been screened onto the colored areas of the lower. You may need to open the “Motion” tab of the upper track and tone down the opacity, until just the right level of rich blackness has been grafted onto your image without making the overall caste look too grim and murky.
Filmic contrast can be further enhanced by placing a “Tint” filter onto the lower video track and applying a subtle teal or auburn color cast to the image - a simple form of color correction - depending on the look you’re going for.
Adding Grain
The final step to get Final Cut Pro make video look like film may feel like a bit of a cheat: while earlier steps have consisted of taking what’s there and tweaking it to achieve an effect, this last process literally adds a layer of artifice to the picture, mimicking a natural byproduct of film processing through digital addition. However, if a filmic look is what you’re after, this is the finishing touch you should apply.
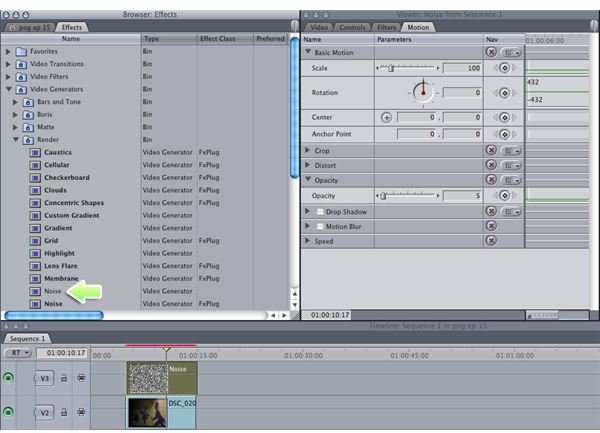
Open the “Video Generators” section of the “Effects” menu and choose “Render.” Drag the upper “Noise” filter - the one whose name isn’t in bold - onto a new, top layer of your timeline. Double-click the filter and open the “Motion” tab, then reduce “Opacity” to around 5-10%. Render and play your clip, noticing how each frame now has a subtle “graininess” that mimics the dancing noise visible on close scrutiny of a film image.