Editing with PowerDirector Tutorial - A Basic Guide for Digital Video Editing
The latest edition of CyberLink’s digital video editing software, PowerDirector 9, features several improvements in the editing department. There are two edit modes: clip mode and keyframe mode. Keyframe mode is particularly useful for controlling particle effects. Expect more customizable transitions and easier audio editing. Before using the more advanced features, learn about the basic editing options.
Cutting a Video Clip into Sections
Open the editing workspace in PowerDirector 9 to begin editing. This editing with PowerDirector tutorial begins with several options for trimming a video clip.
- To divide a video clip: Select a video clip on the timeline and click Split. This will create two clips. You can insert another video clip in between the two or remove a portion of the video clip.
- To merge the two clips back together: Select both video clips, right-click on it, and select Combine.
- To remove unwanted portions at any point during a video clip: Select the video clip on the timeline and click Trim. Use the timeline slider to find the start and end points. Mark them with the trimming tools.
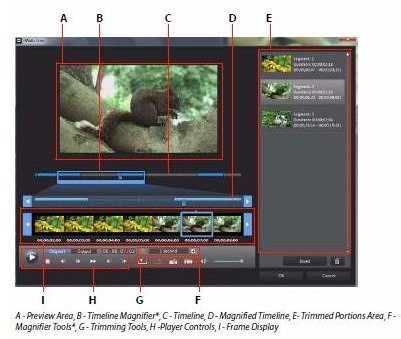
- To remove several portions from a video clip at the same time: Select the video clip on the timeline and click Multi Trim. Drag the timeline magnifier along the timeline to find the portion of the video to trim. Mark the starting point of the trim and the end point.
Adjusting the Duration of Media and Effects
Another useful editing feature in PowerDirector lets you determine how long a particular piece of media remains on screen. This includes images, backgrounds, color boards, and titles. Select the clip on the timeline, right-click on it, and choose Set Duration. In the window that opens, set the duration as a number of frames to display. Another option is to drag the end of the clip on the timeline to the desired duration. A video clip is limited to its original duration.
Editing Audio and Images
Audio and image editing is an important part of any editing with PowerDirector tutorial. Audio files are modified with an application called WaveEditor. To make changes to the audio in a video clip, right-click on it in the timeline and select Edit Audio in WaveEditor. Make changes to the audio and the updated file will replace the current one in the timeline. Images are edited in PhotoNow. You can adjust the brightness, contrast, red-eye effect, and more. To edit an image, select it on the timeline and click the Edit Image button.
Video Effects
There are several video effects you can add to a video clip in PowerDirector 9. Select the video clip on the timeline and click on the Power Tools button. Choose the desired effect:
- To play the video clip backwards: Select Video in Reverse.
- To zoom in on a particular portion of a video clip: Select Video Crop.
- To reduce the speed of the video clip: Select Video Speed and then click the option for Slow Motion Video with Frame Interpolated Technology.
- To increase the duration of an audio clip to match the reduced video speed: Select Stretch Audio.
- To take a snap shot of a video frame and insert it into the timeline: Right-click on the video clip on the timeline and select Freeze Frame.
Reference
1. CyberLink PowerDirector 9 User’s Guide - https://download.cyberlink.com/ftpdload/user_guide/powerdirector/9/PowerDirector_UG_ENU.pdf
Image Credit - Image courtesy of CyberLink PowerDirector 9 User’s Guide