
Mt. Rushmore is one of the most iconic landmarks in America–and thanks to technology, you, too, can become iconic with the help of Mt. Rushmore and Photoshop.
Mt. Rushmore
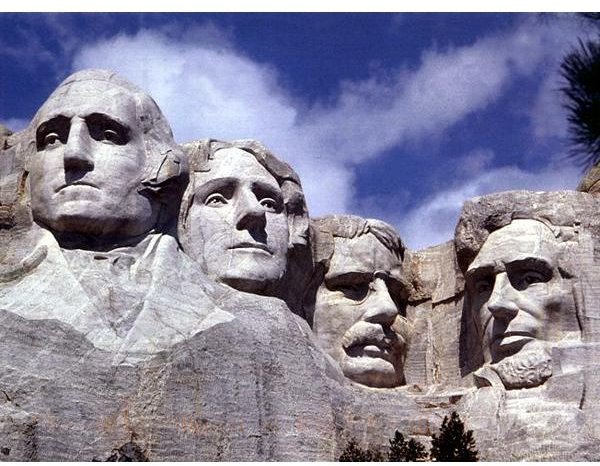
America is full of famous landmarks–the Statue of Liberty, the Grand Canyon, the Golden Gate Bridge. As a testament of the first 150 years of the United States, sculptor Gutzon Buglum came up with the idea of placing the four most important presidents on the face of Mount Rushmore near Keystone, South Dakota.
The structure features, from left to right, the faces of George Washington, Thomas Jefferson, Theodore Rosevelt, and Abraham Lincoln. The structure began in 1927 and was finally completed in 1941 after Buglum’s death by his son Lincoln. The iconic image of Mt. Rushmore has since become a great way of getting your face–or that of someone else–in the same iconic pose.
With the use of Adobe’s Photoshop software, users can easily put their face, their friend’s faces, and even celebrities’ faces at the top of icon images.
Why the Fascination?
Since the introduction of the Internet and other relevant technology, the ability to place oursevles in comic or funny situations has been appealing. Take the popular Demotivational Posters, which take scenes from television, movies, comics, and even personal images in order to promote an unmotivational message, in a parody of Motivational Posters.
Adobe’s Photoshop software has not only become a popular resource amoung desktop publishers, graphic designers, website designers, and photographers, but also to the regular users who enjoy using the software’s vast amount of features to change images and pictures to something more interesting than originally pictured.
In the case of Mt. Rushmore, the ability to place in the image of an individual or four individuals has an appeal, especially if you use
the images of popular charcters or celebrities to represent something. For instance, this image was the winner of the PhotoChopz 2008 photo contest, which asked members to change the iconic image with something interesting. This depicts the four most popular characters in Nintendo’s history, who are also the most popular characters in the Super Mario Brothers video game series - Mario, his brother Luigi, Yoshi, and Princess Peach.
If you’ve ever come across a funny image such as this, you might wonder, “How can I do that?” Actually, the process of placing your image on Mt. Rushmore with Photoshop only takes a short amount of time, depending on the level of your know-how and how much you want to invest.
The Tutorial
Getting your image on Mt. Rushmore only requires you to take some time out of your schedule. Ultimately, the entire process takes around ten to twenty minutes. However, if you want to go into more detail or add more people, it may take longer, especially if you are new to using Photoshop.
It took me around fifteen minutes to create my image for this article and while not as perfect or as awesome as the Nintendo one and some of the other images, for someone who doesn’t use Photoshop that much, it’s a pretty decent attempt. For this tutorial, I’m using Photoshop CS3, but anyone with lower or higher versions of the program may still be able to accomplish this.
The first thing you need to do is get an image of Mt. Rushmore. A Google image search will have many pictures of the landmark; it’s important that you get an image that is fairly close up. The next thing you will need is that of a picture of yourself, your friends, or anyone that you would like to post in the photo.
The Steps to Mt. MeMore
First, you’ll need to open your copy of Photoshop. Again, for this tutorial I am using my own copy of CS3. Wait for Photo shop to open
and then go to FILE–>OPEN and then chose first the image of Mt. Rushmore and then the image that you would like to use. I’m using an image that was taken at a birthday a few years ago.
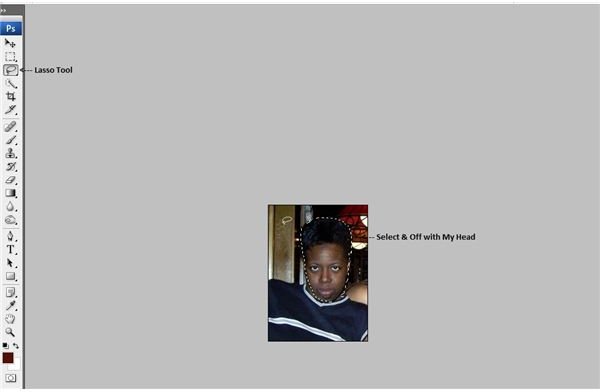
After all images have been opened, select the picture that has you in it. You will need to cut out the head portion so that you can place it in the area of one of the presidents. To do this, select the LASSO tool from your tool bar. If you don’t have your toolbar open, you can open it within the Window option at the top. Most often this toolbar is already available unless you previously decided to get rid of it.
Using the LASSO, trace around the head, making sure you get as much as possible of the physical portions of the face. It helps if you have a frontal- or side-view picture. When the head has been circled, copy that image. You can then close the originating image.
Adding Your Face
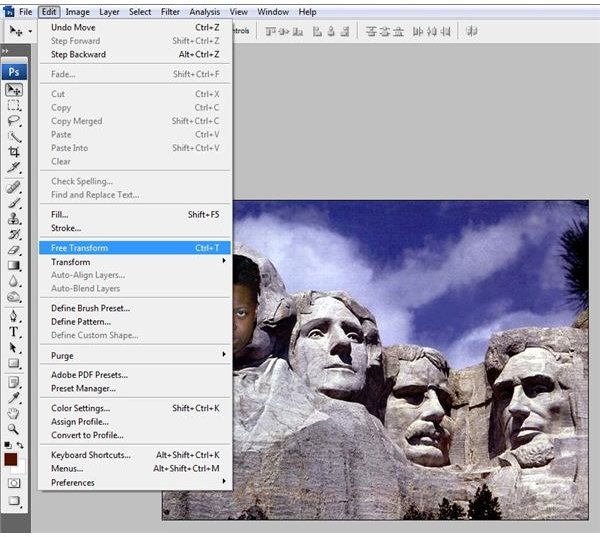
On the image of Mt. Rushmore, right click it to paste the image or use the keyboard shortcut of CTRL+V. If the pasted image is large, you’ll need to resize it so that it matches up with the face you want to paste. This can be done by going to EDIT–>FREE TRANSFORM. THis allows you to resize the image so that it matches the scale of Mt. Rushmore.
If the image is facing the wrong way, you’ll need to rotate it; go to EDIT–>TRANSFORM and then chose the rotation that you need.
If you’re using a color photo, you’ll need to make it black and white. This is accomplished by going to IMAGE–>ADJUSTMENTS–>BLACK&WHITE.
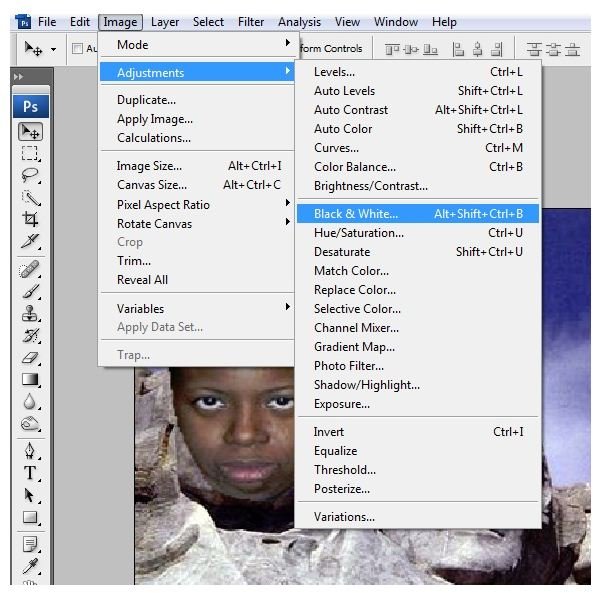
You’ll then want to set the contrast so that your photo matches the contrast with Rushmore. Go to IMAGE–>ADJUSTMENTS–>BIGHTNESS/CONTRAST. Play around with this until you come close to the Rushmore picture. I had some trouble with this as I am darker than the landmark and I tried getting as close as I could without graying my image.
Changing Your Picture
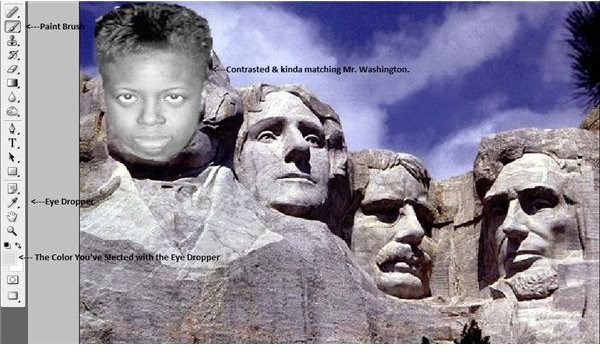
This next step requires that you match up your photo with that of the Mt. Rushmore picture. You will first need to match the color of the rock face. From the tool bar, select the EYEDROPPER TOOL and find an area on Mt. Rushmore to take. Left click and that color will appear in the FOREGROUND COLOR listings near the bottom of the toolbar.
Select the Paintbrush and then touch up your photo to match that of Rushmore. This may take some time so that you get the right tone and blend going.
Next, select the HISTORY BRUSH. This basically brings up the underlying image colors, so that you can start to blend in your photo.
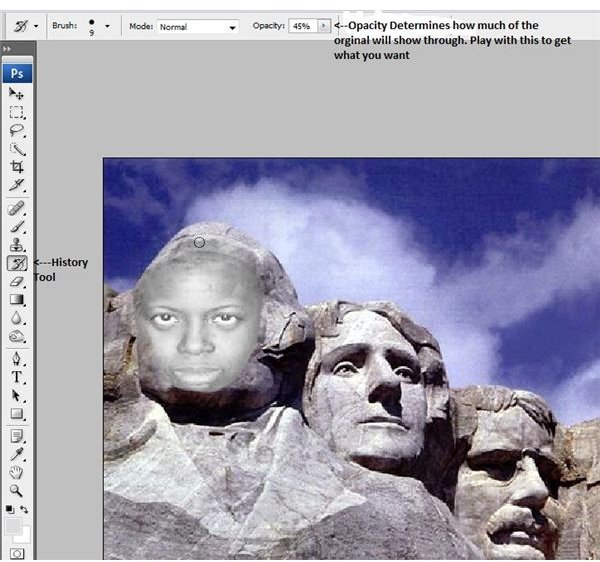
Again, this can take time as you want to get as close as possible to that of the Mt. Rushmore photo.
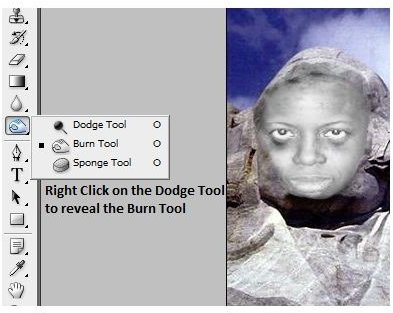
The next thing is to create the shadows that might surround the landmark. This can be done by using the BURN tool. BURN is found under the DODGE tool, so you’ll need to right click on the icon in order to select BURN. Touch up the photo to get some of the shadows.
The last thing is to create the same cracks on your photo as those of Rushmore. This is done by using FILTER–>TEXTURES–>CRAQUELURE. Admittedly, I had some issues with this, as I couldn’t get the right look. This might be an issue if the image is darker, so you may be able to forgo it.
Takes Time
Getting a professional-looking photoshop on Mt. Rushmore takes time for those who don’t use the software on a daily or even monthly basis. As
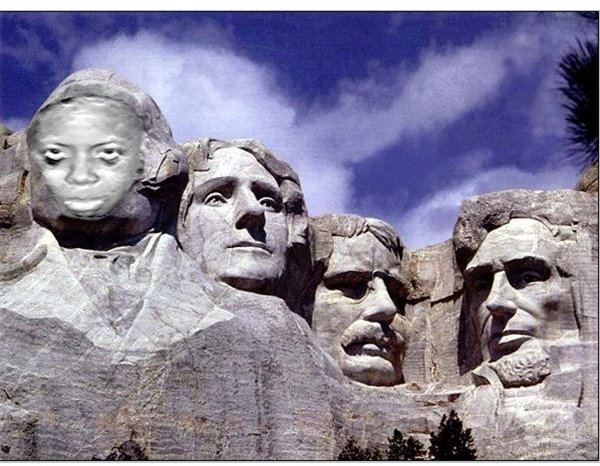
you can tell from my first attempt, it isn’t the best or even greatest achievement, but it is a testament that it can be done. My image was also done in a small time frame and with a much darker image.
One thing to remember is that there are going to be successes and failures, but the important thing it to have fun while doing it. First attempts lead to second, third, and fourth attempts, and the overall fun of the project is that you can use the tips here to implant yourself or your friends onto other images.
References
Mount Rushmore via Photoshop Gurus Community Forum, https://www.photoshopgurus.com/forum/photoshop-newbies/6160-mount-rushmore.html
Spock on Mt. Rushmore via Yank Froggy on YouTube, https://www.youtube.com/watch?v=GRcmJTf2icE
Image Credits: Flickr/jimbowen0306 ; PhotoChopz/PhillySoul11 ,
Mt. Ginamore created by the author


