Fix Crooked and Tilted Photos with Corel Paint Shop Pro Photo X2 – Photo Editing Tips and Tricks - Paint Shop Pro Photo X2 Tutorial

Crooked Photos
The photograph to the left shows what can happen when you try to take a picture with your head hanging out of the car window and the sun glaring in your eyes. I like to call these “mystery shots” since you never know what the picture is going to look like until you upload it from your digital camera. It’s actually a miracle that anything showed up in this photo at all. All in all, though, it wouldn’t be that bad of a shot if it weren’t so… crooked. This is something easily fixed with the straightening tool found in Paint Shop Pro.
Straightening Tilted Photographs with Paint Shop Pro
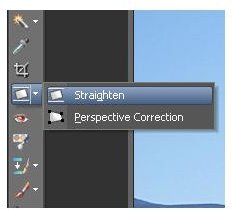
From the tools palette, choose the Straighten tool. After making this choice, the straightening bar will appear in your photograph as in the second screenshot above. You can move this bar to another place in the photo by clicking anywhere on the line, except the endpoints, and dragging it. Try to find a spot in the photo that would be a good guide for straightening the image and move the bar to that point.
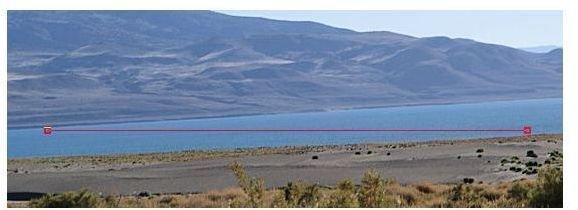
Next, move one of the endpoints of the straightening bar to match the angle of the photograph as in the screenshot to the left. The first time I ever used this tool, I tried to move the bar to an angle that was in the opposite direction of the tilt, thinking that I needed to use the bar as a pointer to indicate the direction in which the photo needed to be rotated.
Instead, Paint Shop Pro adjusts the image by moving the straightening bar back to a horizontal position and “pulling” the photograph along with it. This actually makes the whole process a lot easier since the only thing you have to worry about is getting the slope of the straightening bar to match the tilt of the photo.
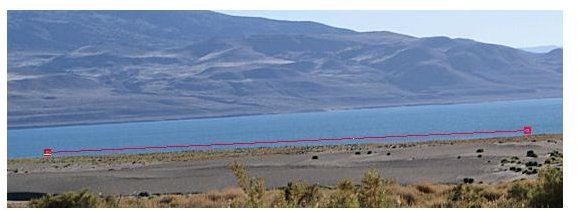
Once you’ve aligned the straightening bar to match the tilt of the photo, click the apply button and you’re

done. If you didn’t get the results you were looking for, undo the action and start over.
Tip: If you mess up when trying to straighten the photo, it’s always best to undo the process and start over again. Each time you straighten the image, the photo is resized and becomes slightly smaller than the original. Paint Shop Pro has to perform this adjustment to keep the photograph in its standard rectangular shape. So, if you apply one straightening action on top of another, you’re losing more photo area than necessary.
Don’t forget to check out the other items in the Digital Photography Channel’s library of Paint Shop Pro user guides!
This post is part of the series: Beginner’s Guides for Corel Paint Shop Pro Photo X2
New to Paint Shop Pro and looking for some quick tips and tricks for getting started on your digital photo editing projects? In this set of guides, we’ll cover some of the basic tools available in Corel Paint Shop Pro Photo X2.