Photography Tips on Capturing Birds in Flight: Camera Equipment
Like all forms of nature photography, bird photography has its own appeal. And an action photo of a bird or animal add that element of drama which differentiates a good photo from the truly unique. Whether it be an eagle swooping down on its prey or a hummingbird hovering over a flower with its wings blurred, images of birds in flight have always captivated our senses. Needless to say, it’s no cakewalk to capture such images. This series covers capturing photos of birds in flight in two parts - tips on equipment and composition tips. Here are some photography tips on capturing birds in flight.
The Equipment
It’s often said that the person operating the equipment has a much more critical role in capturing a good image rather than the equipment itself. All rules have exceptions and capturing birds in flight might well be the exception to this rule. Photographing birds in flight pose a few unique challenges:
1. Speed: Birds fly fast and hence you need an equally fast camera to capture their motion. By speed I mean not only a high shutter speed, but also an equally quick and precise focusing mechanism and the fastest burst speed possible. If you’re using a digital camera, you may also want to use a fast memory card which can keep up with the deluge of data the camera would throw at it. A slow memory card may choke your camera and you’ll be left waiting while the bird flies past!
2. Distance: Birds in flight will not always be close to you, they may be anything from a few feet to multiple metres away. A good telephoto lens is very critical if you also want to identify the bird you’ve just caught on camera!
3. Quality of the lens: The lens must be of good optical quality, with preferably a large aperture, so that you can get clear and bright photos even at very high shutter speeds, and not-so-ideal lighting.
It becomes quite clear from the above points that a simple point-and-shoot camera is not going to produce very good bird-in-flight photos. Even the prosumer cameras, which may yield slightly better results, would soon leave one wanting more. A good place to start would be with an entry level SLR coupled with a fast zoom lens. The better focusing ability and superior burst mode coupled with a faster and longer lens makes a real difference in the results, well worth the effort as well as the extra money involved.
The Lens
Start off with a medium range zoom lens, say a 200 or 300 mm lens, with f-stop between 4 and 8. If you have a faster lens, all the more better. The aperture setting is less important here, and is only to ensure you have a good depth of field and sufficient brightness in your image at low shutter speeds too. And of course, for the fantastic bokeh (background-blur) effect.
Shutter Speed
One has to use varying shutter speeds according to the shot required. 1/500, 1/1000 and above more or less freezes all motion, and is useful to get a sharp clear image of a bird in flight. The brighter the day, the higher the shutter speed you may have to use to get a well-exposed image.
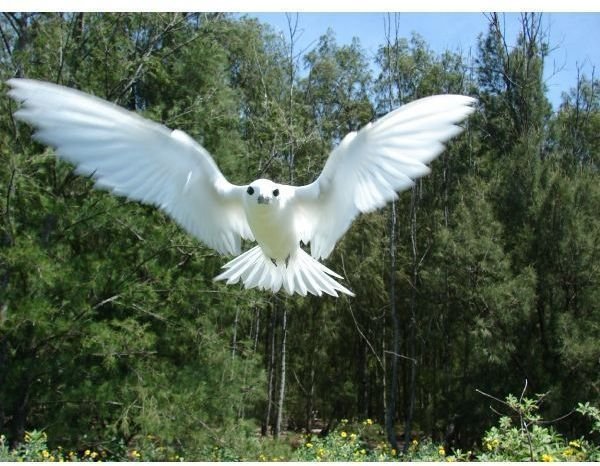
One can play around with lower shutter speeds to get part of the bird blurred. For example, keeping the eyes sharply in focus with the wings progressively blurring gives a fantastic effect of motion in the still image. Though tricky and might require a lot of tries before eventual success, the final image more than makes up for all the effort.
Read Tips for Shooting and Showing Action in Photography for additional information.
(Image: wingblur 1/320, f/4 ; wingblur2 1/800, f/8)
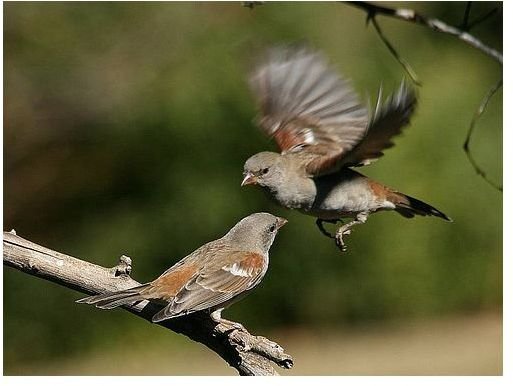
Image Credit: Forest and Kim Starr, Alan Manson
Image Stabilization
This is a feature which is of use when using slow shutter speeds and low light. As we’ll be using fairly high shutter speeds of 1/500 and above, the only purpose image stabilization would serve would be to reduce auto-focus speed. I would recommend to switch off this feature.
Focusing
Birds fly fast and hence getting the camera to focus on the bird just as quickly is imperative to a good photo. I prefer using the ‘AI-Servo AF’ mode for this. Spot focusing on the head, preferably the eye of the bird and panning as it flies by, while continuously shooting frames, is more or less the way to go about it. Do note that it might take a couple of seconds for the focus to lock, so its worthwhile to ensure that before shooting away. Read Pre-Focusing: A Pro Trick for Better Action Photos for additional tips.
Exposure
Most birds appear dark against a bright sky, and the camera meter may get fooled and underexpose the image. Similarly, a white bird, say an egret, in the shade might get all blown out. It’s imperative to make sure the images are getting correctly exposed. It’s better to overexpose a stop or two while shooting a bird against a bright sky, and underexpose a stop or two while shooting a white bird against a dark background.
To learn more tips on capturing birds in flight, please continue on to the second part of this series, where you will learn important tips on composing your photos for the most visual impact.
This post is part of the series: Tips on Capturing Photos of Birds in Flight
This series will provide tips on capturing photos of birds in flight. Part 1 offers tips on the equipment needed for getting the best photos and how to correctly set them up. Part 2 provides important tips on composition techniques to help you create the most memorable photos of birds in flight.