Photography Lighting Equipment: What You Need to Capture Great Photos
Introduction
So you want to take your photography to the next level and stand out? The best way to do that would be to introduce some artificial lighting to your subjects and I’m not talking about your camera’s popup flash! I’m talking about a real external flash (also known as a strobe) that either sits on top of your camera or on a light stand just outside of your scene. Learning to use a flash will allow you to be more flexible when you are out shooting since you can provide your own lighting and decide what the light looks like and how it falls on your subject.
Light Source
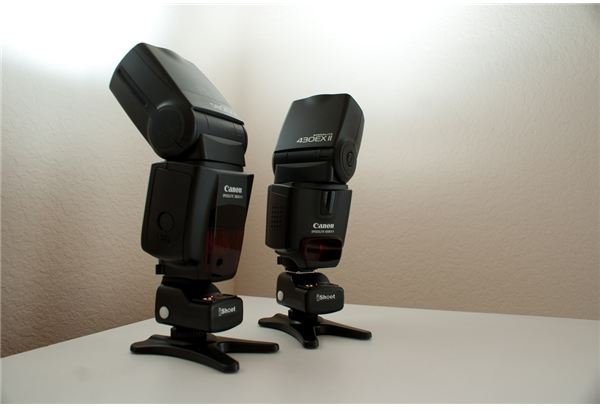
First things first, you will need a flash unit to provide your light. Start with one and slowly add to your kit (as you would lenses for your camera). It is easiest to balance and learn with one flash to keep things simple. I recommend getting a modern flash that will sit on your camera and meter the correct light for you (for Nikon, get one with i-TTL and Canon E-TTL capabilities). Such flashes are the Nikon SB-600 or SB-800/900 and the Canon 430EX II or 580EX II (which I personally own one of each). With these flashes, you can put them on your camera and effectively bounce them off walls or ceilings to diffuse the light knowing that it will meter the correct amount of flash every time.
Alternatively, you can find cheaper off-brand or older Nikon SB-24,-25,-26, or -28 flashes that will work in full-manual mode. If you place these on or off your camera, you will need to set the power manually which can be a good or bad thing depending on the situation. In some instances, your ambient lighting will not be changing, so you can get away with setting the power once and forgetting about it knowing that you will get a consistent light every time. If however, your surroundings are changing, then you will have to adjust the power every time to account for these changes.
Photo by .dr4gon
Softening the Light Source
The easiest way to soften the light source on your camera is to bounce it off of a white wall or ceiling using the tilt-able and rotatable head. This will help distribute the light and wrap your subject(s) in it.
One other method to softening the light while it is on your camera is to use a piece of tupperware to cover the bulb and spread the light everywhere in 360° pattern. This cover is also known as a Sto-Fen Omni Bounce. Gary Fong also makes a really expensive ($50+) version that does the same thing. This covering simulates a bare lightbulb style of light that illuminates everything around it. How it works is it bounces off of the ceiling, floor, and walls to wrap your subject in light from all directions. It works pretty well in the right situation (small white rooms) but is very limited in reality and not useful outside because there is nothing to reflect the light.
Having a flash on your camera is great for convenience and candids at an event or party but it is limited to your surroundings. In the next page, we will talk about moving flash off your camera for more serious flash photography and more interesting photos.
Moving Your Flash Off Camera
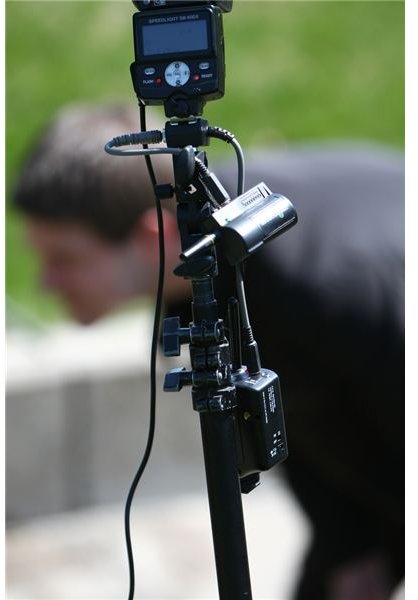
In our previous section, we discussed what you can do with a flash on your camera and its limitations. By moving your flash off your camera, you can have the light come from any direction you want and can combine multiple flashes for even better results.
Light Stand
A basic 6’ light stand is about $20 and does exactly what the name implies, holds your light (flash). Taller, lighter, or more sturdier light stands are more expensive but are worth it if you need the extra height or portability.
A tripod or friend holding the flash can substitute for a stand.
Umbrella
An umbrella is the most basic light modifier out there. It is cheap and softens light making for great portraits. It works by increasing the size of your light. They are about $20+ depending on the size you need. I would recommend getting a 43" Westcott Shoot-Through White Umbrella for its portability and reasonably large size.
Umbrella Holder
To hold the umbrella on the stand to your flash, you will need an umbrella swivel holder. Like buying a head for your tripod, this essential piece of equipment will hold up your flash at various angles. This will set you back another $20+. This is the Shoe Mount Umbrella Adapter that I personally use. It is made of extremely sturdy plastics and metals and holds my flash and umbrella securely.
Triggering Your Flash
The last part of your basic kit you will need is a way to trigger the flash to fire when you click the shutter on your camera.
PC Cord
If your camera and flash both have a PC port, then this is the cheapest, most reliable method to triggering your flash. If your camera lacks a PC Port you will need this adapter, if your flash lacks it, get this adapter. You will also need a PC cord to connect the two ports.
Optical Triggering
Some flash systems like Nikon’s CLS allow TTL wireless triggering using the popup flash to tell your remote flashes when to fire. This is only available on the Nikon D90 and higher models (D300/D300s/D700) and Canon 7D. If you have one of these cameras and the same brand flash as previously recommended, you are ready to start playing with light!
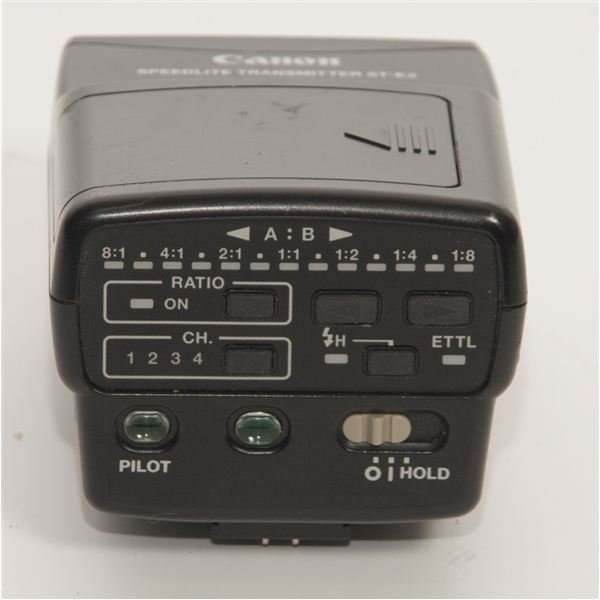
Both Canon and Nikon sell infrared TTL transmitters that work in the same way, requiring line of sight of the flashes. Nikon’s is the SU-800 (not necessary on D90 and higher cameras with a flash) and Canon’s is the ST-E2.
Wireless Triggering
Wireless triggers are the fanciest and most expensive method of triggering your flash. They are also the most convenient and reliable method (but at a price). There are many different wireless triggers, but the ones that work the best are the commercial grade PocketWizards and the more budget friendly RadioPoppers and AlienBees Cybersyncs. A set of these can easily set you back several hundred dollars. There are cheaper variants for less than $50, but they can be quite unreliable and have poor range.
And that is all you will need to get started in off-camera flash! The only thing that will hold you back now will be your creativity and the urge to get more lights and stands. If you want to learn more, check out Strobist, the go-to resource for all things off-camera flash.