This article is aimed at beginner photographers who have just purchased a Canon SLR 500D camera and would like a fast-track course on how to operate the Canon SLR 500D.
Introduction
If you have just purchased a Canon 500D DSLR (Canon 500D Rebel T1i) and are confused by the sheer number of buttons and options available, have no fear. I went through the exact same feeling when I got my Nikon D5000 and so, I can relate to how you feel. However, with a little knowledge of what all the buttons do, and which options to use for what purpose, you will be ready to start shooting beautiful photos!
This short Canon DSLR tutorial on using the Canon 500D Rebel T1i will help you get started.
Attaching / Removing the Lens
The first step is fitting the lens onto the camera. As explained in the manual, all you need to do while fitting the lens is to align the index dot on the lens with that on the camera body and rotate it counter-clockwise till you hear an audible click (the lens has locked into place). To remove the lens, press the lens-release button and rotate the lens clock-wise till it gets detached from the camera body. Practice this a couple of times till you get the hang of it, so that you’re ready to do it in a jiffy when needed.
The Lens Focus Mode can be set to AF (Auto-Focus) or MF (Manual Focus).
Beginners should choose AF and the Image Stabilizer should be On.
Zooming is achieved by turning the zoom ring on the lens. Always remember to zoom in or out prior to focussing, otherwise you may end up with a blurred picture.
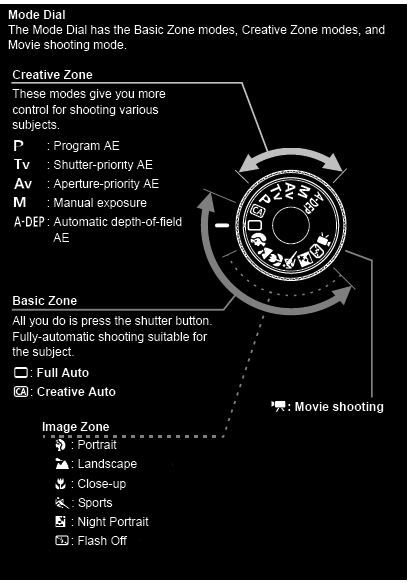
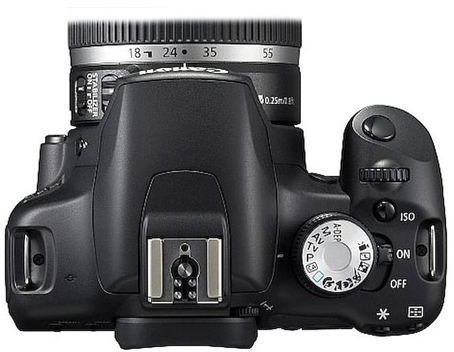
Mode Dial
The Mode Dial is the basic dial present on the top of the camera which can be used to select various options.
Beginners should begin with the Auto modes such as the Full Auto Mode, the Creative Auto Mode and the No Flash Auto Mode.
The video camera icon indicates the HD Movie Mode.
Specific scene modes are also available such as Portrait, Landscape, Close-Up or Macro Mode, Sports Mode and Night Mode.
For more control, the manual modes can be used. This includes a Program Mode, Aperture-Priority , Shutter-Priority and a full Manual mode.
Buttons on the Back Panel
Most of the buttons in the back panel of the Canon 500D Rebel T1i can be easily understood by their names.
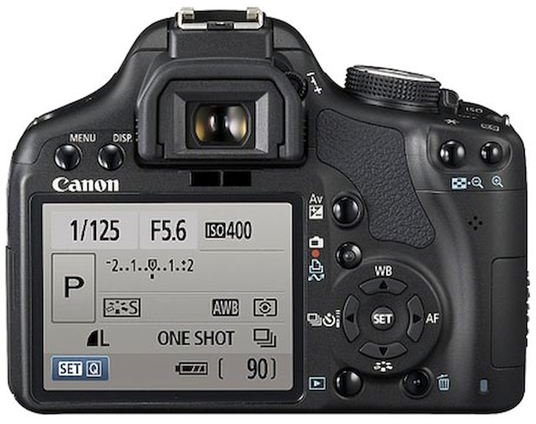
The Menu Button displays the camera menu.
DISP Button can be used to turn on/off shooting settings display.
The knob next to the viewfinder is used to make dioptric adjustments (rotate it until you find that the viewfinder image is clear)
The Av button is for Aperture / Exposure Compensation .
Below the Av button is the LiveView button which can be used to turn on the LCD display. This is especially useful for shooting from unnatural angles (close to the ground/high above your head) or for shooting movies.
The Playback button at the bottom displays the last shot image.
Right next to it is the Erase button to remove unwanted photos.
Your First Photo Shoot Using the Canon 500D Rebel T1i DSLR!
- Attach the lens onto the camera
-
Switch it on and make the diopter adjustment initially (you need not do this every time)
-
Place it on auto and click a few pictures. Experiment with the other auto modes too.
Advertisement -
Review photos using the playback option.
A few thumb rules to remember:
- Sports mode - Faster shutter speed, better for moving images.
- Macro mode - For really close-up photos e.g. flowers, insects, etc.
- While taking a HD movie, always hold camera in landscape orientation.
- Delay deleting an image until you view it back on the computer.
- Practice shooting using the viewfinder and use the LCD only if required.
As you get better with the camera you can also take a look at learning what a histogram is and how you can use it to improve your pictures, center vs. spot metering , panning photos to depict motion and HDR Photography .
That’s the end of this Canon DSLR tutorial. Happy clicking!


