All of us love seeing photographs as they bring along beautiful memories. Have you taken a photograph that has a dull or a very bright sky and you wish to replace it? Read along…
Introduction
Most of the times when we take images everything will be perfect except the sky. Have you ever wondered how to replace the sky in the photographs that you have taken to give them a better look? Great idea, isn’t it? Let me tell you how to replace the sky in Photoshop. If you are reading this article, you are already on your way to replace the sky.
Whenever you see a beautiful looking sky, take a snap of it and store it for future use. Why not create a separate folder called skies and stack all these skies in that folder? Once you are ready with this, you can start replacing the sky. Here are detailed instructions on how to replace the sky in Photoshop using Blend If tool.
Replacing the sky in Photoshop with Blend If tool
1. Make a copy of the original image. Let us name the original image as Sky1.jpg and the copy of it as Sky2.jpg.
NOTE: This is just to preserve your original image if anything goes wrong when doing the sky replacement.
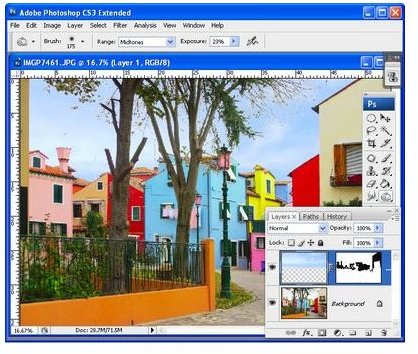
2. Open the Blend If tool. To do so, click Add a Layer Style icon, which can be found at the bottom of the Layers palette. Now, select Blending Options. (Ref: Fig 1 – Blend If tool)
Image Source: Ronbigelow
Fig 1 - Blend If tool
Drag and drop
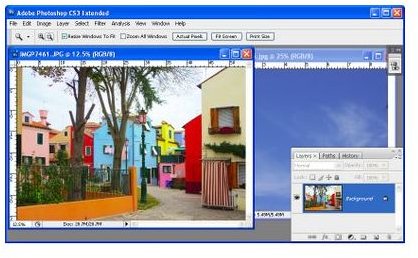
3. Open the original image Sky1.jpg and the nice sky image. Let us name this file as nicesky.jpg. (Ref: Fig 2 – Opening both the images) Drag and drop nicesky.jpg onto the original image Sky1.jpg. Close nicesky.pjg.
Image Source: ProjectWoman
Fig 2 – Opening both the images
Using Blend If to replace
4. Double-click the background layer. You will now find a New Layer dialog box. Press Enter.
5. Simply drag this new layer and drop it in Layers Palette. Now this layer will be at the top and the sky will be at the bottom.
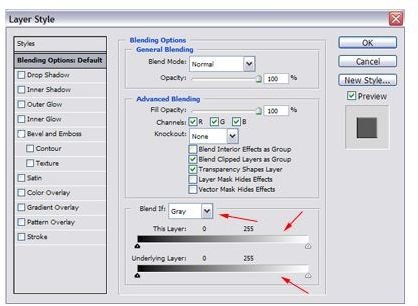
6. Find the Blend If area now. Slowly and steadily drag the slider to the rightmost corner. You can now find the areas in the sky that are very light.
7. To ensure that both sky and other parts of the image are intact, just hold down the Alt key and then simply drag the slider in such a way it splits into two parts. What happens now is that values that are on the left indicates no blending is done, right indicates complete blending and values between these left and right of the slider indicates partial blending.
8. If after all these blending, you find the image to picture perfect click OK. (Ref: Fig 3– Image with replaced sky)
Image Source: ProjectWoman
You have now successfully replaced the sky using Photoshop. Enjoy your photograph.
Image with replaced sky