Pre-Focusing - Learn a Pro Trick to Take Sharper Action Photos
Introduction
It’s nice to be a pro photographer. We get to work with some of the best gear money can buy (of course, we often have to pay for it ourselves). I shoot with Canon L series lenses, which feature solid construction, amazing precision and lighting fast autofocus. My main camera is a Canon EOS 1DmkIIn, a camera designed to make the most of my lenses abilities. There’s nothing to getting sharp photos right? Just hit the shutter and let the camera do the work right?
Well… not so fast, there’s much more to getting sharp images than just letting the equipment do the work. In this article I’m going to let you in on a technique pro photographers rely on. It’s one of the secrets we use to get great sports and wildlife photographs and it’s something any photographer can do no matter what kind of gear they use. It’s called “pre-focusing,” a simple technique that can improve your chances of getting sharp action photos.
Examples
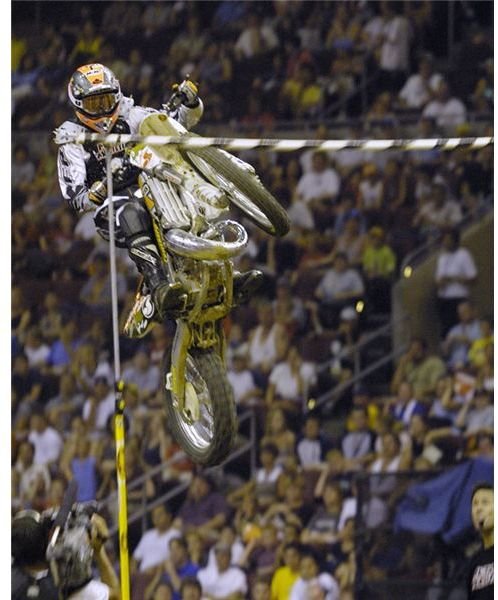
The two photos that accompany this article provide examples of how the pre-focusing technique can work. For the motorcross high jumper, I focussed on a point a few feet beyond the cross bar and tried to time the shot for when his head was slightly above the bar.
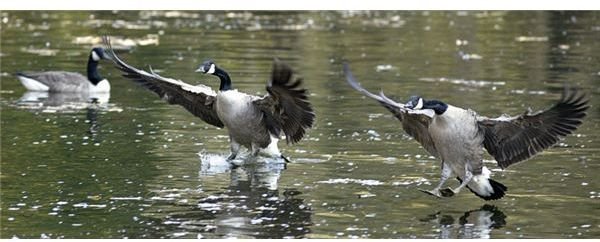
For the shot of the geese landing on the pond, I guessed where they would land and focussed on that spot. It’s important to note, I didn’t have to be dead on for either of these. I was still using autofocus, the difference is that my lens’s autofocus didn’t have to work as hard since the focus point was already close to where the lens was focussed to.
Why it’s important
Pre-focusing is a simple but very effective technique that can improve the results of just about any camera and lens combination. If you can anticipate where the action is going to take place, you can focus your lens to that area and increase the number of in focus shots you make. Reducing the distance your optics have to travel to bring the image into focus really shortens focusing time. While this may seem insignificant, remember, photography is all about working in fractions of a second. If you can get the image in focus a hair faster, it can mean the difference between tack sharp and a touch soft. This is a big, big deal in pro photography. Photos that are “almost” sharp enough are trash at this level.
How to do it
To use this technique effectively, the photographer needs to be able to anticipate where the action is going to occur. While you can’t always know, there are some assumptions you can make. If you’re trying to photograph birds in flight, you can expect that you’ll be better off pre-focusing to a far distance rather than a close one. If you’re shooting sports, take a risk and pre-focus on a spot where you think the next action is going to take place. If you’re photographing a baseball game, key on the pitcher or the catcher first – you know they’re going to be part of the play. If there’s a runner on first, pre-focus on second base in anticipation of a potential stolen base. If there’s a runner on second or third base, pre-focus on home plate in hopes of a play at the plate. For football, consider down and distance and, if possible, use your knowledge of the team’s tendencies to pre-focus on likely action spots. For first down, focus on the backfield since there’s a good chance of a running play and handoff. On passing downs key on an area within range of your lens that produces first down distance. For basketball, pick an area a few feet beyond the rim. These choices will put you in the right place often enough to improve your shots. You won’t always be right, but your results aren’t measured by your average photo, only your best shots. The idea is to aim for home runs, not singles if I can use a sports cliche.