Learn How to Use Photoshop's Move Tool with This Tutorial

The Basics of the Move Tool
In most cases, when you make a selection and drag it on the document window, you will be able to move the selection boundary but not the contents. If you want to move the pixels as well, you will need to use the move tool. For most people, the move tool is pretty basic as there’s only one option - dragging things around the document window. Very few actually realize that this tool is quite handy, and is a multi-purpose gadget. If you are creating a scrapbook or you wand to create a design for the web, the move tool offers great features such as alignment and distribution.
The move tool is found at the top of the tools palette, right beside the rectangular marquee tool. To enable it, just click on the icon which looks like an arrow (minus the tail) or press the letter V on your keyboard.

Whatever tool you may be using, pressing down the CTRL key and dragging will allow you to move the corresponding pixels. In the photo you see here (on the right, click on any image to enlarge), I used the magic wand to make the selection, I pressed down the CTRL key and dragged the pixels. The pixels coming from the hand was pasted on the drawing board so you can see exactly how the move tool works.
When you move or copy a selection using the move tool, you get a temporary layer which disappears when you deselect it. Take note that while that selection is floating, you can already apply commands such as fade, or the blend mode. If you have a whole new layer to work with, you don’t even have to select anything, by clicking and dragging, you can move the entire layer around!

When you have the move tool selected in the tools palette, you can also use your arrow keys to move around the document window. Each press of the arrow keys will move the selection by one pixel in the direction you chose. If you press down SHIFT + any arrow key, the selection will move 10 pixels in that direction. If you press down ALT + any arrow key, you will get a duplicate of the pixels you selected. Of course, don’t press it down after that or you will get a lot of duplicates (see photo on the left).
Working with Layers
One of Photoshop’s most powerful features is its use of layers. Each layer is basically a separate image which can be edited without making changes on all the others.
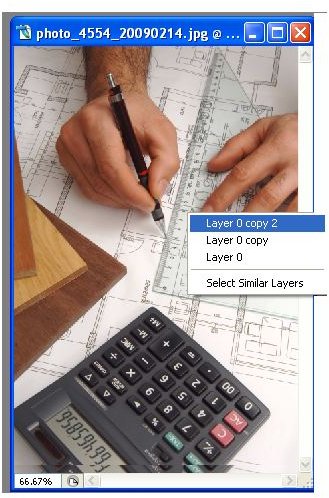
The neat thing about the move tool is that it has a built-in layer navigation so Photoshop can determine the layers beneath an area in the image. When you press CTRL + right click, a menu will pop up displaying the names of the layers in order, from top to bottom (see image on the right). To select the layer you want to move, highlight that layer in the popup menu and drag.
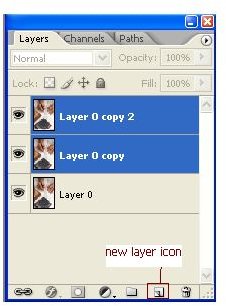
If you have multiple layers on your image, one of the problems you will encounter is that you won’t be able to move multiple layers at the same time. Thankfully, there are several workarounds available for this. By default, the layers window should already be on the low right corner of your workspace (see photo on left). If you don’t have it yet, click on ALT + W and choose layers to activate the layers palette.
To select multiple layers, press CTRL and choose the layers you want. Now click on the document window and drag. This should move the layers you have selected. Note however that this only works if there are no active selections on the image.
If you wanted to duplicate your layers, you can just click the new layer icon on the layers palette (see photo above) or select duplicate layer from the layer menu. If you have several pixels selected, pressing CTRL + J will duplicate those pixels.
You will also have an option to merge layers without having to delete all the other layers. To do this, just select merge in the layers menu or press CTRL + SHIFT +ALT + E. Make sure to create a new layer before you do this so that the merged layers will end up in a separate layer and would allow you to revert your changes without any trouble.
If your right click on a selection, the option to copy will only apply to the selected layer. If you want to copy all the visible layers, choose copy merged instead. The keyboard shortcut for this is CTRL + SHIFT + C.
If you had to paste pixels into an image, this will automatically create a new layer. You can also choose to paste into (CTRL + SHIFT + V) or paste behind (CTRL + SHIFT + ALT + V) will allow you to create a layer and a layer mask in just a couple of steps.
If you want to copy pixels or a layer to another document, just drag it from the source document and drop into the target image so you wont have to use the clipboard (to avoid wasting your RAM). Remember that the image will be placed on the exact spot where you dropped it. Hold down the SHIFT key to center the selection in the new image. If the target image has the same pixels as the source, pressing the SHIFT key will place the copied pixels in the exact place as in the original document.
On the next page, you will learn how you can use layers and the move tool to align and distribute elements.
Aligning and Distributing Elements in Photoshop
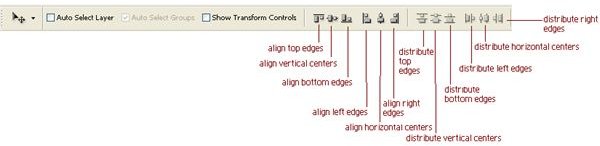
When you have the move tool selected, there are a number of options available for you (see photo on the left). The very first option you will see on the options bar (found at the top of the document right below the menu bar) is the auto select layer. This option lets you click on a pixel in the image and Photoshop will select the layer where that pixel is found.
The show bounding box will show a transform box around the selection/element/layer you have chosen. When you drag at the handles of the box, you will be able to move the selection (not the pixels selected). If you click on the lines of the box, you will automatically switch to free transform mode where you can scale, rotate and deform the objects.
When you have selected a layer that’s linked with another, the options for aligning and distributing will become active. On the options bar, you can align or distribute elements on various key points - left, right and center (see images below). You need to take note that these options work only within the bounding box of the layer so if you have a series of elements, using the align and distribute options will have no effect since the canvass is already filled up.
If you are concerned with the positioning of elements, then the align and distribute features will prove to be invaluable for your purpose.
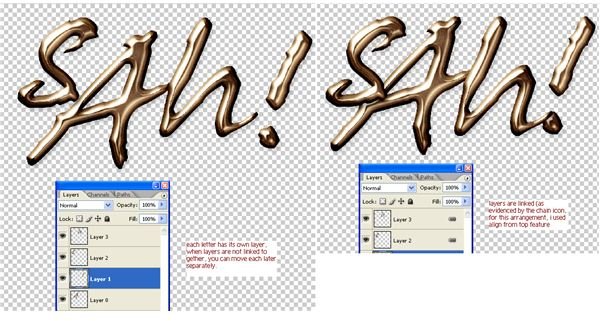
To get the best out of the alignment features, make sure you lock some of the layers to ensure that it stays put while the others move. If you want to align several layers, you need to make sure that they are linked together. After aligning your elements, make sure to turn off the link unless you want these layers linked permanently.
If you choose three or more layers, you can distribute them instead of aligning. Unlike the alignment feature, the distribute feature doesn’t care which of the layers are selected and which ones are linked.
This post is part of the series: Using the Navigation Tools while Editing Images in Adode Photoshop
If you want to create exact selections in Photoshop, you will need to know the easiest ways you can navigate your photos. In this series, you will learn about the different navigation tools and shortcuts and how you can use them to manage your workspace more efficiently!