Learn How to Whiten Teeth and Brighten Eyes with Makeover Tools in Paint Shop Pro

Brighten Teeth and Eyes
Have you ever seen photographs of people that seemed to look absolutely perfect? You know the ones – people with flawless skin, perfect teeth, and bright twinkling eyes. Nowadays, most assume that these photos have been retouched using some type of professional editing software, but not so many realize how easy these changes can be made on their own personal photographs using Paint Shop Pro.
The makeover tools found in Paint Shop Pro are pretty versatile and can allow you to improve the appearance of a subject in a photo with just a click or two. In this tutorial, we’ll take a look at two of these tools – the Toothbrush which can be used to whiten teeth and the Eye Drop which helps get rid of bloodshot eyes.
The digital photograph we’ll be using as an example in this demonstration is of musician Sara Groves (credit: Henryhartley, Wikimedia Commons).
(Click any image for a larger view.)
Using the Toothbrush
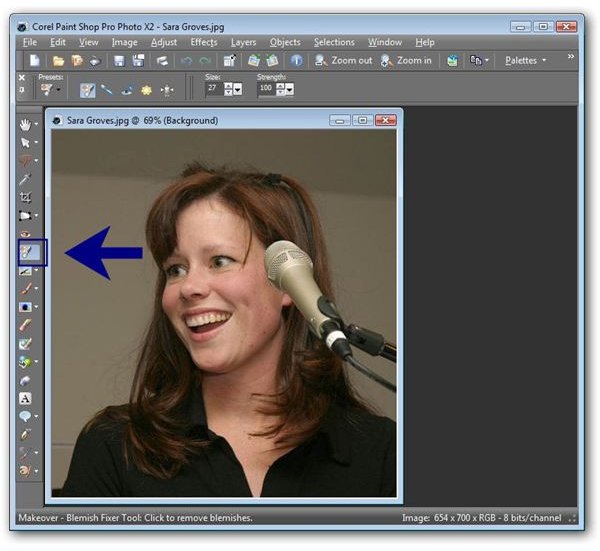
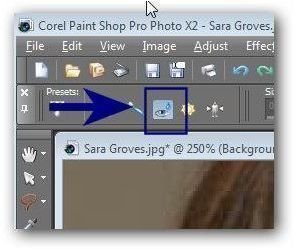
Step 1: To begin, click on the Makeover icon on the Paint Shop Pro side toolbar.
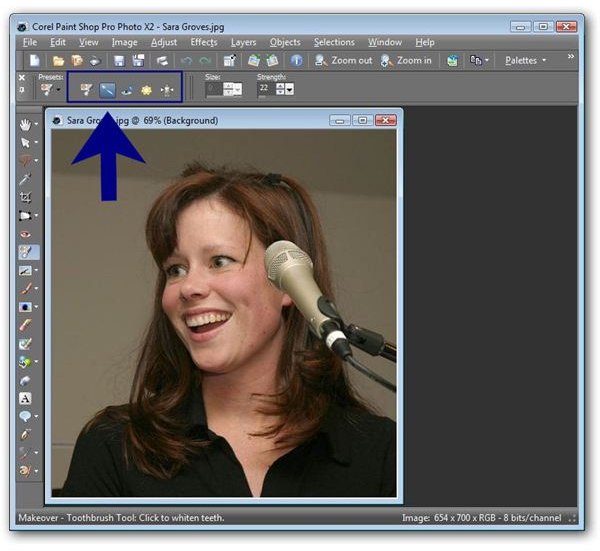
Step 2: Select the Toothbrush from the Makeover toolbar that should now be present under Paint Shop Pro’s main toolbar.
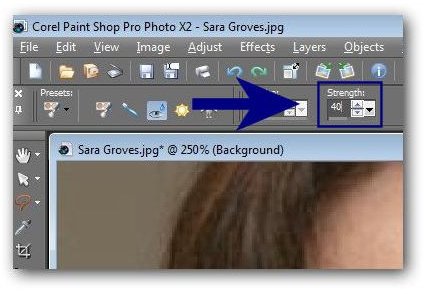
Step 3: Adjust the Strength of the Toothbrush tool on the Makeover toolbar. A higher setting will make the teeth appear whiter, but that whiteness might bleed into the gums if the value is too high. Also, you want to make sure that that whitening looks natural and not like someone painted the subject’s teeth with typewriter correction fluid.
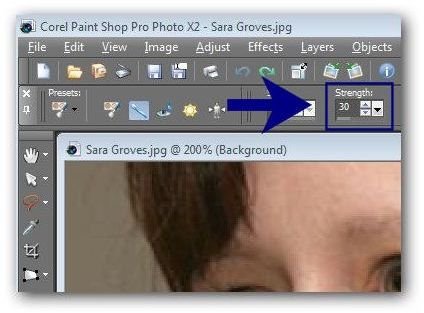
I’ve found that a Strength of around 30 usually works perfect for most cases. You can always experiment here with different values and use the Undo button if the setting isn’t right and you want to try again.
Step 4: Move the mouse pointer to any part of the digital photograph containing the teeth of the subject. Click once to apply.
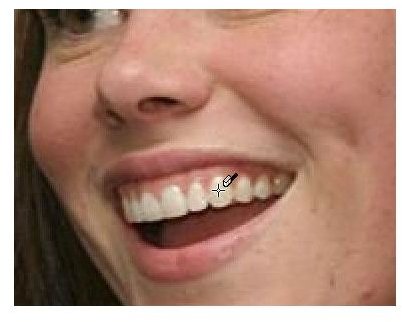
You don’t have to click on each individual tooth. One click over the area should modify the entire row of teeth. However, if both the top and bottom rows of teeth are showing, you may have to click once on the top row and once on the bottom, depending on the gap between the rows.
Using the Eye Drop
The Eye Drop tool works very similar to the Toothbrush in terms of application, except that it is used to improve the appearance of tired or bloodshot eyes instead of to whiten teeth.
Step 1: Click on the Makeover icon on Paint Shop Pro’s side toolbar.
Step 2: Select the Eye Drop tool.
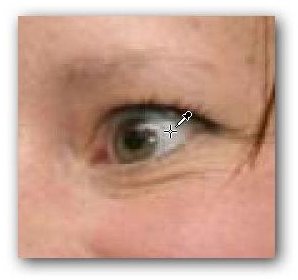
Step 3: Adjust the Strength of the Eye Drop tool. Just as with the Toothbrush, a higher value will make the eye area appear brighter and whiter, but you do want to be careful not to choose too high of a setting. In this case, I’m using a standard setting of 40.
Step 4: Click on the white area of the eye. If you don’t like the result, click the Undo button and try again with a different Strength setting. Once you’ve found a Strength value that works for your photo, apply it to both eyes.
For more tips and tricks, be sure to take a look at the other items in Bright Hub’s collection of Paint Shop Pro tutorials and user guides found here on the Digital Photography Channel.
This post is part of the series: The Makeover Tools in Paint Shop Pro
With the collection of Makeover Tools found in Corel Paint Shop Pro Photo X2, you can quickly and easily improve the appearance of subjects in your digital photographs. In this series, we’ll take a look at how to use these powerful and fun tools.