How to Photograph Hockey - Sports Photography Tips & Techniques
Introduction
This article is the first of a series on how to shoot sports. We’ll tackle what I consider the most difficult sport first. In hockey games, things can happen in the blink of an eye, which is why most of the work is done before the game. Always arrive at games at least 20 minutes before game time. In some cases, if you want to use a shooting hole, you will have to arrive 1-2 hours early to claim a time slot. You will also encounter mixing of light sources within the arena. You may have sodium vapor lights lighting the ice and a different set of lights for the seating. Bring fresh batteries and a lot of free space on your memory cards.
As a warning, you will probably not be able to capture every moment in the game unless you have the best cameras and lenses.
Equipment
Hockey will require some higher end equipment to capture quality photographs.
- At least an entry level DSLR. I’ve photographed games with a Canon Rebel XT and haven’t had any problems.
- I would recommend a 70-200 f2.8 lens (you may be able to get away with f4). In these extremely low light settings, a large aperture will be needed. I have seen people photograph with 50mm 1.8, which can be a good start if you’re not sure whether or not you’d like to invest the money in a longer lens.
Some items that are optional would include a grey card, a white balance filter such as an Expo Disc, and a second camera to capture wide angle or even more telephoto.
Camera Settings
- Shoot in manual, aperture priority and shutter priority will yield inconsistent exposures.
- Obtain the smallest aperture while keeping the shutter speed at 1/500 or faster. 1/500 will be sufficient to freeze action. The reason for smaller aperture is because you want more things in focus. A lot of the time, the auto focus will not be fast enough which is why the aperture will help it out.
- Don’t be afraid to raise your ISO to 1600 and above. A grainy image is worth more than a blurry image.
- Use SERVO focus so the camera continuously focuses.
- Use continuous shooting to shoot multiple frames with a single press.
- Change the focus to the center dot. The camera can focus much quicker on one point rather than the entire matrix.
- Fix the white balance with either a grey card, white balance filter, or manually adjust the color temperature.
JPG or RAW
If you have set all the settings correctly on your camera, JPG will be the most beneficial. With JPG, you’ll be able to free up the buffer and shoot more images without having to wait for them to download to the memory card. RAW saves too much unnecessary information for this type of photography. JPG will also allow you to shoot more images because of their smaller file size.
Positioning
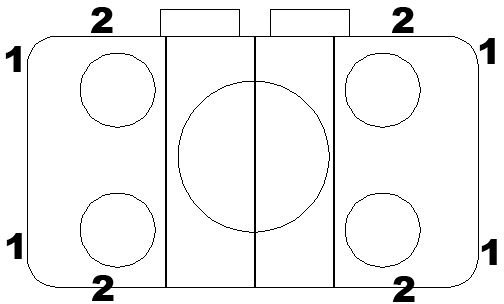
These are certainly not the only shooting locations, but they are the most available. (Click on image to enlarge)
From position one, you will be able to catch players skating into the offensive zone, shooting, and checking. One thing you will probably not see is the face of the goaltender. The glass here is usually pretty dirty and more difficult to shoot through so, make sure you find a clean section to shoot through.
Position two will give you a great vantage point for photographing the goaltender. You sacrifice, however, players skating into the zone. From here, you’ll also be able to get close ups of players while facing off. This glass is a lot cleaner because the pucks rarely hit this section.
Another option (not in the diagram) would be to shoot from the stands, above the glass entirely. This will provide the sharpest images since the light does not have to pass through additional glass. The only problem is that the players will seem smaller in the photos compared to those shot from rinkside.
Shooting Holes
Personally I do not recommend using the holes. I have seen pucks, sticks, and other objects fly through the hole, which could easily damage equipment. There is always a place where you can shoot through the glass and get great pictures.
Tips
- If you do use the shooting hole, use your lens hood as protection. It’s better to have a little than none.
- Watch the plays. If two forwards are skating toward the opponents net, try to guess which forward will be shooting. You don’t have enough time to try to watch both players.
- Watch the point shooters on powerplays, they will often shoot the puck.
- Don’t bother with down-ice photos (the other end of the rink) unless you have the right lens/teleconverter (300mm+ I would say)
This post is part of the series: Sports Photography Tips & Techniques
In this series, we’ll look at how to photograph various types of sports. Camera settings, lighting and equipment are just a few elements that will vary depending on which sport you are trying to photograph. Learn tips and techniques that will help you capture the best action sports photography!