Learn 3D Photography: Tips and Tricks on How to Take Stereo Photographs - Digital Photography Techniques
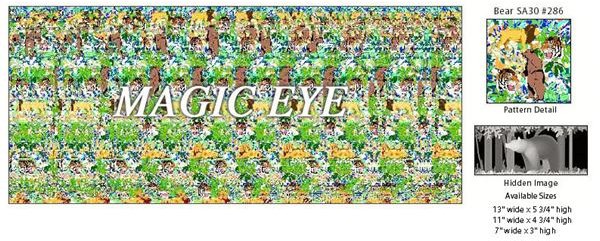
A blast from the past
Do you remember those Magic Eye books that were popular some years back? The ones where you’d relax – or in some cases, strain – your eyes until an image appeared before your eyes in 3D?
Did you know it is quite easy to produce the same effects using nothing but your digital camera and some know-how? The process is called stereo photography.
What exactly is stereo photography?
Stereo photography is achieved when two photos taken from slightly different perspectives are placed side-by-side and then the viewer forces their eyes to merge the photos. The result is an image which creates the feeling of depth: a 3D photo.
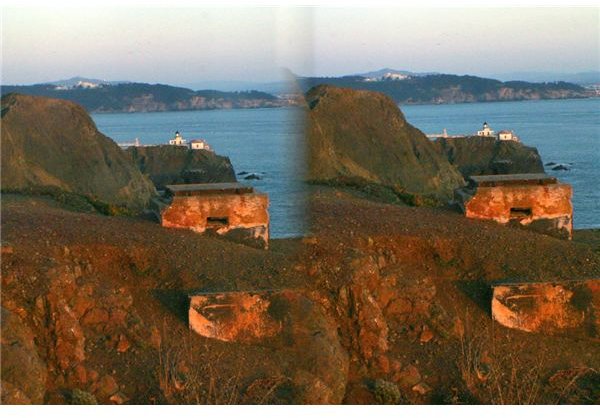
Photo by Genista
How do I create 3D photographs?
There are several ways to create 3D images including the use of a scanner, microscope, video camera or image editing software. This article concentrates on generating 3D images using nothing but your digital camera and imagination.
Steps to taking a stereo photograph:
- Decide on a subject. When first learning the art of stereo photography, two things you should avoid are complex images and subjects that are too close to the camera. Objects such as buildings or trees make great foreground subjects, while mountains, distant buildings or other large landscapes make for excellent background objects.
- Take two shots. The idea is to take one photo and then reposition your camera slightly to the left and take the second shot. The closer your foreground subject is to the camera, the less you’ll need to shift your camera. To illustrate how slight the camera needs to move, a foreground object 20 feet away will only need the camera shifted less than 12 inches.

Photo byjoserodmon
Stereo Photography - Points to Consider
Mastering the art of stereo photography takes practice. Keep the following tips in mind when learning how to take 3D images:
- Keep the camera parallel to the background in both photos.
- Do not reposition the camera towards the foreground subjects. You should simply be sliding your camera to the left, not changing the angle.
- Make sure your subjects aren’t going to move between shots -animals or children may not be the best choice. Additionally, a windy day can cause trees to wave, shadows to form or clouds to move.
- Be careful if you’re using a built-in flash. It is possible the light from the flash will produce shadows which differ in each photo. Either turn the flash off or use an external flash which is in the same position for both photos.
- If you are unsure of the distance to move your camera between shots, you can try the “cha-cha” method. This involves taking one photo while looking through the viewfinder with one eye, then taking the other photo while looking through the viewfinder with the other eye (moving the camera, not your face). The cha-cha method can also be used to describe the shuffle of your feet from one shot to the next. Again, it’s extremely important to note that you do not move your camera up, down or change the angle – simply slide the camera horizontally (as little as 1-2 inches in some cases).
Now that I’ve taken the photos, how the heck do I view them in 3D?
Just as there are several ways to take stereo photographs, there are also a number of ways to view them. We’re going to focus on how to view them with the naked eye, known as the cross-eyed method or the free-vision fusion method. This way of viewing stereo photographs will come easier to some than others. It takes practice and possibly an irritating strain felt behind the eyes. It is done in the same way you viewed Magic Eye images. Relax your eyes until you see three or four images. If you see four images, adjust your eyes until there are only three. Now, focus on the middle image and before long the image should appear in 3D.
3D Photography Resources
There are several websites out there that focus on stereo photography. Two websites that deserve an honourable mention are listed below. Both of these links are helpful when learning 3D photography. They are also excellent resources in helping to get your creative juices flowing!
3dphoto.net gives excellent instructions on how to view stereo photographs: Free-vision Fusion Instructions.
If you’d like to try your hand at viewing other people’s stereo photographs, there’s a group on Flickr dedicated to stereo photographs. You can check it out here: Flickr Group – Stereophotography.
**A special thanks to Pepe, Jeff and Kai for allowing me to link to their work to better illustrate this amazing form of photography!