How to Use the Curves Tool - Photoshop Tutorial & GIMP Tutorial
Curves Tool
The curves tool is a powerful and flexible way to manipulate the brightness of an image. When invoked, the curves tool shows a graph of output brightness level against original brightness level. This graph can be split into small sections, and each section can be modified to change output brightness level.
In Photoshop, the curves tool is accessible through the menu: Image » Adjustments » Curves or from shortcut key Ctrl+M. In Gimp, the curves tool can be accessed from the menu Tools » Color Tools ».Curves
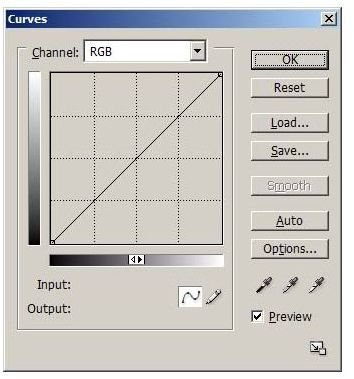
Shown below is how the curves tool looks.
Correcting Brightness
One of the most important uses of the curves tool is to make fine adjustment in brightness.
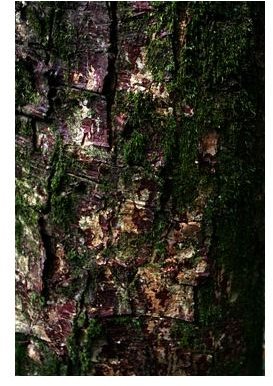
The picture shown below is of moss growing on the trunk of a tree. As you can see, the greener parts of the picture with moss are under-exposed, while rest of the bark has been exposed properly (to learn more about getting the proper exposure, check out this article). Now, to selectively increase the brightness of the moss without affecting rest of the image, we need to change lower part of the graph in the curves tool, which denotes darker tones.
To do this, click on the center of the graph. Photoshop places a dot on this point, called a control point. The control point can be dragged up or down to lighten or darken the tones near control point. When there are multiple control points in a graph, any changes made to the graph will be restricted till the neighbouring contol point. We will use the control point in the center to restrict our changes to darker tones.
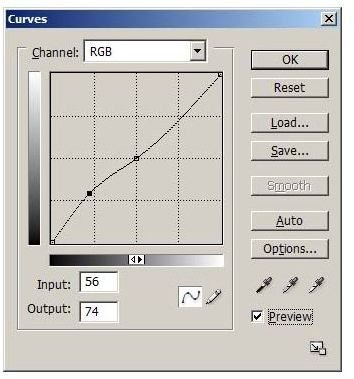
Now click somewhere between the center and bottom of the graph. This creates a new control point. Drag this point upwards slowly to see shadow areas getting lighter. Move the control point left and right and adjust it until you get the best tones. You can also move the control point by entering Input and Output values at the bottom of the graph.
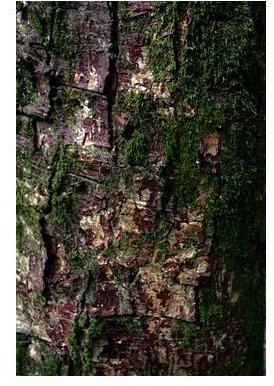
Note that while you can change the bottom portion freely, changes above the center control point is very minimal, ensuring that there is little change in highlights. Shown below is the adjusted graph and the resulting image. Compare this with original image.
The S Curve
One of the popular uses of Curves Tool is to increase contrast. A simple way to increase contrast is by making shadows darker and highlights brighter. This can be achieved with the curves tool by an ‘S’ shaped curve generated with three control points. Below is an example of S curve and change in contrast brought by applying it on an image.


As you can see, change in the contrast of the image is evident in the image after applying the curves.
Conclusion
The Curves Tool is a versatile utility for changing brightness of the image. It can be used for various purposes, such as bringing out details from shadow areas, darkening the highlights and improving image contrast. By employing multiple control points, it can be used to selectively enhance small sections of the image.
However, curves tool has to be used carefully, as it can add lot of noise to the image with too much of change. Making large adjustments can degrade the image considerably.