Photography Tutorial: Overexposed Photo Edit GIMP
Photograph Too Bright?
GIMP is basically a free version of Photoshop. While the program doesn’t have all of the capabilities of its very expensive cousin, you can perform editing tasks like adding layer masks, fixing image issues and adding effects to your images.
Overexposed images are a problem that every photographer has experienced. The highlights of the image are completely blown, ruining what would otherwise be a perfectly good image. You can, however, use GIMP to fix this problem. When correcting an overexposed photo, GIMP offers different tools to help you with this issue.
Dealing with Overexposures
Overexposure problems often occur during the middle of the day, especially if you have your camera set to the automatic exposure setting. Your camera will make the image bright enough to highlight a dark subject, but all surrounding objects are too bright. Or, you may also have the problem of your main subject being too light while the background or foreground objects are too bright.
GIMP allows you use different areas of the image that have the correct exposure, and basically you graft non-burnt out sections of the image onto sections that are too bright. This is done via the clone tool, which is a very powerful tool in the GIMP toolset. For example, if you have a bunch of leaves in your shot, some may have perfect exposure while others are just too bright. You can just take the correctly exposed leaves and basically paste the settings for that leaf onto the overexposed leaves.
When You Still Have Color Info
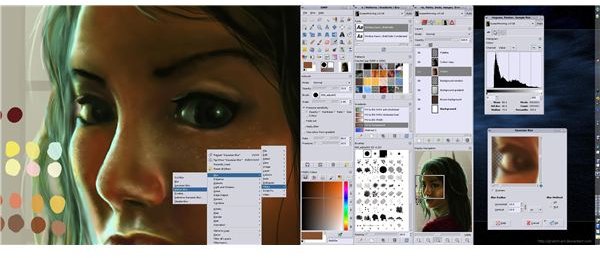
To start fixing your overexposed image in GIMP, open up the color picker tool. Place the tool over the area that is too bright, and see if there is any information that you can salvage from the section of the photograph. If all of your colors (red, green and blue) have a rating around 255, then the highlights really are completely shot. Ratings of 255 for all colors means that the color is pure white, and no color information is left.
If there is a little information left, you can try overlaying the section with a digital neutral density filter. This is done by creating a copy of the main layer and overlaying that image over the original. You can then manipulate the neutral density filter layer, including adjusting the curves and highlights.
Once you do that, select the Add Layer Mask button, and select White (Full Opacity). Then click OK. Go to the toolbox, and pick white for the foreground and black for the background. Use the gradient fill tool, and draw a line for the graduation that you want. Your image should now look better.
When the Area is Completely White
If you have no image information, and the highlights are pure white, then you need to create a channel mask. Create a copy of the first image by pressing Ctrl + D.
Now, go to Image, Colors and Threshold. Select the extreme highlights of the histogram. Your white colors will turn completely white,
and the rest of the pixels will be black.
Next, select the original image again, and hit Ctrl + L to open up the Layers and Channel dialog box. Select the Channels tab, and create a new channel. Click back on the threshold image, and hit Ctrl + A and then Ctrl + C.
Edit/Paste this image onto the first image. Click on the Layers tab, and then anchor the floating image. Close the threshold image since you won’t be needing it anymore.
Go back into Channels tab, and right-click on the new channel. Press Ctrl + S, and then go to Select and Feather. Generally, you want the feather value to be around 15. You may want to adjust this further, but 15 should be fine for most selections.
You should now go back into the Layers tab. Click on the Background layer. You can now start grafting back in the pixels that you lost in the previous processes.
Click on the clone tool. Clone a section of the image that most closely matches the mixing pixels, and zoom in to make sure that you fill the entire area. The new section will standout a bit from the background. Use the smudge and airbrush tools to adjust the edges of the selection.
As you can see, GIMP is very effective at correcting overexposed photos. The program has a lot of features, and it really doesn’t take up a lot of room on your computer, unlike traditional Photoshop. Plus, you can’t beat the price of the program – free. While you may get frustrated by some lack of capabilities in GIMP, the program is really effective with a lot of different edits, including fixing photos that are too bright.
References
Image Source