Top 10 Photography Flash Tips & Tricks: Part 1
Most people believe that the sole purpose of a flash on a camera is to provide light when they shoot indoors or in at night. Nothing could be farther from the truth. Apart from providing light for night shots, the flash can be used in a multitude of other ways. Depending on the type of camera you use - point-and-shoot or SLR - you may or may not be able to use some of these tips.
Point-and-shoots are intended to ‘do-it-all’ without offering too much control to the photographer, and there’s not much you can play around with its flash too. On the other hand, SLRs and prosumer cameras have flashes which offer more control, and also allow attaching an external ‘flash-gun’ on the hot-shoe provided. This really opens up options and the flash can be put to a variety of uses.
Lets start off with photography flash tips that are universal and would apply irrespective of the type of camera you use, and gradually move on to ones requiring dedicated flash-guns.
1. Watch Out for Reflections
The first and most important flash tip would be to look out for reflective surfaces behind your subject. Common ones would be a mirror, glass windows, metal objects, even your high-school football trophy proudly on display. Reflective surfaces would bounce the flash right back to the camera, causing a bright blob of white on the image. It would be prudent to either move the subject, move the reflective object or change your angle of shooting so that the reflected light doesn’t come right back at you.
2. Mind the Distance
In continuation with the previous point, it doesn’t always take a mirror to reflect flash. Faces do the job equally well, only that they don’t send the light right back at you, but scatter it around. The result is that the texture and details get washed out and you get a ghostly-white, over-exposed face. So, learn the correct distance at which you should use the flash so that faces appear well-exposed. If you cannot move back, then use other techniques like a higher f-stop or lower shutter speed to reduce exposure time.
Similarly, while taking a group photo, try to position people side-by-side rather than in multiple rows, to get them all evenly illuminated.
Photo Courtesy: Travis Hornung
All flash units have a range, and beyond the range, the flash is really not of much use. So if you find that you’re on the back row in a rock concert, you really shouldn’t be using the flash at all. Increase exposure time, open up the aperture, crank up ISO, but keep the flash out. More on this trick in the next tip.
3. Flash Fallout
This problem is more so with compact cameras whose flash is not too powerful. Such flashes do not evenly light up a subject - the centre is often brighter than the edges. Knowing the range in which the flash is bright enough can help you position your subject in such a manner that they all are well lit when you take the snap.
4. Know you Flash Sync Speed
Every camera has a maximum shutter speed that can be used with the flash. This is known as the Flash Sync Speed. It is usually in the range of 1/90 in compact cameras to 1/250 in SLRs. Selecting a shutter speed higher than the Flash Sync speed while using flash results in a black line in the photo caused due to the shutter closing mid-way
5. Keep the Flash Out!
Many-a-times, the subject is simply beyond the range of the flash, and it really doesn’t make sense to be expending our battery charge on a faraway subject. So the trick is to switch off the flash, and try a few other tricks. Firstly, use longer shutter speeds. Anything slower than 1/25 might require the use of a firm support or a tripod to stabilize the camera.
But this wont work if your subject is moving. In such cases, open up the aperture. But do remember that beyond a limit, opening up aperture would reduce depth of field, which can be good or bad on a case-to-case basis.
As a final attempt, crank up ISO. Most cameras have usable ISO range of up to ISO200, with SLRs offering decent photos even at ISO800 or ISO1600.

Keeping the flash out works even when the subject is close, but you want to capture it in ambient light. Say a face in candle-light. Using the flash would ruin an otherwise romantic photo. Again, avoid the flash when trying to capture another source of light in the photo - say a bulb, tube-light, candle, lamp, etc.
Photo Courtesy: Eduardo de Sao Paulo
6. Slow Sync Flash
Another technique to make the best of ambient light as well as use the flash to fill in dark areas is known as Flash Slow-Sync or Second/Rear Curtain Sync. A typical situation to use this would be to capture a dark foreground against a bright background, say your subject standing in front of an illuminated building at night. The idea is quite simple - keep a long exposure time to get the dimmer background ambient light, and at the end of the exposure, fire the flash to get the foreground (your subject) exposed. Most prosumer and SLR cameras offer this option in their menus.
7. Softening the Light from Flash
Light originating from small areas, like the flash, are usually harsh and by contrast, those originating from wide areas are soft and diffuse. To give another example, sunlight at noon is harsh, but the sun behind a layer of clouds, as on a cloudy day, gives diffuse, soft light. Harsh light often gives sharp shadows and makes the photo ‘flat’ and un-alluring. It also kills surface texture and detailing. To soften light from your flash, one can use either of the following two methods:
- A diffuser: The simplest of diffusers is a translucent sheet or a white cloth in front of your flash. A ‘frosted’ scotch-tape/cello-tape also works!
- Bounce Flash: Usually restricted to flash-guns, the bounce flash requires you to point your flash to the ceiling, and allow light to ‘bounce’ off the ceiling onto your subject. This mimics real-life situations wherein the source of light is usually overhead, and the wide area of the ceiling ‘softens’ the harsh light of the flash.
8. Fill Flash
A very simple and effective trick to get avoid dark, under-exposed faces while shooting on a bright day. Often, when the main subject is against a powerful source of light, like the sun, the background is so bright that the foreground gets underexposed and appears dark. Using the flash to ‘Fill-in’ the dark foreground helps correctly expose all elements in the photo. Learn more about the nitty-gritty of Fill Flash here.
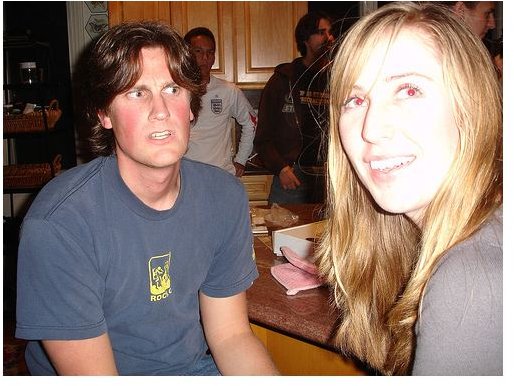
9. Dealing with Red-Eye
Most compact cameras have the flash situated quite close to the lens. As a result, light from the flash which gets reflected from the eye falls directly on the lens. As the light passes through certain tissues of the eye before getting reflected back onto the lens, the eye appears red in the resulting image. There are a couple of simple photography flash tips to reduce or avoid the red eye effect.
- Use of multiple flashes before the main flash helps to dilate the pupil and prevent the ‘red-eye’. This mechanism is built into quite a few modern digital cameras.
- Keeping the flash farther away from the lens prevents the reflected light from entering the lens, completely eliminating red-eye. Though this is not possible in a compact camera, SLRs having external flashgun use this mechanism to avoid red-eye.
Read more on Red eye and its prevention here.
10. Flash to Freeze Action
Flash can be used to freeze motion too. Again, an external flash would be preferable here rather than the in-camera flashes. A shot of, say a flying bird, taken with the flash on, with the shutter speed set at Flash Sync speed, will result in a sharp shot with the motion ‘frozen’ due to the burst of flash light. A flash lasts for around 1/1000th of a second, which will hit sometime during the exposure time, (say 1/200th of a second, leading to a far better motion-frozen image than just using a high shutter speed. The only caveat is that the subject has to within the limited range of the flash-gun to effectively get a good shot.